JeepParts
My Garage
My Account
Cart
OEM Dodge Avenger A/C Condenser
Air Conditioning Condenser- Select Vehicle by Model
- Select Vehicle by VIN
Select Vehicle by Model
orMake
Model
Year
Select Vehicle by VIN
For the most accurate results, select vehicle by your VIN (Vehicle Identification Number).
5 A/C Condensers found


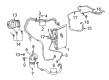
Dodge Avenger Condenser Part Number: 68004053AA
$250.84 MSRP: $379.00You Save: $128.16 (34%)
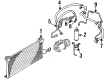
Dodge Avenger Condenser Part Number: MR500408
$86.08 MSRP: $109.12You Save: $23.04 (22%)Ships in 1-2 Business Days

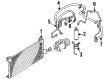
Dodge Avenger Condenser Part Number: 68004052AB
$216.40 MSRP: $318.00You Save: $101.60 (32%)
Dodge Avenger Condenser Part Number: MR298593

Dodge Avenger Condenser Part Number: MR148182
Dodge Avenger A/C Condenser
Choose OEM A/C Condenser that meet Dodge factory standards. Dodge designs and tests every component for precision and durability. Each A/C Condenser follows strict manufacturing steps to lock in quality and fit. If your Dodge Avenger matters to you, OEM parts make the smart choice. You'll get the exact look, feel, and performance you expect. Shop genuine Avenger parts at the highly competitive prices online. Enjoy a manufacturer's warranty, a hassle-free return policy, and rapid delivery. No more guesswork with off brands. Get genuine parts with exact fit and true factory performance. Shop with confidence today at JeepPartsDeal.com.
In the Dodge Avenger vehicles, the A/C Condenser serves as a heat exchanger that is charged with the responsibility of cooling the gaseous refrigeration and turning into liquid state as it is transported to the accumulator. Frequently located ahead of the radiator, the A/C Condenser is made up of a bunch of tubes through which this cool down method transpires. In the production of the Dodge Avenger different styles of A/C Condensers may have been installed even though the differences are not clearly described. Regardless of the vehicle model, the function of the A/C Condenser primarily aims in optimizing the car's air conditioning system through regulating the temperatures or the refrigerant. In summing up, it would be paramount to suggest that the A/C Condenser plays a crucial role for the thermo-comfort within the cabin of the Dodge Avenger.
Dodge Avenger A/C Condenser Parts and Q&A
- Q: How to Remove an A/C Condenser on Dodge Avenger?A:First, unhook and block the negative Battery Cable, then take out the refrigerant from the refrigerant system before you remove the condenser. If your vehicle is a 2.0L diesel, take out the front fascia; but if it's a gasoline, you can skip this step. After that, take out the upper Radiator mounts from the support on gasoline engine models, so you can carefully move the radiator back to reach the A/C condenser. Unfasten the nut that is holding the A/C discharge line to the discharge jumper line, separate the lines and toss out the old O-ring and gasket. Bring out the nut holding the discharge jumper line to the A/C condenser and then bring out the bolt that secures the discharge jumper line against the radiator. Unhook the discharge jumper line from the A/C condenser and toss out the seal and gasket, then block the opening at the discharge, jumper line and condenser fitting with either a plug or tape. Connect a blower to the car and secure it above the vehicle, then reach in through the bottom of the front fascia to access the AC liquid line if you have a gasoline engine model. Get rid of the holding nut, separate the A/C liquid line from the A/C condenser and toss away the O-ring seal and gasket. After that, plug up any openings in the liquid line fittings and the condenser with either plugs or tape. Remove both bolts that hold the lower condenser brackets to the radiator, lower the car and detach the automatic transmission cooler lines from the left side of the A/C condenser if you have them (on some models, the automatic transmission cooler is mounted to the right side of the A/C condenser). After that, pick up the condenser from its bottom, let go of the top condenser brackets attached to the radiator and finally remove the condenser from the top of the engine bay.
- Q: How to Service and Install an A/C Condenser on Dodge Avenger?A:Before starting the condenser service, plug the refrigerant lines to protect the system from air contamination while substances are pumped out. To remove the condenser, move the Radiator next to the engine and take the unit out. It is important to refill a new condenser with 15 cm3 (0.51 fl.oz.) of SUN PAG 56 compressor oil during installation.


Related Dodge Avenger Parts
 Dodge Avenger Heater Core
 Dodge Avenger Blower Motor Resistor
 Dodge Avenger Cabin Air Filter
 Dodge Avenger A/C Accumulator
 Dodge Avenger A/C Compressor
 Dodge Avenger A/C Compressor Cut-Out Switches
 Dodge Avenger A/C Expansion Valve
 Dodge Avenger A/C Hose
 Dodge Avenger A/C System Valve Core
 Dodge Avenger Blower Control Switches
 Dodge Avenger Evaporator
 Dodge Avenger HVAC Pressure Switch
Browse Dodge Avenger A/C Condenser by Years
2014
2013
2012
2011
2010
2009
2008
2000
1999
1998
1997
1996
1995