JeepParts
My Garage
My Account
Cart
OEM Dodge Avenger Brake Master Cylinder
- Select Vehicle by Model
- Select Vehicle by VIN
Select Vehicle by Model
orMake
Model
Year
Select Vehicle by VIN
For the most accurate results, select vehicle by your VIN (Vehicle Identification Number).
3 Brake Master Cylinders found

Dodge Avenger Master Cylinder Part Number: 68004718AE
$156.10 MSRP: $234.00You Save: $77.90 (34%)Dodge Avenger Master Cylinder Part Number: 68004720AD
Dodge Avenger Master Cylinder Part Number: 68004708AD
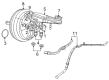
Dodge Avenger Brake Master Cylinder
Choose OEM Brake Master Cylinder that meet Dodge factory standards. Dodge designs and tests every component for precision and durability. Each Brake Master Cylinder follows strict manufacturing steps to lock in quality and fit. If your Dodge Avenger matters to you, OEM parts make the smart choice. You'll get the exact look, feel, and performance you expect. Shop genuine Avenger parts at the highly competitive prices online. Enjoy a manufacturer's warranty, a hassle-free return policy, and rapid delivery. No more guesswork with off brands. Get genuine parts with exact fit and true factory performance. Shop with confidence today at JeepPartsDeal.com.
The Brake Master Cylinder in the usage of Dodge avenger cars is one of the imperative parts of brake systems, being responsible for translating the pressure applied by the driver to hydraulic force in order to control the brake system's slave cylinders. This mechanism works with the help of hydraulic fluid that transmits through flexible hose or metal tubing to calipers or drum brakes which allows to build up the necessary friction for stopping the vehicle. Many Dodge Avenger models include a dual circuit master cylinders which in turn makes braking much safer because in the event that one of the circuits fails, the other is in a position to deliver the desired braking force. The pump of the design must be equipped with an integral reservoir or an extra reservoir, even though an extra reservoir is more typical. Over the years, variations in the Brake Master Cylinder may have occurred, but the fundamental function remains consistent: to ensure that the braking is produced to offer optimum braking capability and safety to tackle required tasks.
Dodge Avenger Brake Master Cylinder Parts and Q&A
- Q: How to Remove and Replace a Brake Master Cylinder Without ABS on Dodge Avenger?A:When installing a brake master cylinder manually, first check that all proportioning valves are in their proper cylinder ports and tightened to 30 Nm (22 ft. lbs.). Before you put the brake master cylinder in, you have to ensure it is bled. Crack the Brake Line at the master cylinder and clean the booster face where the master cylinder seal touches; do not put cleaner or debris into the booster. A new vacuum O-ring seal should be added to the master cylinder flange; if the old seal still shows, take off the old seal and fit the new one in its place. If problems occur while inserting the push rod, make sure the master cylinder push rod is lined up correctly with the booster push rod. Lay the master cylinder injection holes on the mounting studs on the Brake Booster and press it flush with the booster housing until it touches. Attach two new master cylinder screws, screwing them in until the torque is 25 Nm (18 ft. lbs.). If your vehicle has a manual transaxle and a new reservoir, cut the center of the "V" groove on the clutch actuator to open the hydraulic clutch port and throw away the removed plug. Slide the clutch actuator hose over the reservoir port and fix it in place with a hose clamp. Attach the rear brake tubes to the proportioning valves on the master cylinder, securing them with 20 Nm (177 in. lbs.); then attach the two front brake tubes to the master cylinder with the same amount of torque. Join the wiring harness to both the brake fluid level switch and the negative Battery Cable. Filling the reservoir of the master cylinder to the proper point ensures the brakes are strong enough for driving; otherwise, the system must be bled and checked for any leaks. Prepare for a driving test to check the brakes on the vehicle.

Related Dodge Avenger Parts
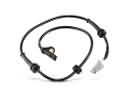 Dodge Avenger ABS Sensor
 Dodge Avenger ABS Control Module
 Dodge Avenger Brake Booster
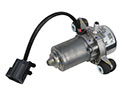 Dodge Avenger Brake Booster Vacuum Pump
 Dodge Avenger Brake Caliper Bolt
 Dodge Avenger Brake Caliper Bracket
 Dodge Avenger Brake Proportioning Valve
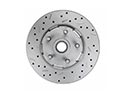 Dodge Avenger Brake Rotor
 Dodge Avenger Parking Brake Cable
 Dodge Avenger Vacuum Pump
 Dodge Avenger Wheel Bearing Dust Cap
 Dodge Avenger Wheel Cylinder