JeepParts
My Garage
My Account
Cart
OEM Dodge Caliber Shock Absorber
Suspension Shock Absorber- Select Vehicle by Model
- Select Vehicle by VIN
Select Vehicle by Model
orMake
Model
Year
Select Vehicle by VIN
For the most accurate results, select vehicle by your VIN (Vehicle Identification Number).
12 Shock Absorbers found


Dodge Caliber Insulator Washer, Rear Part Number: 5085529AA
$5.16 MSRP: $7.80You Save: $2.64 (34%)Ships in 1-2 Business Days


Dodge Caliber Isolator Bushing, Lower Part Number: 5151285AA
$6.13 MSRP: $9.15You Save: $3.02 (34%)Ships in 1-2 Business Days


Dodge Caliber Upper Bushing, Rear Part Number: 5151286AA
$6.58 MSRP: $9.75You Save: $3.17 (33%)Ships in 1-2 Business Days

Dodge Caliber Isolator Plate, Rear Part Number: 5085534AA
$7.13 MSRP: $10.35You Save: $3.22 (32%)Ships in 1-2 Business Days
Dodge Caliber Shock Absorber, Rear Part Number: 5272706AE
$88.80 MSRP: $196.00You Save: $107.20 (55%)Ships in 1-2 Business DaysDodge Caliber Shock Absorber, Rear Part Number: 5272706AH
$49.73 MSRP: $107.00You Save: $57.27 (54%)Ships in 1-2 Business DaysDodge Caliber Shock Absorber, Rear Part Number: 68058866AA
$169.48 MSRP: $260.00You Save: $90.52 (35%)Ships in 1-2 Business Days
Dodge Caliber Strut Mount, Rear Part Number: 5085495AC
$43.37 MSRP: $64.55You Save: $21.18 (33%)Ships in 1-2 Business DaysDodge Caliber Strut Part Number: 5105106AG
$137.01 MSRP: $204.00You Save: $66.99 (33%)Ships in 1-2 Business DaysDodge Caliber Shock Absorber, Rear Part Number: 5181030AG
$110.99 MSRP: $149.00You Save: $38.01 (26%)Ships in 1-2 Business DaysDodge Caliber Shock Absorber, Rear Part Number: 5105105AF
$106.25 MSRP: $141.00You Save: $34.75 (25%)Ships in 1-2 Business Days
Dodge Caliber Lower Bushing, Rear Upper Part Number: 5105879AA
$2.38 MSRP: $3.55You Save: $1.17 (33%)
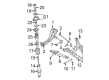
Dodge Caliber Shock Absorber
Choose OEM Shock Absorber that meet Dodge factory standards. Dodge designs and tests every component for precision and durability. Each Shock Absorber follows strict manufacturing steps to lock in quality and fit. If your Dodge Caliber matters to you, OEM parts make the smart choice. You'll get the exact look, feel, and performance you expect. Shop genuine Caliber parts at the highly competitive prices online. Enjoy a manufacturer's warranty, a hassle-free return policy, and rapid delivery. No more guesswork with off brands. Get genuine parts with exact fit and true factory performance. Shop with confidence today at JeepPartsDeal.com.
Dodge Caliber Shock Absorber is part of the suspension system, and it is highly trusted and recommended on different Dodge Caliber made from 2007 to 2012. This type of Shock Absorber cooperates with struts which provides additional stability and control; it drastically reduces bouncing and the amplitude of shock impulses; thus the car becomes more comfortable and easier to handle. The Dodge Caliber has incorporated different shock absorbers' designs such as the twin-tube shock absorbers and the mono-tube shock absorbers where each of these designs is optimized for the hydraulic fluid movement to enhance its performance under various road conditions. For instance, the Position Sensitive Damping (PSD) and Acceleration Sensitive damping (ASD), build on the basic foundation, enhance the sharpness of the Dodge Caliber Shock Absorber It's worth mentioning that Modern technologies like the electrorheological and magnetorheological dampers allow the innovation of semi-active to active suspension systems. These innovations not only make the car more comfortable but also increase its general safety; the Dodge Caliber has been given rather good scores by the Insurance Institute for Highway Safety. Given the compatibility with many Caliber models, the Dodge Caliber Shock Absorber contributes to improving the parameters of vehicles' efficiency and safety, making it the standout offers within the field of automotive industries. The durability of the car and performance will make a driver comfortably and safely drive the car, thus giving propriety to the Dodge Caliber compact hatchback car.
Dodge Caliber Shock Absorber Parts and Q&A
- Q: How to Properly Install a Rear Shock Absorber on Dodge Caliber?A:To install the rear shock, raise the lower Control Arm and feed the lower end of the shock assembly through from on top, just enough for it to clear the car. Now, set up bolt 1 and nut 3 on the lower control arm, holding the shock assembly in place, but don't tighten the nuts for now. After that, attach and mount tire and wheel assembly 1 and tighten the wheel nuts to 135 Nm (100 ft. lbs.). After lowering, put the two nuts through the wall on the shock assembly and into the body bracket and tighten them to 48 Nm (35 ft. lbs.). Fix the trim panel for the rear quarters inside the car. Put the vehicle on an alignment rack or drive-on lift and raise it so that you can access shock mounting bolt 1 and nut 3 below. Keep turning the final bolt on the mounting side of the shock until the nut is torqued to 3 to 99 Nm (73 ft. lbs.).
- Q: How to Remove a Shock Absorber on Dodge Caliber?A:Before disassembling the shock, it has to be taken out of the car. Apply a Strut Spring Compressor, teamPSE tool 223-7400 or any other similar tool and use the maker's instructions to begin the process. Make sure the shock rod nut doesn't come off until you've compressed the coil spring and relieved stress on the upper mounting bracket. Write the names of each shock on the bottom parts of their coil springs to indicate where they go. If fitted with a noise abatement cap, remove it and after that, put the shock assembly into the strut spring compressor, hooking the bottom and top shut with the coil spring. Compress the coil spring tightly enough that all tension goes out of the upper mounting bracket and bushings. Avoid powerful and rapid tools to not damage the shock's internal bearings. Install a Snap-On(R) Shock Absorber Socket A139 or similar on the shock rod and, after putting the rod under tension, unthread and remove the nut and washer with a wrench. Grab the shock absorber from beneath the coil spring which will let go of the washer, jounce bumper, dust shield and lower spring isolator. Slip the washer, jounce bumper and dust shield from the shock rod and take off the lower isolator from the shock seat. Take off the bracket, bushings, sleeve and upper spring isolator from the spring. Then remove the bushings, sleeve and upper spring isolator from the upper mounting bracket. When working on the coil spring, back the compressor drive off, move the hooks back and get rid of the coil spring. Evaluate the shock assembly by checking for shaft binding, cracks, deterioration and wear on the shock, jounce bumper, dust shield, upper mounting bracket, bushings, sleeve, spring isolators and coil spring coating.


Related Dodge Caliber Parts
 Dodge Caliber Wheel Hub
 Dodge Caliber Axle Pivot Bushing
 Dodge Caliber Axle Support Bushings
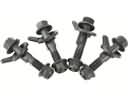 Dodge Caliber Camber and Alignment Kit
 Dodge Caliber Coil Spring Insulator
 Dodge Caliber Coil Springs
 Dodge Caliber Control Arm Bolt
 Dodge Caliber Lateral Link
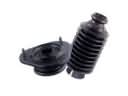 Dodge Caliber Shock and Strut Boot
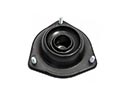 Dodge Caliber Strut Mounts
 Dodge Caliber Sway Bar Bushing
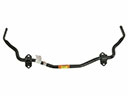 Dodge Caliber Sway Bars