JeepParts
My Garage
My Account
Cart
OEM Dodge Caliber Steering Knuckle
Front Steering Knuckle- Select Vehicle by Model
- Select Vehicle by VIN
Select Vehicle by Model
orMake
Model
Year
Select Vehicle by VIN
For the most accurate results, select vehicle by your VIN (Vehicle Identification Number).
9 Steering Knuckles found


Dodge Caliber Knuckle, Front Passenger Side Part Number: 68088498AD
$259.96 MSRP: $585.00You Save: $325.04 (56%)Ships in 1-2 Business Days
Dodge Caliber Knuckle, Front Passenger Side Part Number: 68088532AB
$372.11 MSRP: $614.00You Save: $241.89 (40%)Ships in 1-2 Business DaysDodge Caliber Knuckle, Front Driver Side Part Number: 68088531AB
$389.20 MSRP: $608.00You Save: $218.80 (36%)Ships in 1-2 Business DaysDodge Caliber Knuckle, Front Driver Side Part Number: 68088534AB
$267.18 MSRP: $424.00You Save: $156.82 (37%)Ships in 1-2 Business DaysDodge Caliber Knuckle, Front Driver Side Part Number: 68088499AD
$384.54 MSRP: $585.00You Save: $200.46 (35%)Ships in 1-2 Business Days
Dodge Caliber Knuckle, Front Part Number: 68088533AA
$192.61 MSRP: $284.00You Save: $91.39 (33%)Ships in 1-3 Business DaysDodge Caliber Knuckle, Front Part Number: 4854636AD
$1786.20 MSRP: $2600.00You Save: $813.80 (32%)Ships in 1-3 Business DaysDodge Caliber Knuckle, Front Part Number: 4854635AD
$1786.20 MSRP: $2600.00You Save: $813.80 (32%)Ships in 1-3 Business DaysDodge Caliber Knuckle, Front Passenger Side Part Number: 68088533AB
Dodge Caliber Steering Knuckle
Choose OEM Steering Knuckle that meet Dodge factory standards. Dodge designs and tests every component for precision and durability. Each Steering Knuckle follows strict manufacturing steps to lock in quality and fit. If your Dodge Caliber matters to you, OEM parts make the smart choice. You'll get the exact look, feel, and performance you expect. Shop genuine Caliber parts at the highly competitive prices online. Enjoy a manufacturer's warranty, a hassle-free return policy, and rapid delivery. No more guesswork with off brands. Get genuine parts with exact fit and true factory performance. Shop with confidence today at JeepPartsDeal.com.
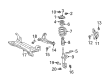
The Dodge Caliber Steering Knuckle is a highly essential part that plays a major role in boosting the efficiency and the trustworthy features of the Dodge Caliber series; it consists of multiple models that were manufactured from 2007 through to 2012. Through this linkage, the suspension and the steering mechanisms are attached to the front wheels; the linkage allows for movement to be created in the vertical and horizontal plane as it reacts to different road surfaces and driver's commands. The Dodge Caliber Steering Knuckle is used for various drivetrain versions, with the spindle that changes according to the model - rear-wheel drive; the hub - for front-wheel, all-wheel and four-wheel drive vehicles. Through the combination of strength of its material, it offers longevity, and therefore increases general reliability and security of Dodge Caliber. It is highly recommended to check the conditions of st ud bores, spindles, and bushings in the Steering Knuckle to avoid its deterioration of performances, and instabilities. The Dodge Caliber has been particularly praised for safety; it has won quite good scores from the Insurance Institute for Highway Safety underlining the role of a trustworthy Steering Knuckle in a car's protection during crashes. Specially, the Dodge Caliber Steering Knuckle offers higher recognized position in the Global automotive Industry because of its multiplicative compatibility with several versions of Caliber and contributes to improve the driving smoothness and increase fuel efficiency. Due to aspects like stability and control of the wheels, the Dodge Caliber Steering Knuckle is the optimal and essential part for the drivers who want a reliable car.
Dodge Caliber Steering Knuckle Parts and Q&A
- Q: How to Install a Steering Knuckle on the Front on Dodge Caliber?A:To fix the steering knuckle in place, slide the hub section over the halfshaft outer C/V joint's splines. Put the knuckle onto the ball joint stud, lining up the hole in the knuckle boss with the groove on the ball joint. Verify that a new ball joint stud, pinch bolt and nut are used. Tighten the nut to a torque of 82 Nm (60 ft. lbs.) When fitting the strut assembly to the knuckle with these serrated and fixed bolts, hold the knuckle and tighten the nuts onto the bolts. Line up the lower strut part with the top of the knuckle, check that the holes are aligned and put in the two connecting bolts. As you put the nuts onto the bolts, tighten them to 110 Nm (81 ft. lbs.) keeping your hands on the bolts. First, put the outer tie rod ball stud into the knuckle arm, thread the tie rod end-to-knuckle nut over the stud, secure it with 132 Nm (97 ft. lbs.) of force and hold the stud in place with a wrench. Set the wheel speed sensor head into the knuckle, hold it securely with the screw tightened to 12 Nm (106 in. lbs.) and attach the clip for the wheel speed sensor wire to its bracket. Add the brake rotor, disc Brake Caliper and adapter to your assembly before proceeding. Rinse off the stub shaft threads and fit the washer and hub nut onto the end of the stub shaft. When the helper brakes to stop the hub rotation, use an torque wrench to tighten the hub nut to 244 Nm (180 ft. lbs.). Attach the spring washer and the hub nut lock to the hub nut and stub shaft, insert the new cotter pin into the hub lock, then wrap the cotter pin's prongs tightly over the nut lock. Set the wheel and tire onto the hub and tighten the wheel nut with a torque wrench to 135 Nm (100 ft. lbs.) and bring the vehicle back to the ground. If the original knuckle goes back on the vehicle, chances are wheel alignment won't be necessary thanks to Net-Build, but check and do it if required.
- Q: How to Remove the Front Steering Knuckle on Dodge Caliber?A:First, get the vehicle lifted and supported, remove the wheel mounting nuts and take out the tire and wheel from the steering knuckle. After that, remove the cotter pin, lock and spring washer from the halfshaft stub shaft. If a helper stops the hub red from spinning while you hold the rear axle still, you can unfasten the hub nut and washer. Release and take out the front brake rotor. Take off the screw holding the wheel speed sensor to the knuckle and, after that, pull the sensor out by removing the connecting clip. Keep the shaft-end of the tie rod secured with a wrench and loosen the nut that links the outer tie rod to the knuckle. Attach Remover 9360 to the knuckle and unfasten the outer tie rod end first. After that, tear out the nut and pinch bolt on the ball joint stud that is connected to the knuckle, making sure the attaching bolts are not rotated. Do not move the bolt heads as you take off the two nuts bolting the strut to the knuckle; after that, remove the bolts with a pin punch. Use a prying tool to lift up the lower Control Arm and press down on the ball joint boss on the knuckle. Do this carefully so you don't damage the seal. Support the half shaft and make sure the inner C/V joint does not come loose, next remove the knuckle from the half shaft joint and remove the knuckle from the vehicle.


Related Dodge Caliber Parts
 Dodge Caliber Wheel Bearing
 Dodge Caliber Sway Bar Link
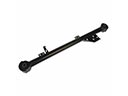 Dodge Caliber Trailing Arm
 Dodge Caliber Coil Springs
 Dodge Caliber Lateral Link
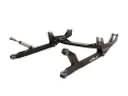 Dodge Caliber Radius Arm
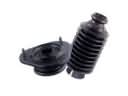 Dodge Caliber Shock and Strut Boot
 Dodge Caliber Strut Bearing
 Dodge Caliber Strut Mounts
 Dodge Caliber Sway Bar Bushing
 Dodge Caliber Sway Bar Link Bushing
 Dodge Caliber Sway Bars