JeepParts
My Garage
My Account
Cart
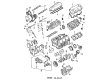
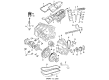
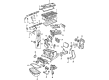
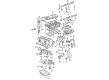
OEM Dodge Caravan Piston
Engine Pistons- Select Vehicle by Model
- Select Vehicle by VIN
Select Vehicle by Model
orMake
Model
Year
Select Vehicle by VIN
For the most accurate results, select vehicle by your VIN (Vehicle Identification Number).
12 Pistons found


Dodge Caravan Vibration Damper Part Number: 5142303AB
$56.55 MSRP: $81.25You Save: $24.70 (31%)Ships in 1-3 Business Days
Dodge Caravan Pistons Part Number: MD119671
$28.61 MSRP: $36.27You Save: $7.66 (22%)Ships in 1-2 Business Days
Dodge Caravan Piston Part Number: 68086046AB
$122.02 MSRP: $134.00You Save: $11.98 (9%)Ships in 1-2 Business Days

Dodge Caravan Pistons Part Number: 4773037
$13.94 MSRP: $17.67You Save: $3.73 (22%)Ships in 1-2 Business Days
Dodge Caravan Pistons Part Number: MD197814
Dodge Caravan Pistons Part Number: MD197808
Dodge Caravan Pistons Part Number: MD152563

Dodge Caravan Piston Assembly Part Number: 4797692

Dodge Caravan Piston Part Number: 4796212

Dodge Caravan Piston Assembly Part Number: 4798744

Dodge Caravan Piston Part Number: 68067617AA


Dodge Caravan Piston Part Number: 4666130AB
Dodge Caravan Piston
Choose OEM Piston that meet Dodge factory standards. Dodge designs and tests every component for precision and durability. Each Piston follows strict manufacturing steps to lock in quality and fit. If your Dodge Caravan matters to you, OEM parts make the smart choice. You'll get the exact look, feel, and performance you expect. Shop genuine Caravan parts at the highly competitive prices online. Enjoy a manufacturer's warranty, a hassle-free return policy, and rapid delivery. No more guesswork with off brands. Get genuine parts with exact fit and true factory performance. Shop with confidence today at JeepPartsDeal.com.
Dodge Caravan Piston Parts and Q&A
- Q: How to Install Piston and Connecting Rod Assemblies on Dodge Caravan?A:Make sure to stagger the location of the compression rings, not having them sit next to the oil ring rail during installation of the piston and connecting rod assemblies. Before adding a ring compressor, both the oil ring ends should be butted and the rail gaps must be in line. Add the piston head and rings to clean oil, slide over the ring compressor and avoid any movement of the rings. The direction on the piston has to be facing the front of the engine. Put the Crankshaft in position so that the center of the connecting rod journal is inside the cylinder bore. Then, apply clean engine oil to all bare areas. Add the upper half of the bearing into the connecting rod and then secure Special Tool 8189, the connecting rod guides, to the connecting rod. Force the piston toward the cylinder bore with the hammer handle, as you at the same time position the connecting rod correctly on the journal. When the engines are installed, eliminate the connecting rod guides. You should never reuse the connecting rod cap bolts; instead, oil the threads of replacement bolts and insert the lower bearing part into the cap before installing them. Set the cap in place, fastening each bolt just tight enough by hand and then tighten each bolt to 27 Nm (20 ft. lbs.) followed by an additional 1/4 of a turn. Check how wide the connecting rod side is using a feeler gauge and see if it meets the standards. After that, fix the Balance Shaft Carrier Assembly, Oil Pan and cylinder head.
- Q: How to Remove and Replace Engine Pistons on Dodge Caravan?A:The first step to changing the pistons is to take out the Cylinder Head. Put a ridge reamer on the reamer handle and remove the top groove from the cylinder bores while keeping the piston lids covered, placing a number on each piston that matches where it belongs. After that, pull out the Oil Pan and mark the cylinder number on the side of the rod and cap to help with identification. Make sure you notice that there is a directional stamp on the front half of the pistons. Turn the Crankshaft to place the pistons down and center the connecting rods in the cylinder bore to remove them and then the Balance Shaft Assembly. With the bolt heads exposed, push and remove the pistons and connecting rods from out of the engine block. With the bearing removed, fit the bearing cap onto the rod's end, because the piston and rod are serviced as a unit. Before installing, arrange that the compression ring gaps are uneven and do not match with the oil ring rail gaps. Do not use the ring compressor until you know that the oil ring expander sliders are joined tightly and the rail distances are set correctly. Cover the piston head and rings with clean engine oil before sliding the ring compressor onto the piston, so the ring locations are not affected. The arrow on the piston should be pointing in the direction of the engine's front. Turn the crankshaft to get the journal on the connecting rod to fit inside the cylinder bore, instal the rod and piston assembly into the cylinder and direct the rod over the crankshaft journal. Slide the piston down into the cylinder bore and, as you do, position the connecting rod so it sits on the connecting rod journal. Bind screws, but first, coat the threads of the fresh cap screws with engine oil. Tighten each bolt finger tight before doing the rest and then use your hands to tighten each bolt in turn for the last step. Then, tighten the mounting bolts to 27 Nm, add an extra 1/4 rotation and check the clearance of the connecting rod side with a feeler gauge.

Related Dodge Caravan Parts
 Dodge Caravan Timing Belt
 Dodge Caravan Camshaft Plug
 Dodge Caravan Crankshaft Timing Gear
 Dodge Caravan Cylinder Head
 Dodge Caravan Engine Mount Bracket
 Dodge Caravan Oil Pan Gasket
 Dodge Caravan Oil Pump Rotor Set
 Dodge Caravan Rocker Arm
 Dodge Caravan Rod Bearing
 Dodge Caravan Timing Belt Idler Pulley
 Dodge Caravan Timing Chain Guide
 Dodge Caravan Timing Chain Tensioner