JeepParts
My Garage
My Account
Cart
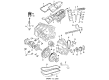
OEM Dodge Caravan Crankshaft
Crank Shaft- Select Vehicle by Model
- Select Vehicle by VIN
Select Vehicle by Model
orMake
Model
Year
Select Vehicle by VIN
For the most accurate results, select vehicle by your VIN (Vehicle Identification Number).
4 Crankshafts found


Dodge Caravan Crankshaft Part Number: 4621983AD
$374.75 MSRP: $1045.00You Save: $670.25 (65%)Ships in 1-2 Business Days

Dodge Caravan Crankshaft Part Number: 4781643AA
$539.13 MSRP: $818.00You Save: $278.87 (35%)Ships in 1-2 Business Days
Dodge Caravan Crankshaft Sensor Part Number: 4556224


Dodge Caravan Crankshaft Part Number: 4621917
Dodge Caravan Crankshaft
Choose OEM Crankshaft that meet Dodge factory standards. Dodge designs and tests every component for precision and durability. Each Crankshaft follows strict manufacturing steps to lock in quality and fit. If your Dodge Caravan matters to you, OEM parts make the smart choice. You'll get the exact look, feel, and performance you expect. Shop genuine Caravan parts at the highly competitive prices online. Enjoy a manufacturer's warranty, a hassle-free return policy, and rapid delivery. No more guesswork with off brands. Get genuine parts with exact fit and true factory performance. Shop with confidence today at JeepPartsDeal.com.
Dodge Caravan Crankshaft Parts and Q&A
- Q: What Are the Steps Involved in Installing a Crankshaft on Dodge Caravan?A:The crankshaft rides on five main bearings and all the upper bearing shells in the crankcase include oil grooves and holes. Its end play is controlled by a flanged bearing on the number three main bearing journal. The next step is to install the upper bearing shells, lining their oil hole and lubrication groove with those in the engine block and pushing the bearing tabs in correctly. If the crankshaft is out for machining, the assembly must be balanced using the target ring. Clean both the crankshaft and target ring with Mopar(R) brake parts cleaner, then use compressed air to clean them thoroughly. Replace all the screws in the target ring, starting with the #1 location and tighten them only with your hands, then tighten all screws again with a T30 torx bit to 13 Nm (110 in-lbs) in the arranged pattern. Handle crankshaft with care, as any damage to the tone wheel will ruin the bed plate mating surface. Before installing the crankshaft, cover the gears and journals with oil and apply Mopar(R) Bed Plate Sealant only to the bed plate. Fit the lower main bearings on the other side of the main bearing cap/bed plate so that their tabs are set and well oiled. Cover the bed plate with a 1.5 to 2.0 mm amount of Mopar(R) Bed Plate Sealant and later slide it inside the engine block. Apply some oil to the bolt threads after installing them finger tight and continue to tighten them until the bed plate meets the cylinder block. Put the crankshaft so that the number 4 Piston touches the deck from above, then push and pull the crankshaft rearward to the end of its movement, leaving a tool in place between the crankshaft counterweight and the rear of the cylinder block. Install each bolt (1-10) as described, fasten all of them to 41 Nm (30 ft. lbs.), remove the wedge tool and repeat the final tightening to check any changes. After doing so to bolts (1-10), apply 28 Nm (250 in. lbs.) of torque to bolts (11-20) following the sequence shown, then retighten them to the same torque reading. After inserting the main bearing bed plate, measure the crankshaft turning torque and notice if it goes over the permitted value of 5.6 Nm (50 in. lbs.). Connecting Rod Bearings and caps should be installed separately, with connecting rod bolts changed for new ones and then tightened to 27 Nm (20 ft. lbs.) plus an extra 1/4 turn. Fit the balance shafts and housing assembly, along with the oil pump, plus the oil pump pick-up tube (Use the torque listed in the manual to tighten), Oil Pan, crankshaft position sensor, any detached cylinder head, Timing Belt rear cover, crankshaft sprocket, timing belt, timing belt front covers, engine mount support bracket, new Oil Filter, crankshaft rear oil seal and flex plate (Use Mopar(R) Lock & Seal Adhesive in the places specified, tighten as recommended). Then, connect the transaxle to the engine and tighten the bolts to 101 Nm (75 ft. lbs.), installing the engine piece as the last step.
- Q: How to Remove and Replace a Crankshaft in an Engine Assembly on Dodge Caravan?A:You need to remove the engine assembly from the vehicle and divide it from the transaxle before replacing the crankshaft. Now, undo the flex plate and crankshaft rear oil seal and once that's done, put the engine on a repair stand. Change the engine oil and replace the Oil Filter, after which remove the Oil Pan and the Timing Belt covers. Get rid of the timing belt, oil pump and balance shafts, plus the housing assembly that holds them together. Every one of the bedplate bolts connecting the engine block must be unscrewed and by using a mallet, carefully tap all sides of the bedplate on the dowel pins so that it comes off gently. Be careful not to injure the main bearings or journals when removing the crankshaft from the cylinder block. Examine the crankshaft's journals for signs of too much wear or taper, as well as any scoring and check that the protection against out of roundness or oblique wear in the main bearing is in range. Following grinding, polish the crankshaft oil holes and clean all channels, assuring that the final finish on nodular cast iron crankshafts points in the same way the engine rotates. Before putting the other shells in, install the main bearing shells with their lubrication grooves into the cylinder block so their oil holes and tabs are aligned properly. Do not let oil reach the mating surface, grease the bearings and journals and fit the crankshaft in place by using only the exact recommended anaerobic sealant on the bedplate surface. Choose a 1.5 to 2.0 mm bead of Mopar Bed Plate Sealant, put it on the cylinder block, fit the lower main bearings into the main bearing cap/bedplate and promptly put the bearing tabs upright. Before installing the bolts, coat the threads with oil and only screw the main bearing bedplate to the cylinder block until it's only finger tight. After that, tighten the bolts until the bedplate touches the cylinder block. For correct alignment, put the number 4 Piston as TDC and move the crankshaft completely rearward and forward to limits, insert a wedge between the block rear and counterweight and bolt them in sequence up to 41 Nm. Once you've installed the wedge, tighten the bolts again to 41 Nm +1/4 turn. Attach the bearing bedplate onto the engine block with main bolts torqued to 28 Nm, look at the crankshaft turning torque and confirm it remains lower than 5.6 Nm. Once everything is in place, take the balance shafts and housing assembly, oil pump and all timing belt covers and install them, applying Mopar Lock & Seal Adhesive to each bolt thread. Tighten all bolts to 95 Nm. Assemble the transaxle with the engine using 101 Nm of tension, then place and fasten the engine back in its place.


Related Dodge Caravan Parts
 Dodge Caravan Engine Mount
 Dodge Caravan Dipstick
 Dodge Caravan Oil Pan
 Dodge Caravan Timing Chain
 Dodge Caravan Cylinder Head
 Dodge Caravan Oil Filler Cap
 Dodge Caravan Oil Pump Gasket
 Dodge Caravan Pushrod
 Dodge Caravan Timing Belt Tensioner
 Dodge Caravan Timing Chain Tensioner
 Dodge Caravan Timing Cover
 Dodge Caravan Timing Cover Gasket