JeepParts
My Garage
My Account
Cart
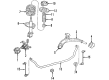
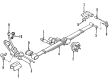
OEM Dodge Grand Caravan Sway Bar Kit
Stabilizer Sway Bar Set- Select Vehicle by Model
- Select Vehicle by VIN
Select Vehicle by Model
orMake
Model
Year
Select Vehicle by VIN
For the most accurate results, select vehicle by your VIN (Vehicle Identification Number).
8 Sway Bar Kits found


Dodge Grand Caravan Stabilizer Bar, Front Part Number: 4743027AA
$116.36 MSRP: $147.51You Save: $31.15 (22%)Ships in 1-2 Business Days

Dodge Grand Caravan Stabilizer Bar, Front Part Number: 4721084AE
$197.65 MSRP: $296.00You Save: $98.35 (34%)Dodge Grand Caravan Stabilizer Bar, Front Part Number: 4743026AA
$4.64 MSRP: $182.00You Save: $177.36 (98%)Ships in 1-2 Business Days

Dodge Grand Caravan Stabilizer Bar, Front Part Number: 4721419AE
$168.82 MSRP: $249.00You Save: $80.18 (33%)
Dodge Grand Caravan Stabilizer Bar, Rear Part Number: 5080990AA

Dodge Grand Caravan Stabilizer Bar, Front Part Number: 4856130
Dodge Grand Caravan Stabilizer Bar, Rear Part Number: 4766031AC
Dodge Grand Caravan Stabilizer Bar Part Number: 4694751
Dodge Grand Caravan Sway Bar Kit
Choose OEM Sway Bar Kit that meet Dodge factory standards. Dodge designs and tests every component for precision and durability. Each Sway Bar Kit follows strict manufacturing steps to lock in quality and fit. If your Dodge Grand Caravan matters to you, OEM parts make the smart choice. You'll get the exact look, feel, and performance you expect. Shop genuine Grand Caravan parts at the highly competitive prices online. Enjoy a manufacturer's warranty, a hassle-free return policy, and rapid delivery. No more guesswork with off brands. Get genuine parts with exact fit and true factory performance. Shop with confidence today at JeepPartsDeal.com.
Speaking of the differences, there is Sway Bar Kit change in the Dodge Grand Caravan vehicles that offer significant improvement in the mechanical steadiness and control of the vehicles. For counterbalancing the movement of opposite suspensions it is connected between opposite ends of the Sway Bar Kit minimizes the lateral movement while cornering and over uneven terrains reducing body roll. This is done via a high tech spring known as a torsion spring which enhances roll stability but does not affect vertical stability and thus leads to better traction and less side-slipping. Different types of Sway Bar Kit have been deployed in Dodge Grand Caravan models within the years ranging from adjustable to active types. These advanced Sway Bar Kits can allow increased or decreased stiffness and hence, tune the handling features and the ride comfort. Thus, while conventional Sway Bar Kits are indeed highly efficient in preventing lateral lean of the vehicle's body, these also tend to transmit jolts from one wheel to another that causes the car to waddle on rough roads. All in all the Sway Bar Kit is an important equipment required to sustain the vigor of Dodge Grand Caravan and passengers' comfort while on the ride.
Dodge Grand Caravan Sway Bar Kit Parts and Q&A
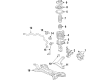
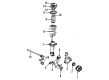
- Q: How to Install a Sway Bar Kit for the Front Stabilizer on Dodge Grand Caravan?A:Consult the manual for steps on checking the sway bar kit before installing and swap out any worn, cracked or distorted links before you put it on. The sway bar kit should have its ends curving under the steering gear tie rods after it is mounted. Rotate and install the sway bar kit along the driver side wheel opening until you feel it is centered above the suspension crossmember. Place the two bushings over the sway bar kit, inserting them through the slit in the bushing side and then install the sway bar bushing retainers over top of the bushings. Install the retainers on the crossmember using four screws, made with a torque of 45 Nm (33 ft. lbs.). On the back of the crossmember, put the hose pressure routing clamp in place and fasten it with a screw to 8 Nm (71 in. lbs.). First set up the rear Engine Mount and then attach the heat shield over the steering gear, installing the hold-downs and screwing them in to 8 Nm (71 in. lbs.). Lower the fore-aft crossmember into the engine compartment and add the mounting bolts; tighten the bolts at the front end to 113 Nm and the rear bolts to 55 Nm. Install the thru-bolt that holds the engine to the mount, then tighten it to 57 Nm (42 ft. lbs.). On the outside, fasten the outer tie rod to the knuckle, add a nut to its end, secure the stud with one hand and use a wrench to tighten the nut to 75 Nm (55 ft. lbs.), before turning the end of the stud 245°. Secure the ends of the sway bar kit with a link and then tighten the nut holding the link's lower stud stationary at 88 Nm (65 ft. lbs.). For arrival, fit the tires and wheels onto their associated axle and bolt the wheels on firmly to 135 Nm (100 ft. lbs.).
- Q: How to remove a Sway Bar Kit on Dodge Grand Caravan?A:You should start by elevating and supporting your car to remove the front sway bar kit. Take out the wheel mounting nuts (3) on each side and then the tire and wheel assembly (1) from both wheels. Both ends of the sway bar kit, take a wrench to hold the lower stud stationary while removing the nut joining the Sway Bar Link to the bar. From each end, loosen and remove the nut near the rod end stud while the knuckle end is fixed by hand. Remove each outer Tie Rod End from the knuckle by using Remover, Special Tool number 9360 (1). Then, get rid of the front Engine Mount thru-bolt (4) and remove the front mounting bolt (6) in the fore-aft crossmember and take out all the four rear bolts (3, 4) to remove the crossmember. Detach the screws and push-pins holding the heat shield (1) onto the right side of the steering gear (2) and afterwards take off the heat shield. Remove the screws (3) securing the power steering pressure hose routing clamp(s) (4.0L auto only has one) and also take out the rear engine mount. Unscrew the retainers (1) holding the sway bar kit bushings (2) to the crossmember and then take the retainers out. Ease the two cushions out of the sway bar kit by removing them from the slit in the bushings. Rotation of the sway bar kit is next and then remove it from the bottom of the driver side.


Related Dodge Grand Caravan Parts
 Dodge Grand Caravan Wheel Bearing
 Dodge Grand Caravan Ball Joint
 Dodge Grand Caravan Axle Beam Mount
 Dodge Grand Caravan Axle Support Bushings
 Dodge Grand Caravan Control Arm Bushing
 Dodge Grand Caravan Crossmember Bushing
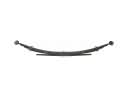 Dodge Grand Caravan Leaf Spring
 Dodge Grand Caravan Leaf Spring Bushing
 Dodge Grand Caravan Shock Absorber
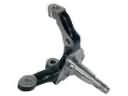 Dodge Grand Caravan Spindle
 Dodge Grand Caravan Steering Knuckle
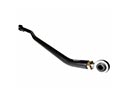 Dodge Grand Caravan Track Bar