JeepParts
My Garage
My Account
Cart
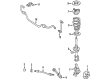
OEM Dodge Intrepid Sway Bar Kit
Stabilizer Sway Bar Set- Select Vehicle by Model
- Select Vehicle by VIN
Select Vehicle by Model
orMake
Model
Year
Select Vehicle by VIN
For the most accurate results, select vehicle by your VIN (Vehicle Identification Number).
7 Sway Bar Kits found


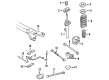
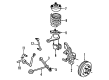
Dodge Intrepid Stabilizer Link, Front Part Number: 4782254AB
$98.93 MSRP: $125.00You Save: $26.07 (21%)Ships in 1-2 Business Days
Dodge Intrepid Stabilizer Bar, Front Part Number: 4772633AB
$20.26 MSRP: $117.00You Save: $96.74 (83%)Ships in 1-2 Business Days
Dodge Intrepid Stabilizer Bar, Front Part Number: 4782282AA
Dodge Intrepid Stabilizer Bar, Front Part Number: 4772633

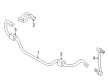
Dodge Intrepid Stabilizer Bar, Rear Part Number: 4581081AB

Dodge Intrepid Stabilizer Bar, Front Part Number: 4782303AA

Dodge Intrepid Stabilizer Bar Part Number: 4616322
Dodge Intrepid Sway Bar Kit
Choose OEM Sway Bar Kit that meet Dodge factory standards. Dodge designs and tests every component for precision and durability. Each Sway Bar Kit follows strict manufacturing steps to lock in quality and fit. If your Dodge Intrepid matters to you, OEM parts make the smart choice. You'll get the exact look, feel, and performance you expect. Shop genuine Intrepid parts at the highly competitive prices online. Enjoy a manufacturer's warranty, a hassle-free return policy, and rapid delivery. No more guesswork with off brands. Get genuine parts with exact fit and true factory performance. Shop with confidence today at JeepPartsDeal.com.
Dodge Intrepid Sway Bar Kit Parts and Q&A
- Q: How to Service a Sway Bar Kit on Dodge Intrepid?A:When fixing the rear sway bar kit, lift the vehicle either with jack stands or a frame contact hoist. Attach a thin wrench to the hex mounting point for the link stud and let it stop the stud from turning. With the nut removed from the stud and the sway bar disconnected from the strut, you can remove the link from the bar on that side and repeat this for the other link. After that, unfasten the screw securing the brake tubes to the bushing retainer on the left sway bar, along with the remaining two bolts on both sway bar isolator bushing retainers that secure them to the frame rails; note that the rearward bolts are also securing the front corners of the rear suspension crossmember. Get rid of the sway bar from the car and fit it with one bushing mount into a soft jawed vise just above the jaws. Pull off the two retainer tabs on the broader part of the upper bushing retainer, then move the upper assembly of the bushing retainer by tapping at the retainer with a hammer and a brass drift punch to remove the assembly from the lower half and bushing. Unbolt the bushing retainer and the bushing from the lower half, while keeping the cut in the bushing near the vehicle's front. With the sway bar removed from the vise, repeat the steps just described to get out the second bushing. During installation, review the bushings and retainers for any defects and cracks and switch them out as needed. Before mounting the sway bar into the vise, be sure the bushing is installed so the slit is below the jaw. Fasten the bushing to the lower retainer with the elongated opening up front, then press the upper half onto the lower retainer until both pair up. Place the lower retainer half, bending the retainer tabs as you go and doing the same for the second half in the other end. Also, place the rear sway bar between the frame rails and attach the two bushing retainers to the frame rails, fastening the rear bolts to 100 Nm (75 ft. lbs.) and the front bolts to 40 Nm (30 ft. lbs.). After reinserting the screw for the brake tube on the left sway bar isolator bushing retainer, join both sway bar links to their nuts, tightening everything to 95 Nm (70 ft. lbs.). Depress the vehicle by bringing it completely to the ground.
- Q: How to Remove and Install a Sway Bar Kit on Dodge Intrepid?A:Before removing the front sway bar kit, detach the mounting nut and washer from the upper strut assembly mounting point on the strut tower. Lift the vehicle on jacks or in a hoist, then take out the right front wheel and tire together. Afterward, loosen the right sway bar link nut on the strut assembly, remove the sway bar link and then unscrew the left sway bar link nut on the sway bar. Back off the attaching nut on the outer right tie rod end, then remove the tie rod from the right steering arm using the Puller, Special Tool C-3894A and take off both. If your vehicle has antilock brakes, take out the speed sensor cable routing bracket from the strut assembly. Take out the 2 strut assembly bolts connected to the Steering Knuckle, never trying to turn the bolts inside the steering knuckle to keep it safe. First, take out the right front strut assembly, then loosen the nine bolts that hold the structural collar to the engine Oil Pan and transaxle and finally remove the 4 nuts securing the engine motor mounts to the cradle assembly. Loosen all the bolts holding the sway bar bushing retainers to the cradle assembly, then pull out both the sway bar isolator bushing retainers and both bushings. Put a transmission jack under the engine oil pan and use wood to stop it from sinking, raise the jack so the motor mounts rise above the cradle and unbolt the left sway bar through the right side and guide it out front of the right halfshaft and behind the right knuckle, taking care the knuckle is not pulled out when the sway bar is lifted. For removal, lift the car up, undo the bolts from each sway bar bushing retainer, look over the bushings for any damage and if they need to be replaced, slide the new bushings in with the slit pointing forward. For installation of the sway bar, remove it in the reverse order, sustaining the upright position of the knuckle, guide the motor mount studs into the cradle assembly and attach the assembly and nuts, tightening to 61 Nm (45 ft. lbs.). Put the structural collar between the engine oil pan and transaxle, tighten the bolts in order and start with 3 Nm (30 inch lbs.) and finish with 61 Nm (45 ft. lbs.). With small cuts facing in front and the smooth part down, install the sway bar isolator bushings and end with installing the isolator bushing retainers. Center the sway bar inside the cradle assembly, get the bushing retainers in line with the assembly holes and use 61 Nm (45 ft. lbs.) on the bolts to attach the retainers to the assembly. After that, fasten the left sway bar link to the left edge of the sway bar and check that the nut on it is tightened to 95 Nm (70 ft. lbs.). Similarly, install the right front strut assembly in the shock tower and fasten the 4 strut assembly upper mount to the shock tower using attaching nuts tightened to 45 Nm (33 ft. lbs.). Put the steering knuckle onto the strut assembly, screw on the attaching bolts and tighten the nuts until they reach 203 Nm (150 ft. lbs.). Should your vehicle have antilock brakes, fit the front speed sensor cable bracket to the front strut. Place the outside tie rod back on the strut, then tighten it to 37 Nm (27 ft. lbs.). Do the same with the sway bar link, touring its nut to 95 Nm (70 ft. lbs.). Attach the front wheel and tire assembly and tighten each wheel mounting nut exactly as shown in the manual, to a torque of 135 Nm (100 ft. lbs.). Bring the car down to the ground. During bushing installation, have the slits in the bushings face forward and fasten them with flat sides down. After that, set the bushing retainers back onto the isolators and line up the sway bar retainers with the cradle assembly mounting holes. Tighten each bolt to 61 Nm (45 ft. lbs.) and then lower the vehicle.


Related Dodge Intrepid Parts
 Dodge Intrepid Control Arm
 Dodge Intrepid Axle Pivot Bushing
 Dodge Intrepid Axle Support Bushings
 Dodge Intrepid Coil Spring Insulator
 Dodge Intrepid Coil Springs
 Dodge Intrepid Control Arm Bushing
 Dodge Intrepid Lateral Link
 Dodge Intrepid Shock Absorber
 Dodge Intrepid Shock And Strut Mount
 Dodge Intrepid Steering Knuckle
 Dodge Intrepid Sway Bar Link
 Dodge Intrepid Wheel Hub