JeepParts
My Garage
My Account
Cart
OEM Dodge Journey Rack And Pinion
Steering Gear- Select Vehicle by Model
- Select Vehicle by VIN
Select Vehicle by Model
orMake
Model
Year
Select Vehicle by VIN
For the most accurate results, select vehicle by your VIN (Vehicle Identification Number).
6 Rack And Pinions found

Dodge Journey Steering Gear Part Number: 68145033AC
$688.89 MSRP: $1045.00You Save: $356.11 (35%)Ships in 1-2 Business Days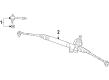
Dodge Journey Steering Gear Part Number: 68145034AC
$499.88 MSRP: $753.00You Save: $253.12 (34%)Ships in 1-2 Business DaysDodge Journey Steering Gear Part Number: 68140631AE
$650.21 MSRP: $985.00You Save: $334.79 (34%)Dodge Journey Steering Gear Part Number: 68145032AC
$600.41 MSRP: $876.00You Save: $275.59 (32%)Ships in 1-2 Business DaysDodge Journey Steering Gear Part Number: 68140632AE
$985.93 MSRP: $1415.00You Save: $429.07 (31%)Ships in 1-2 Business DaysDodge Journey Steering Gear Part Number: 68140628AE
$1099.63 MSRP: $1625.00You Save: $525.37 (33%)
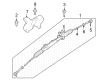
Dodge Journey Rack And Pinion
Choose OEM Rack And Pinion that meet Dodge factory standards. Dodge designs and tests every component for precision and durability. Each Rack And Pinion follows strict manufacturing steps to lock in quality and fit. If your Dodge Journey matters to you, OEM parts make the smart choice. You'll get the exact look, feel, and performance you expect. Shop genuine Journey parts at the highly competitive prices online. Enjoy a manufacturer's warranty, a hassle-free return policy, and rapid delivery. No more guesswork with off brands. Get genuine parts with exact fit and true factory performance. Shop with confidence today at JeepPartsDeal.com.
The Dodge Journey is well-known for its dependability and capability as a result, it utilized the particular of its highly efficient Rack And Pinion steering system. This transforms the rotational movement of a steering wheel into linear movement at the front wheels to give the much needed feedback for a good steer. This Dodge Journey vehicle has a Rack And Pinion mechanism whose principal function is to enhance power-assisted steering for easier maneuverability, particularly in congested areas. Journey models' compatibility with this complex steering innovation guarantees convenience for drivers regardless of the car's production year or variant. Just as much, the Dodge Journey boasts of three rows of seating and its roomy interior coupled with ultra-efficient safety features such as the braking systems as elaborated in the Rack And Pinion. The incorporation of such aspects as the contemporary infotainment systems as well as safety updates developed for the later models also contributes to the differentiation in the Dodge Journey in the automotive industry. Even though Manufacturing of Dodge Journey ceased in 2020, it is still one of the preferred vehicles for families looking for affordable and reputable SUV. The Rack And Pinion of the Dodge Journey is among the aspects that make it excel in performance and safety.
Dodge Journey Rack And Pinion Parts and Q&A
- Q: How to Remove the Rack and Pinion on Dodge Journey?A:To remove the rack and pinion from a left-hand drive, first empty the power steering fluid from the reservoir. Set the front wheels and Steering Wheel straight, after which lock the steering wheel and disconnect the intermediate shaft. Reposition both the floor carpeting and the soundproof insulation to reach the base of the column, where the intermediate shaft coupling is located; the bolt securing it can then be removed. Divide the rack and pinion pinion shaft from the intermediate shaft coupling, remove the clips on the dash seal over the dash panel and move the seal away. There are many types and means to raise your vehicle, but once you support it and remove the wheels, remove all the nuts and the assembly. Pull the nut off the outer end of the tie rod at the knuckle on each side, then separate the two parts using Special Tool 9360. If you have an engine belly pan, take it off first before you unthread the rear and front engine mount through-bolts. Clean out the metal fasteners on the hose at the back of the crossmember, then go to the rack and pinion and remove the return hose and afterward take out the pressure hose by detaching its tube nut. Remember to mark where the front crossmember will secure to the body near each mounting bolt for the right installation. Place a transmission jack under the crossmember, then unscrew the four bolts that secure the front crossmember to the outside and the mounting screws on the front crossmember reinforcement brackets to the outside. Gently remove the crossmember so that it's lowered about 3 inches, ensuring you avoid damaging the radiator support. Take out the screws and pins holding the heat shield to the rack and pinion right side, then take out the bolts that join the rack and pinion to the crossmember. Hold the rack and pinion pinion shaft in the upright position and lift the dash seal off the rack and pinion, then pull the rack and pinion across the crossmember and move it out through the left wheel opening. If axles are removed, do not forget to check the number of rotations made when attaching the outer tie rods.
- Q: How to Install a Rack and Pinion Steering Gear on Dodge Journey?A:On a left-hand drive car, begin the installation of the rack and pinion by putting the outer tie rods on the inner tie rod screw threads, turning each tie rod as many times as during removal to approximate the toe before alignment. Place each of the jam nuts on the tie rod and tighten them according to the requirements during the wheel alignment. Put the rack and pinion in place through the left wheel opening, making it central on the crossmember. Make the rack and pinion pinion shaft stand vertical and put in the dash seal so that it fits the contour of the housing. Put the rack and pinion under the car on the crossmember and attach it with two bolts, turning them tight at 100 Nm (74 ft. lbs.). Attach the heat shield over the rack and pinion, then fasten it securely with screws and push-pins tightened to 6 Nm (53 in. lbs.). If you have a car with power steering, place the gear rack in the center. The front suspension crossmember should be attached in the same hole on the body as during removal to keep the wheel alignment set properly. Gradually lift the crossmember with a transmission jack so it lines up with where you have marked it. Cover the rear mounting bushings with the front crossmember reinforcement brackets and put in only the mounting screws, without tightening them. Apply four bolts to the front crossmember, tighten them to 135 Nm (100 ft. lbs.) and then tighten the screws on the reinforcement bracket to 50 Nm (37 ft. lbs.). Take away the transmission jack, insert the pressure hose tube into the rack and pinion and fasten the nut to 32 Nm (24 ft. lbs.). Next, insert and fasten the return hose tube with a nut tightened to 32 Nm (24 ft. lbs.). Put the hose in place and install the routing clamps on the crossmember; fasten the screws firmly to 8 Nm (71 in. lbs.). Fit the rear and front Engine Mount through-bolts and the belly pan if yours is equipped that way. Examine the tie rod seal boot before hooking up the outer Tie Rod End. If it looks damaged, replace it. Mount the outer tie rod end onto the end of the knuckle arm. Next, start a new mounting nut on the stud, tighten it to 85 Nm (63 ft. lbs.) and move on to the inner tie rod end. Fit the tires and wheels to each side and tighten the wheel mounting bolts to 135 Nm (100 ft lbs.), after which lower the vehicle. New clips under the dash seal to fit both pieces together and secure them. Remove the steering wheel holder, while making sure the front wheels remain straight in front of you. When center the intermediate shaft coupling over the rack and pinion pinion shaft, slide it onto the shaft and tighten down the coupling bolt to 42 Nm (31 ft. lbs.). Installing the deadening insulation and the back of the floor carpet, bleeding the power steering system, inspecting for leaks and carrying out wheel alignment when needed should be done next.

Related Dodge Journey Parts
 Dodge Journey Steering Wheel
 Dodge Journey Power Steering Pump
 Dodge Journey Power Steering Hose
 Dodge Journey Tie Rod
 Dodge Journey Power Steering Cooler
 Dodge Journey Drag Link
 Dodge Journey Power Steering Reservoir
 Dodge Journey Steering Column
 Dodge Journey Steering Column Cover
 Dodge Journey Steering Column Seal
 Dodge Journey Steering Gear Box
 Dodge Journey Tie Rod End