JeepParts
My Garage
My Account
Cart
OEM Dodge Magnum Front Cross-Member
Front Engine Cross Member- Select Vehicle by Model
- Select Vehicle by VIN
Select Vehicle by Model
orMake
Model
Year
Select Vehicle by VIN
For the most accurate results, select vehicle by your VIN (Vehicle Identification Number).
9 Front Cross-Members found

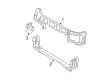
Dodge Magnum Upper Tie Bar, Front Part Number: 4805844AJ
$200.54 MSRP: $295.00You Save: $94.46 (33%)Dodge Magnum Upper Tie Bar, Front Part Number: 5112323AB
$206.21 MSRP: $304.00You Save: $97.79 (33%)Ships in 1-3 Business Days
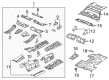
Dodge Magnum Rear Crossmember Part Number: 4780800AA
$338.77 MSRP: $499.00You Save: $160.23 (33%)Ships in 1-3 Business Days

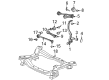
Dodge Magnum Engine Cradle, Front Part Number: 4782700AH
$1028.21 MSRP: $1505.00You Save: $476.79 (32%)


Dodge Magnum Engine Cradle, Front Part Number: 4895030AF
Dodge Magnum Front Cross-Member
Choose OEM Front Cross-Member that meet Dodge factory standards. Dodge designs and tests every component for precision and durability. Each Front Cross-Member follows strict manufacturing steps to lock in quality and fit. If your Dodge Magnum matters to you, OEM parts make the smart choice. You'll get the exact look, feel, and performance you expect. Shop genuine Magnum parts at the highly competitive prices online. Enjoy a manufacturer's warranty, a hassle-free return policy, and rapid delivery. No more guesswork with off brands. Get genuine parts with exact fit and true factory performance. Shop with confidence today at JeepPartsDeal.com.
Dodge Magnum Front Cross-Member Parts and Q&A
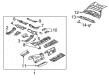
- Q: How to Install a Front Cross-Member on Dodge Magnum?A:Before you fit the front cross-member, put the Control Arms in place and raise the engine cradle to it's proper marked position for easier fitment. Install the cradle by bolting it down with four bolts tightened to 185 Nm (136 ft. lbs.), next add the isolators and retainers to the stabilizer before setting it on the cradle. Fit the stabilizer bar isolator retainer securely by bolting it on each arm at 60 Nm (44 ft. lbs.) tightness. After that, secure the engine mount nuts to 60 Nm (44 ft. lbs.) and the left and right ball joint nuts to 122 Nm (90 ft. lbs.) so that the lower control arm ball joint stud links with the knuckle. Secure the steering gear with the exhaust, put on the lower bolts tightened to 142 Nm (105 ft. lbs.) and install the upper bolt and nut. Attach each inner tie rod bellow and then fasten the heat shield as well as two pressure line retainer bolts to the cradle above. Attach the front belly pan, then combine the shock clevis bracket to the lower control arm with a nut and bolt, torque it with 174 Nm (128 ft. lbs.). Hold the stabilizer link in each side of the vehicle and fix it to the stabilizer bar. After that, tighten the link nut to reach 81 Nm (60 ft. lbs.). Fasten the outer tie rod end nut at each knuckle, followed by doing up the nut to a tightness of 86 Nm (63 ft. lbs.). With the car fully down from the hoist, pour power steering fluid into the pump reservoir, reconnect the negative Battery Cable and do an alignment.
- Q: How to Service and Repair a Front Cross-Member on Dodge Magnum?A:To deal with and fix the front cross-member, start by separating and isolating the negative Battery Cable at its post and then drain the pump's power steering fluid reservoir. Lift the vehicle and bring the vehicle's frame up, then take off the left and right front wheels. Take off the nut from the outer tie rod end nut at each knuckle and then use Special Tool 9630 to divvy up the outer tie rod from the knuckles. On your end, take out the nut that connects the stabilizer link to the stabilizer bar and shift the link ball joint stem off the bar. With your brass drift punch, gently tap the bolt out of the clevis bracket, having first made sure that the nut against the lower Control Arm is flush to the end of the bolt. Take off the nut and bolt on the clevis bracket and control arm and put support tool # 8534 in place. After removing the upper airbox inlet tube, put on the left and right engine lift brackets to the cylinder head. Take out the belly pan from the front and undo both pressure line retainer bolts in the cradle. Unscrew the mounting screws and heat shield above the inner tie rod bellows, unscrew the steering gear upper bolt and nut and remove both lower bolts. Get rid of the steering gear and its support from the exhaust system. Relax the nut holding the lower control arm ball joint stud to the knuckle so that it is lined up with the end of the stud, allowing you to separate these without distortion with 9360 Special Tool. Then, take out the impact tool, then get rid of both the left and right engine mount nuts and the nut from the end of the ball joint stud. Both sides require removing the isolator retainer bolt and then pulling out the stabilizer bar and isolators from the vehicle. Put something under the engine cradle to support it and mark its position with grease pencil. Loosen the four cradle bolts and let the cradle down and if necessary take off the control arms. To finish installation, fit the control arms, position the engine cradle as marked and bolt down the four cradle bolts. Screw on the stabilizer with isolators and retainers to the cradle and install the bolts securing the stabilizer bar isolator retainer, tightening all to the required torque. Next, tighten the nuts securing the engine mounts and the left and right ball joints as marked. Next, lower the steering gear and mount from the exhaust onto the chassis, fastening it with the lower mounting bolts to 142 N Install the heat shield and mounting screws above each inner tie rod bellow and then add the two pressure line retainer bolts to the cradle and the front belly pan. After assembling the shock clevis bracket and tightening it with 174 N.m, place the stabilizer link on the stabilizer bar and tighten the link nut to 81 N.m. Next, put the outer tie rod end nut on each knuckle, snugging it to 86 N.m. Assemble the wheel and tire assembly, lower the car from the hoist, refill the power steering fluid in the pump reservoir and reconnect the negative battery cable to the battery. In the end, have your vehicle aligned.


Related Dodge Magnum Parts
 Dodge Magnum Ashtray
 Dodge Magnum Axle Beam
 Dodge Magnum Brake Master Cylinder Reservoir
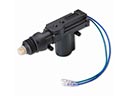 Dodge Magnum Door Lock Actuator
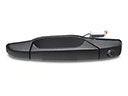 Dodge Magnum Exterior Door Handle
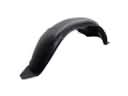 Dodge Magnum Fender Splash Shield
 Dodge Magnum Floor Pan
 Dodge Magnum Glove Box
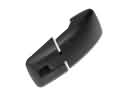 Dodge Magnum Liftgate Hinge
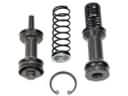 Dodge Magnum Master Cylinder Repair Kit
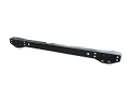 Dodge Magnum Rear Crossmember
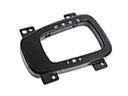 Dodge Magnum Shift Indicator