JeepParts
My Garage
My Account
Cart
OEM Dodge Ram 1500 Clock Spring
Spiral Cable Clock Spring- Select Vehicle by Model
- Select Vehicle by VIN
Select Vehicle by Model
orMake
Model
Year
Select Vehicle by VIN
For the most accurate results, select vehicle by your VIN (Vehicle Identification Number).
10 Clock Springs found


Dodge Ram 1500 Clockspring Part Number: 56045455AH
$256.06 MSRP: $377.00You Save: $120.94 (33%)Ships in 1-3 Business Days


Dodge Ram 1500 Clockspring Part Number: 56007627AA
$321.03 MSRP: $363.00You Save: $41.97 (12%)Ships in 1-2 Business Days
Dodge Ram 1500 Clockspring Part Number: 56045652AD
$397.32 MSRP: $580.00You Save: $182.68 (32%)Ships in 1-3 Business Days


Dodge Ram 1500 Clockspring Part Number: 56049795AE
$226.60 MSRP: $334.00You Save: $107.40 (33%)


Dodge Ram 1500 Clockspring Part Number: 68050846AB
$293.45 MSRP: $437.00You Save: $143.55 (33%)


Dodge Ram 1500 Clockspring Part Number: R5082062AJ
Dodge Ram 1500 Clockspring Part Number: 56007624
Dodge Ram 1500 Clockspring Part Number: 56045456AG
Dodge Ram 1500 Clockspring Part Number: 56045454AA
Dodge Ram 1500 Clockspring Part Number: 56045454AG
Dodge Ram 1500 Clock Spring
Choose OEM Clock Spring that meet Dodge factory standards. Dodge designs and tests every component for precision and durability. Each Clock Spring follows strict manufacturing steps to lock in quality and fit. If your Dodge Ram 1500 matters to you, OEM parts make the smart choice. You'll get the exact look, feel, and performance you expect. Shop genuine Ram 1500 parts at the highly competitive prices online. Enjoy a manufacturer's warranty, a hassle-free return policy, and rapid delivery. No more guesswork with off brands. Get genuine parts with exact fit and true factory performance. Shop with confidence today at JeepPartsDeal.com.
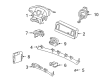
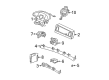
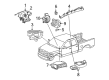
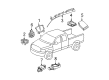
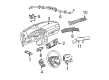
The Dodge Ram 1500 Clock Spring functions as a critical part of Supplemental Restraint System (SRS) by maintaining constant electrical communication between the airbag module and vehicle electrical system. A proper connection between airbag modules and the vehicle system through this system enables instant airbag functioning which provides boosted safety to vehicle occupants. A distinct spiral layout in Dodge Ram 1500 Clock Springs enables the device to accumulate energy as the steering wheel turns demonstrating remarkable engineering achievement. Different models of the Ram 1500 employed Clock Springs with modified designs as manufacturers developed better construction methods to deliver improved reliability and performance. Different Clock Spring designs either use spring-loaded brushes to reach concentric slip rings or keep using traditional spiral cables. Collectively the Dodge Ram 1500 Clock Spring fits numerous variants of Ram 1500 models thus providing better operational safety across diverse vehicle models. The market recognizes the Dodge Ram 1500 Clock Spring as its premier feature through its dual capabilities of high performance and exceptional durability because it directly supports essential safety systems functions. The car Clock Spring from Dodge represents ongoing manufacturer dedication to innovation and reliability which strengthens Dodge model's position as a preferred choice for powerful and dependable full-size pickup trucks.
Dodge Ram 1500 Clock Spring Parts and Q&A
- Q: How to Remove and Replace a Clock Spring Assembly on Dodge Ram 1500?A:Disable the Supplemental Restraint System (SRS) by cutting off the battery negative cable and then wait two minutes so the system capacitor can empty. Turn the Steering Wheel so that the front wheels point straight ahead. Unhook the air bag from the driver air bag seat switch and the steering wheel wire harness from the upper Clock Spring connector receptacles. Release the steering wheel slowly, being careful the screws on the puller do not damage the Clock Spring. Removal of the cover over the steering hole in the instrument panel should be followed by taking out the screw holding the tilt steering column knob and removing the knob from the actuator. Take out the two screws on the wheelshroud at the steering column base, then push gently on both sides of the upper shroud until the snap features come free. Uncover the steering column, next get rid of the center screw on the lower shroud, then pull out the lower shroud. Remove the wires from the two instrument panel wire harness connectors from their receptacles beneath the steering column in the Clock Spring housing. In vehicles with Electronic Stability Program, first take out the SAS' wire harness from the instrument panel connector. Pull out the two screws holding the Clock Spring to the multi-function switch mounting housing and remove the Clock Spring. If you want to reuse the Clock Spring, make sure the rotor is secured to the case at all times until you insert it again; if not, you must center it before reinstalling.
- Q: How to Install a Clock Spring Assembly on Dodge Ram 1500?A:Before you fit the Clock Spring assembly, disconnect and isolate the battery negative cable to stop the SRS from work. Wait two minutes afterward to drain the capacitor and avoid any air bag deployments by chance. Be sure that the Clock Spring is centered between the Steering Angle Sensor, the Steering Wheel, the steering shaft and the steering gear, so you don't damage anything or activate any Diagnostic Trouble Codes. The Clock Spring included in a service replacement package is centered and held with a locking pin that shouldn't be removed until installation on the steering column. To start, slide the multi-function switch into the Clock Spring, then snap the adjustable pedal switch blank filler or switch in place. After locking the rotor and case into place, place the Clock Spring around the upper shaft of the steering column and reattach its harness connectors: multi-function switch connector, heated steering wheel slip ring, SAS connector, two Clock Spring connectors and adjustable pedal switch connector. Put the Clock Spring in place on the steering column housing and secure it with screws turned to 3 Nm (25 in. lbs.). Install the upper and lower shrouds onto the steering column and afterward, remove the locking pin to ensure proper Clock Spring centering. Reinstall your steering wheel, make certain the engagement dowel matches and attach the Clock Spring pigtail wire connector for the steering wheel heater element if you have that. Link the steering wheel wire harness back together, confirming it is in the right place, then fit the driver air bag onto the wheel again and attach the battery negative cable. The SAS Menu Item, Data Display function can be used with a diagnostic scan tool to confirm correct Clock Spring installation.


Related Dodge Ram 1500 Parts
 Dodge Ram 1500 Air Bag Control Module
 Dodge Ram 1500 Air Bag Sensor
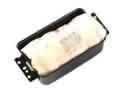 Dodge Ram 1500 Airbag
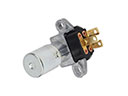 Dodge Ram 1500 Dimmer Switch
 Dodge Ram 1500 Fuel Pump Relay
 Dodge Ram 1500 Headlight Switch
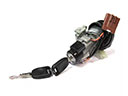 Dodge Ram 1500 Igniter
 Dodge Ram 1500 Ignition Relay
 Dodge Ram 1500 Occupant Detection Sensor
 Dodge Ram 1500 Relay Block
 Dodge Ram 1500 Turn Signal Switch
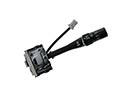 Dodge Ram 1500 Windshield Wiper Switch