JeepParts
My Garage
My Account
Cart
OEM Dodge Ram 1500 Dimmer Switch
Light Dimmer Switch- Select Vehicle by Model
- Select Vehicle by VIN
Select Vehicle by Model
orMake
Model
Year
Select Vehicle by VIN
For the most accurate results, select vehicle by your VIN (Vehicle Identification Number).
5 Dimmer Switches found


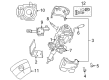
Dodge Ram 1500 Multifunction Switch Part Number: 56046114AF
$154.09 MSRP: $231.00You Save: $76.91 (34%)
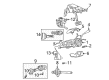
Dodge Ram 1500 Multifunction Switch Part Number: 56044802AC
$211.12 MSRP: $318.00You Save: $106.88 (34%)Ships in 1-2 Business Days


Dodge Ram 1500 Ignition Switch Part Number: 4728424


Dodge Ram 1500 Turn Signal Switch Part Number: 56049823AB


Dodge Ram 1500 Window Switch Part Number: 56021383
Dodge Ram 1500 Dimmer Switch
Choose OEM Dimmer Switch that meet Dodge factory standards. Dodge designs and tests every component for precision and durability. Each Dimmer Switch follows strict manufacturing steps to lock in quality and fit. If your Dodge Ram 1500 matters to you, OEM parts make the smart choice. You'll get the exact look, feel, and performance you expect. Shop genuine Ram 1500 parts at the highly competitive prices online. Enjoy a manufacturer's warranty, a hassle-free return policy, and rapid delivery. No more guesswork with off brands. Get genuine parts with exact fit and true factory performance. Shop with confidence today at JeepPartsDeal.com.
The Dodge Ram 1500 Dimmer Switch functions as a critical control which enables drivers to manage different lighting features between high and low beam headlights and interior illumination brightness. The Dodge Ram 1500 Dimmer Switch stands as a performance-driven component which ensures optimal illumination across different driving environments for improved safety and comfort for all passengers and drivers. The Dimmer Switch designed for various Ram 1500 models has undergone design and feature changes through time as Dodge continues its focus on product innovation. Users can rely on the Dodge Ram 1500 Dimmer Switch because it demonstrates proven resistance to daily operating stress which guarantees its operational longevity. The automotive market selects this dimmer switch as a necessary component in Ram 1500 vehicles because it provides user-friendly controls together with exact light adjustment capabilities. The Dodge car Dimmer Switch offers a wide range of affordability from $10 to $510 in brand or warranty rates and installs for between $60 and $90, making it a critical yet affordable investment for sudden dimmer switch failures. The the automaker model part demonstrates the brand's commitment to excellence and performance which has established itself as a leading full-size pickup truck model.
Dodge Ram 1500 Dimmer Switch Parts and Q&A
- Q: How to Install a Dimmer Switch on Dodge Ram 1500?A:Before fitting the switch, disconnect the negative cable from the battery, let the SRS system discharge for two minutes and put caps to the ends of the disconnected Battery Cable. Place the multi-function switch into the mounting housing from the left side so the alignment pins are properly in place. Use two screws to hold the switch in the mounting housing, tighten them until they reach 2 Nm (approximately 20 in. lbs.) and attach the wire harness connector to the switch housing. Lift the lower shroud over the transmission and use a jack to keep it from rotating. Position it over the steering column and insert one center screw from below, tightening it to 2 Nm (20 in. lbs.). Cover the lower shroud with the upper shroud, ensuring the gap hider is snapped in if you have an automatic car and apply hand pressure to fit the two shrouds together. Apply two screws to join the upper shroud to the lower shroud, then tighten them to 2 Nm (20 in. lbs.). Place the tilt steering column knob upon the tilt adjuster actuator and secure it tightly with a 2 Nm (20 in. lbs.) screw. While putting the Steering Wheel back on, slide the yellow rubber booted engagement dowel into the Clock Spring rotor between the steering wheel armature hub fins. Attach the steering wheel again, snap the wire harness connections onto the upper Clock Spring connectors and make certain the harness is installed properly. Lastly, reinstall the driver air bag onto the steering wheel. After that, reconnect the battery negative cable.
- Q: How to Remove a Dimmer Switch on Dodge Ram 1500?A:Before removing the combination switch, turn off the Supplemental Restraint System (SRS) by removing the battery negative cable and waiting for two minutes so the system capacitor can discharge. The first step is to take out the air bag from the Steering Wheel and after that, remove all the steering wheel wire harness connectors from the two Clock Spring recesses on the dashboard. Screw the puller into the armature of the steering wheel so the bolts engage properly without injuring the Clock Spring. Take the wheel off the steering column, then separate the screw holding the tilt steering column knob and its knob from the tilt actuator on the left side after that. Withdraw the two screws under the steering column that keep the upper column shroud attached to the lower shroud and press both sides of the upper shroud to disengage the snap features. Lift the upper shroud aside from the steering column, then remove the screw in the middle of the lower shroud and the steering column and pull out the lower shroud. After disconnecting the wire harness connector at the back of the multi-function switch housing, take out the two screws that hold the switch to the multi-function switch mounting housing. After that, hold the switch control stalk and pull it toward the left of the car to uninstall the switch.


Related Dodge Ram 1500 Parts
 Dodge Ram 1500 Clock Spring
 Dodge Ram 1500 Ignition Lock Cylinder
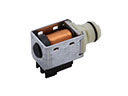 Dodge Ram 1500 Shift Solenoid
 Dodge Ram 1500 Air Bag Sensor
 Dodge Ram 1500 Brake Light Switch
 Dodge Ram 1500 Headlight Switch
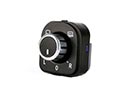 Dodge Ram 1500 Mirror Switch
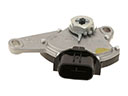 Dodge Ram 1500 Neutral Safety Switch
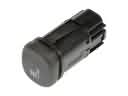 Dodge Ram 1500 Seat Heater Switch
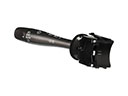 Dodge Ram 1500 Turn Signal Switch
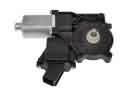 Dodge Ram 1500 Window Motor
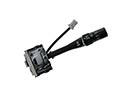 Dodge Ram 1500 Windshield Wiper Switch