JeepParts
My Garage
My Account
Cart
OEM Dodge Ram 1500 Van Crankshaft
Crank Shaft- Select Vehicle by Model
- Select Vehicle by VIN
Select Vehicle by Model
orMake
Model
Year
Select Vehicle by VIN
For the most accurate results, select vehicle by your VIN (Vehicle Identification Number).
2 Crankshafts found

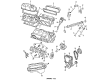
Dodge Ram 1500 Van Crankshaft Part Number: 53020601

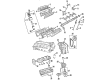
Dodge Ram 1500 Van Crankshaft Part Number: R4790759AB
Dodge Ram 1500 Van Crankshaft
Choose OEM Crankshaft that meet Dodge factory standards. Dodge designs and tests every component for precision and durability. Each Crankshaft follows strict manufacturing steps to lock in quality and fit. If your Dodge Ram 1500 Van matters to you, OEM parts make the smart choice. You'll get the exact look, feel, and performance you expect. Shop genuine Ram 1500 Van parts at the highly competitive prices online. Enjoy a manufacturer's warranty, a hassle-free return policy, and rapid delivery. No more guesswork with off brands. Get genuine parts with exact fit and true factory performance. Shop with confidence today at JeepPartsDeal.com.
Dodge Ram 1500 Van Crankshaft Parts and Q&A
- Q: How to service and repair the crankshaft on Dodge Ram 1500 Van?A:Before servicing or repairing the crankshaft, remove the oil pan and the oil pump. Before lifting the bearing caps, figure out which ones you have and then start to remove them along with the bearings individually. Remove the crankshaft from the engine block and throw away the rear and front crankshaft oil seals. Application involves greasing the edges of the upper rear oil seal with oil and then setting the seal into place with white markings to the rear of the engine. Set the crankshaft in the cylinder block, apply a little bit of oil to the new lower seal lips and attach the new lower rear bearing oil seal into the bearing cap with the white edge facing to the rear. Add a thin layer (5 mm or about 0.20 in.) of Loctite 518 to both surfaces of the bearing cap, ensure it's not touching the rubber seal and immediately install the bearing cap on the cylinder block. Place the bearing cap into alignment by using the cap slot, alignment dowel and cap bolts to avoid cutting too much material off and stop at two strikes at the rear cap for proper contact between parts. Clean the cap bolts and oil them, then fit the main bearing caps and finally tighten all the cap bolts alternately to 115 Nm or 85 ft. lbs. Replace the oil pump and apply a thin layer of Mopar Silicone Rubber Adhesive Sealant between the bearing cap and engine block. It should make a little extra come from the seal, so you can wipe it away from the oil pan. Lastly, fit the replacement front crankshaft oil seal, then the oil pan and lastly the new rear oil seal.
- Q: How to remove and install a crankshaft on Dodge Ram 1500 Van?A:Initially, take off the oil pan, then remove the oil pump from inside the rear main bearing cap. Mark the bearing caps before you remove them and take the bearings out one by one while the caps are off. Pull the crankshaft from its position in the block and get rid of both the rear and front crankshaft oil seals. Assembly is done by applying some engine oil to the new upper seal lips and setting the seal into place with the white spot on the rear. After placing the crankshaft into the cylinder block, put some oil on the lips of the new lower seal and set it into the rear of the bearing cap with the white paint facing rearward. Drop a 5 mm (0.20 inch) amount of Loctite 518 or similar on the sides of the rear main bearing cap, making sure not to get sealant on the rubber seal and join the bearing cap to the cylinder block immediately. Once the simulator is assembled, use the cutout slot, alignment bolt and -pin bolts to place the cap and make no more than two gentle strikes on the rear cap to ensure it works as required. Clean and grease all the cap bolts, then set all the main bearing caps and fasten them, alternating between bolts to tighten them to 115 Nm (85 ft. lbs.). Fit the oil pump in place and apply silicone rubber adhesive sealant or an alternate, to the joint between the bearing cap and block until a small amount of sealant comes out, then clean any surplus from the groove in the oil pan. Lastly, insert the new front crankshaft oil seal and right away reattach the oil pan.

Related Dodge Ram 1500 Van Parts
 Dodge Ram 1500 Van Camshaft
 Dodge Ram 1500 Van Cylinder Head
 Dodge Ram 1500 Van Engine Mount Bracket
 Dodge Ram 1500 Van Exhaust Valve
 Dodge Ram 1500 Van Harmonic Balancer
 Dodge Ram 1500 Van Intake Valve
 Dodge Ram 1500 Van Lash Adjuster
 Dodge Ram 1500 Van Motor And Transmission Mount
 Dodge Ram 1500 Van Pushrod
 Dodge Ram 1500 Van Rocker Arm
 Dodge Ram 1500 Van Timing Chain
 Dodge Ram 1500 Van Valve Cover Gasket