JeepParts
My Garage
My Account
Cart
OEM Dodge Ram 2500 Pitman Arm
Steering Pitman Arm- Select Vehicle by Model
- Select Vehicle by VIN
Select Vehicle by Model
orMake
Model
Year
Select Vehicle by VIN
For the most accurate results, select vehicle by your VIN (Vehicle Identification Number).
7 Pitman Arms found


Dodge Ram 2500 Pitman Arm Part Number: 68039930AA
$128.23 MSRP: $195.00You Save: $66.77 (35%)Ships in 1-2 Business Days

Dodge Ram 2500 Pitman Arm Part Number: 52122392AA
$133.80 MSRP: $202.00You Save: $68.20 (34%)Ships in 1-2 Business Days


Dodge Ram 2500 Pitman Arm Part Number: 52037624
$74.52 MSRP: $94.47You Save: $19.95 (22%)Ships in 1-2 Business Days
Dodge Ram 2500 Pitman Arm Part Number: 52038587
$88.24 MSRP: $111.86You Save: $23.62 (22%)Ships in 1-2 Business Days
Dodge Ram 2500 Pitman Arm Part Number: 52037627

Dodge Ram 2500 Pitman Arm Part Number: 68069795AA

Dodge Ram 2500 Pitman Arm Part Number: 68307383AA
Dodge Ram 2500 Pitman Arm
Choose OEM Pitman Arm that meet Dodge factory standards. Dodge designs and tests every component for precision and durability. Each Pitman Arm follows strict manufacturing steps to lock in quality and fit. If your Dodge Ram 2500 matters to you, OEM parts make the smart choice. You'll get the exact look, feel, and performance you expect. Shop genuine Ram 2500 parts at the highly competitive prices online. Enjoy a manufacturer's warranty, a hassle-free return policy, and rapid delivery. No more guesswork with off brands. Get genuine parts with exact fit and true factory performance. Shop with confidence today at JeepPartsDeal.com.
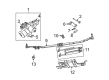
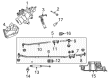
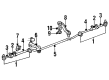
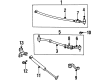
Pitman Arm is an important component of Dodge Ram 2500 vehicles' steering system that means it has a function of changing rotary movements into the linear one so that the wheel of the car can be controlled with high degree of accuracy. It connects the steering box sector shaft to the drag link so as to provide good response and increase safety on the road. Through production of Dodge Ram 2500, various forms of Pitman Arm have been incorporated over the years starting from the initial forms to the latest ones. The earlier models of Pitman Arms had simple wooden setup with simple bushes while the modern Pitman Arms are made of steel with ball joints and bearings for better performance and longevity. The distinctions between these types consist of the found materials and lower parts, which determine dependability and sensitiveness of these auto parts in controlling.
Dodge Ram 2500 Pitman Arm Parts and Q&A
- Q: How to Service and Repair a Pitman Arm on Dodge Ram 2500?A:Begin servicing and repairing the Pitman Arm by removing the nut on the tie-rod and then detach the tie-rod end ball studs from the Steering Knuckles with the right pulling tool. After that, remove the tie-rod ends from the center link and undo the stud bolt from the idler arm link using a suitable puller and then, unbolt the idler arm from the frame bracket. Take the pitman arm ball stud off the center link, then mark the pitman arm and shaft to guide installation after you remove the pitman arm with Puller C-4150A. Assemble the idler arm and fasten it with the bolt that connects to the frame bracket. Align the steering gear to the marks shown and install the pitman arm, then set the lock washer and retaining nut on the pitman shaft at 251 Nm (185 ft. lbs.). Put the center link onto the ball studs and secure them by tightening the retaining nuts as much as needed. Mount the tie-rod ends onto the center link, secure them by turning the nuts to 88 Nm (65 ft. lbs.) and insert new cotter pins. Next, set the tie-rod ends into the steering knuckles and make sure nuts are tightened to 108 Nm (80 ft. lbs.). Once the supports are gone and the vehicle lowered, turn the center of the Steering Wheel and check the toe, making sure the clamp on the sleeve is on the bottom with the bolt. The last step is to tighten the tie-rod adjustment sleeve clamp bolt to 61 Nm (45 ft. lbs.).
- Q: How to Properly Install and Adjust a Pitman Arm on Dodge Ram 2500?A:Place the component so the reference marks on it meet up and then put in the pitman arm. After that, place the lock washer and retaining nut over the pitman shaft, torquing the nut to a force of 251 Nm (185 ft. lbs.). Attach the drag link to the pitman arm, then place the nut, tighten it to 54 Nm (40 ft. lbs.) and move it another 90° afterwards. After you've set aside the supports, lower the car to the road, turn the Steering Wheel to center and set the toe. To finish, use a torque wrench to tighten the tie rod adjustment sleeve clip bolts by 61 Nm (45 ft. lbs.), so that the clamp's retaining bolt is on the bottom side.

Related Dodge Ram 2500 Parts
 Dodge Ram 2500 Power Steering Pump
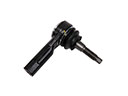 Dodge Ram 2500 Tie Rod
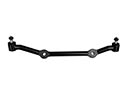 Dodge Ram 2500 Center Link
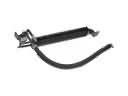 Dodge Ram 2500 Power Steering Cooler
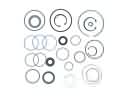 Dodge Ram 2500 Power Steering Gear Seal
 Dodge Ram 2500 Power Steering Reservoir
 Dodge Ram 2500 Rack & Pinion Bushing
 Dodge Ram 2500 Rack And Pinion
 Dodge Ram 2500 Steering Gear Box
 Dodge Ram 2500 Tie Rod Adjusting Sleeve
 Dodge Ram 2500 Tie Rod Bushing
 Dodge Ram 2500 Tie Rod End