JeepParts
My Garage
My Account
Cart
OEM Dodge Ram 2500 Van Exhaust Valve
Exhaust Muffler Valve- Select Vehicle by Model
- Select Vehicle by VIN
Select Vehicle by Model
orMake
Model
Year
Select Vehicle by VIN
For the most accurate results, select vehicle by your VIN (Vehicle Identification Number).
1 Exhaust Valve found

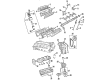
Dodge Ram 2500 Van Exhaust Valve Part Number: 53006724
Dodge Ram 2500 Van Exhaust Valve
Choose OEM Exhaust Valve that meet Dodge factory standards. Dodge designs and tests every component for precision and durability. Each Exhaust Valve follows strict manufacturing steps to lock in quality and fit. If your Dodge Ram 2500 Van matters to you, OEM parts make the smart choice. You'll get the exact look, feel, and performance you expect. Shop genuine Ram 2500 Van parts at the highly competitive prices online. Enjoy a manufacturer's warranty, a hassle-free return policy, and rapid delivery. No more guesswork with off brands. Get genuine parts with exact fit and true factory performance. Shop with confidence today at JeepPartsDeal.com.
Dodge Ram 2500 Van Exhaust Valve Parts and Q&A
- Q: How to service and repair the Exhaust Valve and Intake Valve on Dodge Ram 2500 Van?A:The first step to work on the valve is to take out the cylinder head. Wrap the valve springs with the MD-998772A and 6716A adaptor, compress them using the tool and then unscrew the valve retaining locks, remove the valve spring retainers, valve stem seals and valve springs. It is important to remove all burrs from the valve stem grooves so the valve guides remain safe and to identify each valve so it is installed properly later. Clean the valves very well, removing and replacing any that are damaged with cracks, burns or warping. Get rid of carbon and varnish inside the valve guides using a cleaner you can trust. Take note of the stem-to-valve gap on the bent-tip gauge. If it's more than 0.051 mm (0.002 inch), fit a new valve. Oil the valve stems and slide them into the appropriate holes of the cylinder head. When you discover the valves or seats have been ground, check the valve height and alter the cylinder head when the valve is too tall. Install new seals on each valve guide and then add the valve springs and their retainers. Put the Valve Spring Compressor Tool MD-998772A and the adapter 6716A together, press in the valve springs, secure the locks and use the tool handle to let go. If the valves and buttons have been ground, measure the spring's installed height with spring, seat against seat or top of spacer to its retainer. Place a spacer in the head counterbore if the spring's height surpasses 42.86 mm (1-11/16 inches) to return the spring height to 41.27 to 42.86 mm (1-5/8 to 1-11/16 inch). The final step is to fix the cylinder head in place.

Related Dodge Ram 2500 Van Parts
 Dodge Ram 2500 Van Camshaft
 Dodge Ram 2500 Van Crankshaft
 Dodge Ram 2500 Van Cylinder Head
 Dodge Ram 2500 Van Dipstick
 Dodge Ram 2500 Van Intake Valve
 Dodge Ram 2500 Van Lash Adjuster
 Dodge Ram 2500 Van Motor And Transmission Mount
 Dodge Ram 2500 Van Oil Pan
 Dodge Ram 2500 Van Pushrod
 Dodge Ram 2500 Van Rocker Arm
 Dodge Ram 2500 Van Timing Chain
 Dodge Ram 2500 Van Timing Cover Gasket