JeepParts
My Garage
My Account
Cart
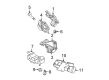
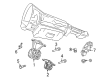
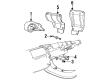
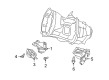
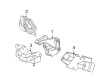
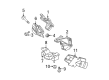
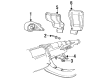
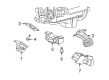
OEM Dodge Ram 3500 Engine Mount
Engine Motor Mount- Select Vehicle by Model
- Select Vehicle by VIN
Select Vehicle by Model
orMake
Model
Year
Select Vehicle by VIN
For the most accurate results, select vehicle by your VIN (Vehicle Identification Number).
40 Engine Mounts found


Dodge Ram 3500 Transmission Mount Part Number: 52021470AD
$81.34 MSRP: $124.00You Save: $42.66 (35%)


Dodge Ram 3500 Motor Mount, Driver Side Part Number: 52121815AC
$255.26 MSRP: $387.00You Save: $131.74 (35%)

Dodge Ram 3500 Motor Mount, Passenger Side Part Number: 52122710AA
$145.99 MSRP: $219.00You Save: $73.01 (34%)Ships in 1-2 Business Days

Dodge Ram 3500 Transmission Mount Part Number: 52122843AG
$220.11 MSRP: $327.00You Save: $106.89 (33%)


Dodge Ram 3500 Motor Mount Part Number: 52021490AC
$521.07 MSRP: $548.00You Save: $26.93 (5%)Ships in 1-2 Business Days


Dodge Ram 3500 Support Bracket Part Number: 52121774AF
$128.78 MSRP: $171.00You Save: $42.22 (25%)Ships in 1-2 Business Days


Dodge Ram 3500 Transmission Mount Bracket Part Number: 52121486AE
$131.33 MSRP: $174.00You Save: $42.67 (25%)


Dodge Ram 3500 Motor Mount Part Number: 52018237
$172.58 MSRP: $218.78You Save: $46.20 (22%)Ships in 1-2 Business Days
Dodge Ram 3500 Motor Mount Part Number: 52021713AB
$113.42 MSRP: $171.00You Save: $57.58 (34%)Ships in 1-2 Business Days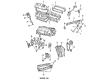
Dodge Ram 3500 Front Mount Part Number: 52020229
$88.88 MSRP: $131.00You Save: $42.12 (33%)Ships in 1-2 Business Days

Dodge Ram 3500 Motor Mount, Passenger Side Part Number: 68290111AA
$102.19 MSRP: $152.00You Save: $49.81 (33%)
Dodge Ram 3500 Rear Mount Part Number: 52020251AA
$118.97 MSRP: $176.00You Save: $57.03 (33%)


Dodge Ram 3500 Rear Mount Part Number: 52058218


Dodge Ram 3500 Engine Support, Driver Side Part Number: 52121507AB


Dodge Ram 3500 Motor Mount Part Number: 52021712AA


Dodge Ram 3500 Motor Mount Part Number: 52018236


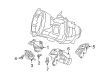
Dodge Ram 3500 Front Mount Part Number: 52122714AB


Dodge Ram 3500 Engine Support, Driver Side Part Number: 52121505AC


Dodge Ram 3500 Motor Mount, Passenger Side Part Number: 52020604AD


Dodge Ram 3500 Motor Mount Part Number: 52021491AC
| Page 1 of 2 |Next >
1-20 of 40 Results
Dodge Ram 3500 Engine Mount
Choose OEM Engine Mount that meet Dodge factory standards. Dodge designs and tests every component for precision and durability. Each Engine Mount follows strict manufacturing steps to lock in quality and fit. If your Dodge Ram 3500 matters to you, OEM parts make the smart choice. You'll get the exact look, feel, and performance you expect. Shop genuine Ram 3500 parts at the highly competitive prices online. Enjoy a manufacturer's warranty, a hassle-free return policy, and rapid delivery. No more guesswork with off brands. Get genuine parts with exact fit and true factory performance. Shop with confidence today at JeepPartsDeal.com.
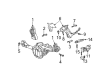
The Engine Mount in Dodge Ram 3500 vehicles serves two primary functions: It isolates acoustic and any form of mechanical interference from the operation of the engine and gives firm support to the place of the engine within the chassis. This positioning is necessary for secure operation of a vehicle and to ensure components are not harmed. Different Engine Mounts have been used in Dodge Ram 3500 models starting with the conventional rubber Engine Mounts through the fluid-filled hydraulic Engine Mounts to the new age active electronic Engine Mounts. Traditional mounts have metal parts with rubber spacers sandwiched in between while hydraulic type provide more damping. The newest active mounts change their stiffness with the help of mechanical devices depending on the engine's revolutions per minute, thus improving the vehicle's performance. Dodge Ram 3500 Engine Mounts can only be poor with time, heat or if they have been exposed to fluid and some of the signs include, noise and vibration. They must be well inspected and maintained for them to effectively perform the task and for them to have many years of use.
Dodge Ram 3500 Engine Mount Parts and Q&A
- Q: How to Service and Repair an Engine Mount for 2WD and 4WD for Front on Dodge Ram 3500?A:Place the insulator on the engine and add some Mopar(R) Lock & Seal Adhesive, Medium Strength Threadlocker to the mount's bolts in the engine block and to the left bracket bolts connecting to the front axle. After that, install the upper and lower mounting bolts, tighten them until you reach 61 Nm (45 ft. lbs.). Set the engine on the engine supports with 8534B special tool, then mount and secure it with the bolts on each side to a torque of 61 Nm (45 ft. lbs.). Lastly, bring the vehicle down, hook up the negative cable to the battery and put the other end into the frame. When fitting a 4WD, install the engine mounts on each front side of the axle and tighten them with 94 Nm (70 ft. lbs.) of torque. Bring the front axle up into the frame and attach the left and right side through bolts, putting in nuts and tightening them to 94 Nm (70 ft. lbs.). Put the two upper through bolts into the engine mounts and add only a small amount of nuts to hold them in place. Support the engine on the engine support cross member using engine support fixture special tool 8534B, so the engine brackets are on the bolts and its mounts are lined up with the lower engine bracket holes, as well as the left engine bracket holes and those of the front axle. Use the bolts loosely to join the front axle to the engine bracket, as well as the lower bolts. Tighten the nuts on the four through bolts and the three axle bolts to the left engine bracket to 101 Nm (75 ft. lbs.). After removal, place the Oil Filter in and install the front crossmember and skid plate. Whip off the car and attache the negative Battery Cable again.
- Q: How to install an engine mount on Dodge Ram 3500?A:You should put threadlocking compound on the bolts before fitting the rear engine mount. First, set the bolts that link the Transmission Mount to the transmission bracket, tightening each to 61 Nm (45 ft.lbs.); be sure to tighten them in a cross pattern pattern. After that, move the transmission back to its gap using a thin piece of metal so that the transmission's mount fits on the crossmember and its studs are in the correct place in the slots. Then take a nut, install it onto the stud on the transmission mount, access it through the crossmember hole and tighten until you reach 54 Nm (40 ft. lbs.).


Related Dodge Ram 3500 Parts
 Dodge Ram 3500 Camshaft
 Dodge Ram 3500 Camshaft Bearing
 Dodge Ram 3500 Camshaft Seal
 Dodge Ram 3500 Crankshaft Thrust Washer
 Dodge Ram 3500 Oil Pan Gasket
 Dodge Ram 3500 Pushrod
 Dodge Ram 3500 Rocker Arm
 Dodge Ram 3500 Rocker Arm Pivot
 Dodge Ram 3500 Timing Chain
 Dodge Ram 3500 Timing Cover
 Dodge Ram 3500 Timing Cover Gasket
 Dodge Ram 3500 Valve Stem Seal