JeepParts
My Garage
My Account
Cart
OEM Dodge Sprinter 2500 Exhaust Valve
Exhaust Muffler Valve- Select Vehicle by Model
- Select Vehicle by VIN
Select Vehicle by Model
orMake
Model
Year
Select Vehicle by VIN
For the most accurate results, select vehicle by your VIN (Vehicle Identification Number).
3 Exhaust Valves found

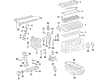
Dodge Sprinter 2500 Exhaust Valve Part Number: 5117402AA
$9.44 MSRP: $43.30You Save: $33.86 (79%)Ships in 1-2 Business Days
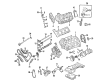
Dodge Sprinter 2500 Exhaust Valve Part Number: 68005657AA
$6.27 MSRP: $36.00You Save: $29.73 (83%)Ships in 1-2 Business Days

Dodge Sprinter 2500 Exhaust Valve Part Number: 5175397AA
Dodge Sprinter 2500 Exhaust Valve
Choose OEM Exhaust Valve that meet Dodge factory standards. Dodge designs and tests every component for precision and durability. Each Exhaust Valve follows strict manufacturing steps to lock in quality and fit. If your Dodge Sprinter 2500 matters to you, OEM parts make the smart choice. You'll get the exact look, feel, and performance you expect. Shop genuine Sprinter 2500 parts at the highly competitive prices online. Enjoy a manufacturer's warranty, a hassle-free return policy, and rapid delivery. No more guesswork with off brands. Get genuine parts with exact fit and true factory performance. Shop with confidence today at JeepPartsDeal.com.
The Dodge Sprinter 2500 Exhaust Valve is a major subassembly that brings a lot to the table regarding dependability and power of the vehicle. Serving the purpose of getting rid of the burnt exhaust gases from the engine cylinders in an efficient manner, Exhaust Valve is one of the most important parts that define the efficient working of the engine. Depending on the extent of the damage, this part can cause problems like low power output, poor engine combustion or inadequate fuel efficiency hence the need to consider a regular check-up on the part. There are, of course, several models compatible with the Dodge Sprinter 2500 vehicle, and the Exhaust Valve of each model boasts of intricate designs that improve the vehicle's performance alongside its safety. The various engines used in the Dodge Sprinter 2500 includes 2.3L I4 OM601 Diesel, 3.0L V6 OM666 Diesel, 4.0L V6 OM612 Diesel and the powerful five cylinder 2.7 liter Mercedes turbo-diesel, hence the Exhaust Valve is optimized for all the variants. This feature alone increases the fuel efficiency of vehicles and at the same time increases the ease of handling of automobiles making this favorite of drivers and dealers. New to the automotive market is the Dodge Sprinter 2500 which can be easily identified by the good workmanship that is associated with Dodge nameplate. Additional qualities of the Exhaust Valve like it is sturdy, very well engineered add to its reliability. Therefore, the Dodge Sprinter 2500 Exhaust Valve is critical for preserving the vehicle's performance, energy, and security making it one of the crucial parts in the Dodge brand family.
Dodge Sprinter 2500 Exhaust Valve Parts and Q&A
- Q: How to Service and Repair Exhaust Valve and Intake Valves in an Engine on Dodge Sprinter 2500?A:Before fixing the valves, first remove the negative Battery Cable and remove both the engine cover and the cylinder head. Before you remove the valves, mark where each valve is in the cylinder head so you don't risk setting them incorrectly and harming the engine during reassembly. Place the retaining fork onto the threaded edge of the cylinder head, using a tool and slide the thrust piece up into the valve spring retainer. With the valve spring secured in a compressor, take out the valve collets, top valve spring retainer, valve spring and valve stem seals. Run through these steps for every valve that needs repair, ensuring you keep the valves, springs and retainers together the same way they were taken out. Inspect every component of the valves after you remove them to look for any kind of damage or wear and change them if that is the case. Build up the assembly in the cylinder head again, starting with the valves, then adding the lower valve spring retainer, the valve stem seal, valve spring and valve spring retainer and checking that the valve keepers are fitted properly. Repeat the process for every valve by compressing the valve spring, installing the valve keepers and letting go of the screw. Once you have finished the valve assembly, put the cylinder head on the engine block, add the Glow Plugs and link up the negative battery cable. When the engine is turned on, watch your movements carefully and never directly touch the fan, any close parts like belts or pulleys or the fan belt, all while wearing clothes that have close fits. Turn on the car, be on the lookout for leaks, keep an eye on the fuel system symbols and attach the engine cover after that.

Related Dodge Sprinter 2500 Parts
 Dodge Sprinter 2500 Crankshaft Pulley
 Dodge Sprinter 2500 Crankshaft Thrust Washer
 Dodge Sprinter 2500 Cylinder Head
 Dodge Sprinter 2500 Intake Valve
 Dodge Sprinter 2500 Lash Adjuster
 Dodge Sprinter 2500 Oil Pan
 Dodge Sprinter 2500 Piston Ring Set
 Dodge Sprinter 2500 Rocker Arm
 Dodge Sprinter 2500 Timing Chain Tensioner
 Dodge Sprinter 2500 Timing Cover
 Dodge Sprinter 2500 Transmission Mount
 Dodge Sprinter 2500 Variable Timing Sprocket