JeepParts
My Garage
My Account
Cart
OEM Dodge Sprinter 2500 Crankshaft Seal
- Select Vehicle by Model
- Select Vehicle by VIN
Select Vehicle by Model
orMake
Model
Year
Select Vehicle by VIN
For the most accurate results, select vehicle by your VIN (Vehicle Identification Number).
4 Crankshaft Seals found


Dodge Sprinter 2500 Crankshaft Seal, Front Part Number: 5073675AB
$54.04 MSRP: $79.25You Save: $25.21 (32%)Ships in 1-2 Business Days
Dodge Sprinter 2500 Rear Main Seal Retainer Part Number: 68054474AA

Dodge Sprinter 2500 Rear Main Seal Retainer Part Number: 5073887AC

Dodge Sprinter 2500 Rear Main Seal Retainer Part Number: 68238383AA
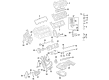
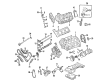
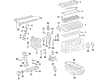
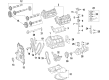
Dodge Sprinter 2500 Crankshaft Seal
Choose OEM Crankshaft Seal that meet Dodge factory standards. Dodge designs and tests every component for precision and durability. Each Crankshaft Seal follows strict manufacturing steps to lock in quality and fit. If your Dodge Sprinter 2500 matters to you, OEM parts make the smart choice. You'll get the exact look, feel, and performance you expect. Shop genuine Sprinter 2500 parts at the highly competitive prices online. Enjoy a manufacturer's warranty, a hassle-free return policy, and rapid delivery. No more guesswork with off brands. Get genuine parts with exact fit and true factory performance. Shop with confidence today at JeepPartsDeal.com.
The Dodge Sprinter 2500 Crankshaft Seal is a part with a very good positive reputation and is among the vital elements in the engine scheme. This Crankshaft Seal is situated at the leading part of the engine and its function is to stop oil leak from the crankcase which is crucial for lubricating some of the major components of the engine and in turn, diminish the friction and wear and tear. The Dodge Sprinter 2500 has many models that have passed through the years, and are usable with certain models of Crankshaft Seals; however, the general purpose of the Crankshaft Seals is to encourage better performance and safety to the engine. A faulty Crankshaft Seal may cause oil leakage, especially in used vehicles; therefore, replacement is critical for the Dodge Sprinter 2500's long life and efficiency. This light commercial vehicle is manufactured by Mercedes-Benz and is badged as Dodge, it available in different body styles and is also available with a powerful 2.7-liter turbo-diesel engine. The Dodge Sprinter 2500 is easily distinguishable in the automotive market due to aspects such as the fuel efficiency and easy to navigate characteristics of the vehicle as well as the quality of the manufacturing which includes the Dodge label on the vehicle. The Dodge Sprinter 2500 Crankshaft Seal spans across the different automobiles that it caters to in terms of vans and pickups, thus, it is an important component that functions as an additional plus to the basic operation of the automobiles.
Dodge Sprinter 2500 Crankshaft Seal Parts and Q&A
- Q: How to Install a Crankshaft Seal on Dodge Sprinter 2500?A:Place the crankshaft seal into the front cover and after that, mount the front cover.
- Q: How to Service and Repair a Rear Crankshaft Seal on Dodge Sprinter 2500?A:Before servicing or repairing the crankshaft oil seal at the rear, remove the transmission from the vehicle. Collected six screws from the top and bottom of the gear case, then disconnect the negative battery, raise the car and drain the engine oil. All Oil Pan bolts should be loosened before removing the rear main oil seal and cover to save the gasket from any harm; check the oil pan gasket for damage and if it's broken, replace the oil pan and the gasket. After that, get rid of the Flywheel while being careful not to harm the oil pan gasket when you get rid of the rear main seal and adaptor assembly. Loose the bolts holding the rear main seal/adaptor and gently lift the adaptor out of the crankcase from its shoulders. Before installing, wash all areas where parts meet with suitable cleansers. Fit the rear main seal/adaptor onto the assembly sleeve so its seal lip is not bent or folded along the edge of the tool. Assemble the gasket onto the housing of the assembly sleeve and place this on top of the crankshaft, ensuring the dowel sleeves don't press into the oil pan gasket. After installing the rear main seal/adaptor to the crankcase bolts and locking with 9 Nm (80 inch lbs.) of force, lock the M6 and M8 bolts to 9 Nm (80 inch lbs.) and 20 Nm (15 ft. lbs.), respectively. The first stage is to tighten the flywheel's bolts to 45 Nm (33 ft. lbs.) and then go back and tighten them to 90 Nm (66 ft. lbs.). Apply the oil pan drain plug and tighten it to 25 Nm (18 ft. lbs.), lower the car and add the right amount of engine oil to the recommended level. Then, connect the negative Battery Cable carefully, exercise care while the engine is on, touch nothing near the pulleys, belts or fan and start the engine to see if leaking continues.

Related Dodge Sprinter 2500 Parts
 Dodge Sprinter 2500 Crankshaft
 Dodge Sprinter 2500 Crankshaft Thrust Washer
 Dodge Sprinter 2500 Cylinder Head
 Dodge Sprinter 2500 Dipstick
 Dodge Sprinter 2500 Exhaust Valve
 Dodge Sprinter 2500 Harmonic Balancer
 Dodge Sprinter 2500 Motor And Transmission Mount
 Dodge Sprinter 2500 Oil Filter
 Dodge Sprinter 2500 Oil Pan
 Dodge Sprinter 2500 Oil Pan Gasket
 Dodge Sprinter 2500 Transmission Mount
 Dodge Sprinter 2500 Variable Timing Sprocket