JeepParts
My Garage
My Account
Cart
OEM Dodge Sprinter 2500 Piston
Engine Pistons- Select Vehicle by Model
- Select Vehicle by VIN
Select Vehicle by Model
orMake
Model
Year
Select Vehicle by VIN
For the most accurate results, select vehicle by your VIN (Vehicle Identification Number).
5 Pistons found

Dodge Sprinter 2500 Piston Part Number: 5161392AB

Dodge Sprinter 2500 Piston Part Number: 68013987AB

Dodge Sprinter 2500 Piston Part Number: 68034366AA
Dodge Sprinter 2500 Piston Part Number: 68013996AB
Dodge Sprinter 2500 Piston Part Number: 68005596AA
Dodge Sprinter 2500 Piston
Choose OEM Piston that meet Dodge factory standards. Dodge designs and tests every component for precision and durability. Each Piston follows strict manufacturing steps to lock in quality and fit. If your Dodge Sprinter 2500 matters to you, OEM parts make the smart choice. You'll get the exact look, feel, and performance you expect. Shop genuine Sprinter 2500 parts at the highly competitive prices online. Enjoy a manufacturer's warranty, a hassle-free return policy, and rapid delivery. No more guesswork with off brands. Get genuine parts with exact fit and true factory performance. Shop with confidence today at JeepPartsDeal.com.
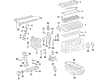
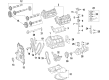
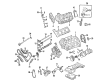
The Dodge Sprinter 2500 Piston is the solid hub of the automotive industry and is responsible for translating combustion power into kinematics energy which is required for the motion and mobility of the vehicle. This element plays the key role of reciprocating force from expanding gase, making the crankshaft's performance better at Dodge Sprinter 2500. Made from quality material such as aluminum alloy, the Piston is made for withstanding diverse engine types eligible for the Dodge Sprinter 2500 models. Because it can work with different engine configuration like the 2.3L I4 OM601 Diesel and 2.7L Mercedes turbo-diesel it can increase the efficiency and safety of the vehicle up to the expectations of the clients. The Dodge Sprinter 2500 Piston is responsible for regulating side loads, oil, and gasses which enhance the vehicle's fuel efficiency and agility. However, among these it is necessary to locate one of the Piston key advantages for the automotive market - the use of lightweight and at the same time very durable material, providing high Rpm levels. Due to its application on different configurations such as cargo vans, chassis cabs, and minibuses, the Dodge Sprinter 2500 remains a go-to choice for business purposes, and it enshrines the brand reputation inherent to the Dodge brand. Finally, the Dodge Sprinter 2500 Piston plays an important part in the car's reputation as a dependable vehicle that can offer great performance as well as operating on the principle of efficiency.
Dodge Sprinter 2500 Piston Parts and Q&A
- Q: How to Properly Install a Piston and Connecting Rod on Dodge Sprinter 2500?A:Make sure to first install the piston rings and carefully check the connecting rod bearing cap bolts; if you find any with necked threads, change them out. Verify the connecting rod bolts for necking by bringing a straight edge or scale to their threads and change out any bolt that doesn't make contact with the tool. Take a measurement and swap any connecting rod bolts that measure longer than 40.5 mm (1.590 in.). Adjust the compression ring gaps so they do not line up with the oil ring rail gap as you place the piston head and rings in clean engine oil. Pull the comuster unit over the ring area and tighten the bolts with the special wrench to maintain the ring positions. Apply the connecting rod bolt protectors and then turn the Crankshaft to put the connecting rod journal right over the cylinder bore. Slide both the rod and piston into the cylinder bore, directing the rod onto the crankshaft journal, with the arrow on the piston facing the front of the engine and the oil squirt hole facing the big thrust side of the bore. Guide the connecting rod onto the connecting rod journal and use the piston to tap it into the cylinder bore with a hammer handle. Install the rod caps with the cleaned connecting-rod bolts and tighten them to 27 Nm (20 ft. lbs.), turning them an extra 1/4 turn. After that, set the upper Oil Pan, lower oil pan, right cylinder head and left cylinder head in place.
- Q: How to Remove and Replace a Piston and Its Connecting Rod on Dodge Sprinter 2500?A:First, detach the negative Battery Cable, then come down and pull off the engine, cylinder head and Oil Pan. Apply pressure to the chain tensioner as you take the Oil Pump chain off the oil pump and only then remove the oil pump. Label the connecting rod and the connecting rod bearing cap on the inlet side and then remove the cap, so you do not mix up the top and bottom bearing shells. Do not remove the connecting rod bearing shell and bearing cap from together as long as they are marked. If pistons are in place, remove carbon from around the arrows and draw over them with a pencil if required. Take out the piston and connecting rod through the engine at the top, ensuring you protect the piston. Take out the piston pin's circle clip and press on the piston pin to remove it from the piston and connecting rod bushing, check the connecting rod for any visible wear or damage. While installing, push the piston into the cylinder bore and coat both the piston pin and the connecting rod bushing with clean engine oil. Make sure you put the connecting rod in place so its mark points toward the inlet side and the arrow faces where the piston will move. Put the piston pin into the bore by hand and make sure the circle clip on the piston pin lines up with the groove in the piston. Use clean engine oil to wipe down the cylinder bores, connecting rod bearing journals, connecting rod bearing shells and pistons, with the piston rings spaced about 120° apart. Cover the piston and rings with a ring compressor and tighten it so the ring position remains unchanged. Be sure to move the crankshaft enough so the connecting rod doesn't contact the connecting rod journal when pushing the piston onto the bore. Make sure the connecting rod mark is toward the inlet side and the arrow is facing the side the rotor will travel into. Wipe the bolts connecting the rods and check that the correct top and bottom bearing shells are used. Make sure the locks of the connecting rod bearing shells are put into the parts of connecting rod bearing cap where they belong. Add the connecting rod bearing shell to the bearing cap, putting them both so the marks are aligned, then fasten the bearing cap with bolts in stages of 5 Nm, 25 Nm and 90° of extra tightness. Turn the crankshaft completely and check the clearance before putting on the oil pump, engine oil pan and oil pan drain plug. Set the cylinder head gasket at its regular or repair thickness according to the piston height, measure the piston's height and finish with cylinder head and engine installation. Pour in the correct engine oil to the right amount in the crankcase and fill the cooling system with the correct coolant. After that, put the negative battery cable back on, start the engine and look for signs of leakage. Care should be taken not to touch the fan, pulleys, belts or their surroundings while the engine is running.


Related Dodge Sprinter 2500 Parts
 Dodge Sprinter 2500 Camshaft
 Dodge Sprinter 2500 Crankshaft Pulley
 Dodge Sprinter 2500 Crankshaft Thrust Washer
 Dodge Sprinter 2500 Lash Adjuster
 Dodge Sprinter 2500 Oil Pan
 Dodge Sprinter 2500 Oil Pump
 Dodge Sprinter 2500 Rocker Arm
 Dodge Sprinter 2500 Timing Chain
 Dodge Sprinter 2500 Timing Cover Gasket
 Dodge Sprinter 2500 Transmission Mount
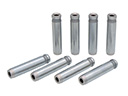 Dodge Sprinter 2500 Valve Guide
 Dodge Sprinter 2500 Valve Stem Seal