JeepParts
My Garage
My Account
Cart
OEM Dodge Sprinter 3500 Clock Spring
Spiral Cable Clock Spring- Select Vehicle by Model
- Select Vehicle by VIN
Select Vehicle by Model
orMake
Model
Year
Select Vehicle by VIN
For the most accurate results, select vehicle by your VIN (Vehicle Identification Number).
2 Clock Springs found


Dodge Sprinter 3500 Clockspring Part Number: 5104089AA


Dodge Sprinter 3500 Clockspring Part Number: 68029347AA
Dodge Sprinter 3500 Clock Spring
Choose OEM Clock Spring that meet Dodge factory standards. Dodge designs and tests every component for precision and durability. Each Clock Spring follows strict manufacturing steps to lock in quality and fit. If your Dodge Sprinter 3500 matters to you, OEM parts make the smart choice. You'll get the exact look, feel, and performance you expect. Shop genuine Sprinter 3500 parts at the highly competitive prices online. Enjoy a manufacturer's warranty, a hassle-free return policy, and rapid delivery. No more guesswork with off brands. Get genuine parts with exact fit and true factory performance. Shop with confidence today at JeepPartsDeal.com.
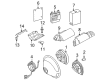
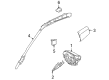
As part of the Supplemental Restraint System (SRS) the Dodge Sprinter 3500 Clock Spring functions as a vital component which allows the airbag module to connect reliably to electrical vehicle components. Airbag deployment efficiency during car collisions relies heavily on this connection which results in major enhancements of passenger safety. Engineers designed the Dodge Sprinter 3500 Clock Spring with flat multicore cable coils that keep the system elastic upon wheel turns thus ensuring proper functionality. The airbag system maintenance integrity finds support in the broad compatibility range spanning Dodge Sprinter 3500 models from 2003 to 2009. The Dodge Sprinter 3500 Clock Spring has established itself as a dependable component that undergoes different material transformations which affect its operational performance throughout time. The safety benefits alongside the improved vehicle performance are two essential functions that this component enables while supporting the key operational systems of the vehicle. Special design aspects and superior durability of the Dodge Sprinter 3500 Clock Spring distinguish this component in the automotive market. Any owner of a the automaker model should invest in a quality Clock Spring since the replacement expenses span between $50 and $400.
Dodge Sprinter 3500 Clock Spring Parts and Q&A
- Q: How Does a Clock Spring Function and How to Properly Center During Installation on Dodge Sprinter 3500?A:The Clock Spring is set up to turn and unwind, in response to the driver's wheel movements, for about six to seven full revolutions from each parking stop. If the Clock Spring is centered properly, the rotor can rotate three to three and one-half times in both directions without breaking. When either the Clock Spring or steering column is no longer connected, pulling the Clock Spring tape can cause it to shift, so it must be re-centered to ensure no damage occurs. Service Clock Springs are supplied with the hole for mounting screws pre-centered so that you just need to back out the screws enough to fit the access holes on top of the rotor. You shouldn't tighten these screws until you have installed the Clock Spring on the steering column. If you tighten them earlier, the Clock Spring will need to be centered manually again. Turn the Steering Wheel until both front wheels face straight on. Put the front wheels straight in front, take out the Clock Spring from the steering column and complete the tightening of its two mounting screws into the case. Reverse the Clock Spring rotor counterclockwise until it stops at its maximum point, then turn it three to three and one-half rotations clockwise to place the clearance holes around the mounting screws. Turn the screws slightly to expand into the holes near the rotor, so the clutch doesn't shift and then gently attach the Clock Spring to the steering column while ensuring the front wheels are straight.
- Q: How to Safely Remove a Clock Spring Assembly on Dodge Sprinter 3500?A:Before you uninstall the Clock Spring Assembly, cut the Battery Cable to block the supplemental restraint system and give it two minutes to make sure all its power is drained. Move the Steering Wheel to the center point and stop the shaft from turning. Afterwards, remove the steering wheel from the Steering Shaft. If necessary, attach the Clock Spring rotor to the Clock Spring case, because it helps maintain centering until everything is put back together. Open the steering column by removing the three screws that hold the Clock Spring and multi-function switch and remove the Clock Spring after that. A replacement power supply is required if the Clock Spring turns out to be defective, damaged or if the driver air bag has been released.


Related Dodge Sprinter 3500 Parts
 Dodge Sprinter 3500 Air Bag Control Module
 Dodge Sprinter 3500 Air Bag Sensor
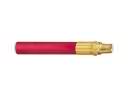 Dodge Sprinter 3500 Air Hose
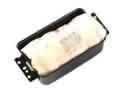 Dodge Sprinter 3500 Airbag
 Dodge Sprinter 3500 Antenna
 Dodge Sprinter 3500 Engine Control Module
 Dodge Sprinter 3500 Ignition Lock Assembly
 Dodge Sprinter 3500 Parking Assist Sensor
 Dodge Sprinter 3500 Relay
 Dodge Sprinter 3500 Relay Block
 Dodge Sprinter 3500 Seat Heater Switch
 Dodge Sprinter 3500 Starter Relay