JeepParts
My Garage
My Account
Cart
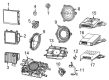
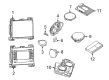
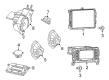
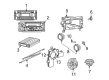
OEM Jeep Cherokee Car Speakers
Audio Speakers- Select Vehicle by Model
- Select Vehicle by VIN
Select Vehicle by Model
orMake
Model
Year
Select Vehicle by VIN
For the most accurate results, select vehicle by your VIN (Vehicle Identification Number).
Filter by Part Type
Filter by Part Type
9 Car Speakers found


Jeep Cherokee Rear Speaker, Outer Part Number: 5064358AB
$32.60 MSRP: $49.80You Save: $17.20 (35%)Ships in 1-3 Business Days


Jeep Cherokee Instrument Panel Speaker, Upper Part Number: 5059062AB
$32.60 MSRP: $49.80You Save: $17.20 (35%)Ships in 1-3 Business Days
Jeep Cherokee Package Tray Speaker, Rear Part Number: 68239787AB
$27.55 MSRP: $42.15You Save: $14.60 (35%)Ships in 1-3 Business Days
Jeep Cherokee Instrument Panel Speaker, Rear Part Number: 68423513AA
$42.57 MSRP: $62.65You Save: $20.08 (33%)Ships in 1-3 Business Days


Jeep Cherokee Rear Speaker, Front Center Part Number: 5091019AB
$53.77 MSRP: $79.85You Save: $26.08 (33%)
Jeep Cherokee Speaker, Rear Part Number: 68346570AB
$112.34 MSRP: $176.00You Save: $63.66 (37%)
Jeep Cherokee Speaker Part Number: 56008751AD

Jeep Cherokee Speaker Part Number: 56008750AD

Jeep Cherokee Speaker, Rear Part Number: 5091212AB
Jeep Cherokee Car Speakers
Choose OEM Car Speakers that meet Jeep factory standards. Jeep designs and tests every component for precision and durability. Each Car Speakers follows strict manufacturing steps to lock in quality and fit. If your Jeep Cherokee matters to you, OEM parts make the smart choice. You'll get the exact look, feel, and performance you expect. Shop genuine Cherokee parts at the highly competitive prices online. Enjoy a manufacturer's warranty, a hassle-free return policy, and rapid delivery. No more guesswork with off brands. Get genuine parts with exact fit and true factory performance. Shop with confidence today at JeepPartsDeal.com.
Jeep Cherokee Car Speakers Parts and Q&A
- Q: How to Upgrade Your Car Speakers in the Front Door on Jeep Cherokee?A:Before you change the front door speaker, cut the negative Battery Cable and disconnect it. If your vehicle comes with a manual window regulator crank handle, remove it using a removal device. Following that, take out the screws securing the front door trim to the door panel below. Take a trim stick or a wide flat-bladed tool and start prying the trim panel from the bottom of the door, proceeding around the edges. Pull up the trim piece to break loose the Weather Strip on the inner belt, then move it to the side so you can access and free the lock linkage rods. Take the plastic retainers off the ends of the rod linkage, unscrew the rods from the remote controls in the motor assembly and get the rod ends out of the remote door controls. Should the proper tools be supplied, unplug the wire harness connectors from the door power switch on both sides and the driver's power Mirror Switch. Afterwards, set the trim panel aside. First, take off the two screws fixating the lower speaker in the lower front corner, move the speaker away to unplug its connector and then leave the speaker in place. To install, undo the steps taken out for removal and tighten the speaker mounting screws to 1.1 Nm (10 in. lbs.) and the trim panel mounting screws to 2.2 Nm (20 in. lbs.). Remove the front door trim from the top of the door and next, take out the screw holding the front door flag trim to the inside panel. Work a trim tool into the gap between the door and use it to pry the flag trim away; this will let you pull away the trim bar enough to disconnect the wire at the top of the speaker harness. Slide the speaker out of the holder molded into the flag panel and to fit it, just reverse the steps you used previously, firmly screwing it in until it reaches 2.2 Nm (20 in. lbs.).
- Q: How to Replace Car Speakers in the Front Door on Jeep Cherokee?A:Before touching the front door tweeter, secure the negative cable attached to the battery. Open the inside front door panel and remove the screw that is holding on the trim panel. Work a trim stick or a broad flat tool around the trim panel to carefully pull it out from the inner door panel to loosen the retainer. Open the trim panel enough to grab the front door wire harness and pull it apart from the upper door speaker pigtail wire connector. Release the top-door speaker from the clips holding it on the back of the trim panel, then take it out. On installation, fit the upper door speaker onto the back of the panel and make sure the plastic retainers hold it in place. Put the fit of the inner door panel up against the trim panel and then attach the wire harness connector. Press on the retainer at the back of the trim panel so that it snaps into the hole in the door panel. Put the screw for the trim panel into the nut on the inner door panel, tighten to 2.2 Nm (20 in. lbs.), fasten the trim panel inside the left front door and reconnect the negative cable to the battery.

Related Jeep Cherokee Parts
 Jeep Cherokee Windshield Wiper
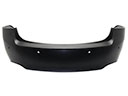 Jeep Cherokee Bumper Cover
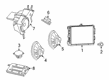
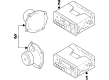
 Jeep Cherokee Subwoofer
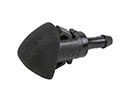 Jeep Cherokee Windshield Washer Nozzle
 Jeep Cherokee Wiper Arm
 Jeep Cherokee Wiper Linkage
 Jeep Cherokee Front Cross-Member
 Jeep Cherokee Fuel Filler Housing
 Jeep Cherokee Lift Support
 Jeep Cherokee Liftgate Lift Support
 Jeep Cherokee Rear Door Striker
 Jeep Cherokee Rear Passenger Door Handle Latch