JeepParts
My Garage
My Account
Cart
OEM Jeep Compass Sway Bar Kit
Stabilizer Sway Bar Set- Select Vehicle by Model
- Select Vehicle by VIN
Select Vehicle by Model
orMake
Model
Year
Select Vehicle by VIN
For the most accurate results, select vehicle by your VIN (Vehicle Identification Number).
14 Sway Bar Kits found

Jeep Compass Stabilizer Bar, Rear Part Number: 5151812AB
$66.85 MSRP: $98.35You Save: $31.50 (33%)Ships in 1-3 Business Days

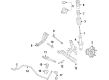
Jeep Compass Bar - Front Part Number: 5105101AD
$148.30 MSRP: $225.00You Save: $76.70 (35%)Ships in 1-2 Business Days
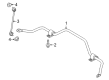
Jeep Compass Link - Stabilizer Bar Part Number: 68498190AB
$40.84 MSRP: $60.50You Save: $19.66 (33%)Ships in 1-2 Business Days
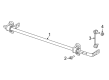
Jeep Compass Stabilizer Bar, Rear Part Number: 68497949AA
$124.88 MSRP: $189.00You Save: $64.12 (34%)Ships in 1-2 Business Days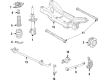
Jeep Compass Stabilizer Bar, Rear Part Number: 68497948AA
$112.62 MSRP: $169.00You Save: $56.38 (34%)Ships in 1-2 Business DaysJeep Compass Stabilizer Bar, Rear Part Number: 68466548AB
$122.65 MSRP: $184.00You Save: $61.35 (34%)Ships in 1-2 Business Days
Jeep Compass Stabilizer Bar, Rear Part Number: 68250804AA
$288.41 MSRP: $441.00You Save: $152.59 (35%)Ships in 1-2 Business DaysJeep Compass Stabilizer Bar, Rear Part Number: 68303071AA
$150.53 MSRP: $225.00You Save: $74.47 (34%)Ships in 1-2 Business Days


Jeep Compass Stabilizer Bar, Rear Part Number: 5168662AA


Jeep Compass Stabilizer Bar, Rear Part Number: 5105887AA
Jeep Compass Stabilizer Bar, Rear Part Number: 5151810AB

Jeep Compass Bar - Front Part Number: 68299023AF
$166.55 MSRP: $246.00You Save: $79.45 (33%)Jeep Compass Stabilizer Bar, Rear Part Number: 5151813AC
$128.03 MSRP: $193.00You Save: $64.97 (34%)Jeep Compass Stabilizer Bar, Rear Part Number: 5105886AA
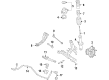
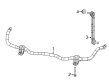
Jeep Compass Sway Bar Kit
Choose OEM Sway Bar Kit that meet Jeep factory standards. Jeep designs and tests every component for precision and durability. Each Sway Bar Kit follows strict manufacturing steps to lock in quality and fit. If your Jeep Compass matters to you, OEM parts make the smart choice. You'll get the exact look, feel, and performance you expect. Shop genuine Compass parts at the highly competitive prices online. Enjoy a manufacturer's warranty, a hassle-free return policy, and rapid delivery. No more guesswork with off brands. Get genuine parts with exact fit and true factory performance. Shop with confidence today at JeepPartsDeal.com.
The Sway Bar Kit in Jeep Compass vehicles play an important function in improving the relative stabilization of the vehicle and reducing rolling of the body of the vehicle during cornering and over irregular terrains. This is an anti roll bar that links opposite wheels by a torsion spring hence increasing roll stiffness while still retaining the vertical spring rates. In preventing it from twisting, the Sway Bar Kit ensures the wheels are adjusted to approximately the same height thereby minimizing lateral tilt and thus better control in tractions. Adjustable and active Sway Bar Kits have been supplied and fitted in Jeep Compass model over the years. These advanced Sway Bar Kits can allow linear adjusting the stiffness, for better handling and comfort of the vehicle. Concerning the Sway Bar Kits of old school in transferring of bumps fro wheel to the other, making the Jeep's movement on rough terrain resemble waddling, then the current models come with an added technologically advanced function of real time adjustments of the bars, thus increasing the stability of the Jeep Compass model.
Jeep Compass Sway Bar Kit Parts and Q&A
- Q: How to Properly Install a Sway Bar Kit on Jeep Compass?A:Be sure to check the cushions and links for any signs of excessive wear, cracks, damage or disturbance and replace any that look unsuitable before installing the sway bar kit. Place the fully extended sway bar kit so the ends stretch over the steering gear and then secure it to the links. Carefully install the sway bar kit, starting with the link ends over the top of the crossmember in the back and then curve them upward to cover the steering gear. Slowly raise the crossmember with a transmission jack, matching the places marked before on the car body. Screw the four mounting bolts into the front crossmember and tighten them to 190 Nm (140 ft. lbs.), remove the transmission jack and take off any supports for the steering gear. Join the two bolts that hold the steering gear to the crossmember, fastening them to 70 Nm (52 ft. lbs.). Set the two bars on the back of the seat, ensuring the cut slit is aligned and cover the cushions with the two bushing retainers. Screw the retainers into the crossmember until they reach 30 Nm (22 ft. lbs.). On each end of the sway bar kit, put a sway bar link, tighten the nuts to 43 ft. lbs. (58 Nm) and keep the lower stud still. Place the hose clamps on the crossmember, use the tool to hold down the fasteners and tighten the screw until you reach 71 in. lbs. Replace the rear Engine Mount and, if you have one, the belly pan under the engine. Reduce the engine and if the wheel alignment needs it, work on the front camber and caster. You may need to slightly modify the crossmember's attachment to the chassis.
- Q: How to Remove a Rear Sway Bar Kit on Jeep Compass?A:Before removing the rear sway bar kit, lift the vehicle off the ground in a supported position and check the service precautions for the rear suspension. On each side, lock the sway bar link stationary and unscrew the nut linked to it. All-wheel-drive models should have the rear driveline module removed. Later, take out the screws holding the sway bar bushing retainers to the crossmember on each side. Following that, pull out the two sway bar bushing retainers and remove the parts from the car. If it's needed, take out the cushions from the sway bar through the slit in them.


Related Jeep Compass Parts
 Jeep Compass Control Arm
 Jeep Compass Ball Joint
 Jeep Compass Sway Bar Link
 Jeep Compass Shock Absorber
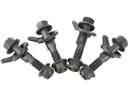 Jeep Compass Alignment Bolt
 Jeep Compass Bump Stop
 Jeep Compass Coil Spring Insulator
 Jeep Compass Coil Springs
 Jeep Compass Lateral Link
 Jeep Compass Steering Knuckle
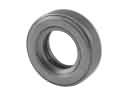 Jeep Compass Strut Bearing
 Jeep Compass Wheel Hub