JeepParts
My Garage
My Account
Cart
OEM Jeep Patriot A/C Condenser
Air Conditioning Condenser- Select Vehicle by Model
- Select Vehicle by VIN
Select Vehicle by Model
orMake
Model
Year
Select Vehicle by VIN
For the most accurate results, select vehicle by your VIN (Vehicle Identification Number).
4 A/C Condensers found


Jeep Patriot Condenser Part Number: 68004053AA
$250.84 MSRP: $379.00You Save: $128.16 (34%)
Jeep Patriot Condenser Part Number: 68004296AA
$282.88 MSRP: $428.00You Save: $145.12 (34%)Ships in 1-2 Business Days


Jeep Patriot Transmission Cooler Part Number: 68078975AB
$435.10 MSRP: $634.00You Save: $198.90 (32%)

Jeep Patriot Condenser Part Number: 68004052AB
$216.40 MSRP: $318.00You Save: $101.60 (32%)
Jeep Patriot A/C Condenser
Choose OEM A/C Condenser that meet Jeep factory standards. Jeep designs and tests every component for precision and durability. Each A/C Condenser follows strict manufacturing steps to lock in quality and fit. If your Jeep Patriot matters to you, OEM parts make the smart choice. You'll get the exact look, feel, and performance you expect. Shop genuine Patriot parts at the highly competitive prices online. Enjoy a manufacturer's warranty, a hassle-free return policy, and rapid delivery. No more guesswork with off brands. Get genuine parts with exact fit and true factory performance. Shop with confidence today at JeepPartsDeal.com.
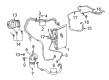
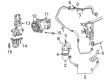
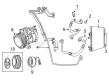
The A/C Condenser in Jeep Patriot vehicles play the role of heat exchanger which has the function of condensing the gaseous refrigerant as well as converting it to liquid state before proceeding to the accumulator. Usually located in front of the automobile radiator to receive air blown by the blower, the A/C Condenser usually uses a system of tubes to perform this cooling function. Compared to other car manufacturers, information on specific Jeep Patriot models and the styles of A/C Condensers used may have changed in the course of the years though variations are not specified. The function of the A/C Condenser does not fluctuates much in these models, it is to ensure that the AC system of the car operates correctly by maintaining the right temperatures of the refrigerant. In general, A/C Condenser is a vital part that helps to provide the comfort of the Jeep Patriot.
Jeep Patriot A/C Condenser Parts and Q&A
- Q: What Are the Best Practices for Installing an A/C Condenser to Prevent Compressor Damage on Jeep Patriot?A:Before installing the A/C condenser, be sure to look at the refrigerant oil level and add some if the condenser was replaced by itself-add 20 milliliters (0.7 fluid ounce) of refrigerant oil. Make it your habit to change the O-ring seals and gaskets when you have to open any refrigerant line to prevent leaks. Initially, drop the A/C condenser front of the radiator and hook the top condenser brackets where you can see them. Should the vehicle have a 2.0L diesel engine, install a charge air cooler. Raise the car and place it on stands, once you have connected the transmission cooling lines to the left A/C condenser. Attach the lower condenser brackets to the radiator by tightening them with two bolts to 4.5 Nm (40 in. lbs.). Pull out the tape or cap from the liquid line fitting and condenser outlet port, clean a rubber O-ring, cover it with oil and connect them onto the liquid line fitting and new gasket. Attach the A/C liquid line to the A/C condenser and fasten the nut to 5 Nm (44 in. lbs.). Now, lay the vehicle back on the floor and treat both the discharge line fitting and the condenser inlet in the same way, attaching a fresh O-ring seal and gasket. With gasoline engine models, pull back on the radiator to reach the A/C condenser and then attach the A/C discharge line and tighten the retaining screw. Of you have 2.4L turbo engine, install a charge air cooler and connect it with the throttle body hose. Connections for the front fascia and the negative Battery Cable need to be completed for the 2.0L diesel. Don't start the engine when a vacuum pump or any vacuum is present in the A/C system, since doing so could break the compressor. Drain the refrigerant out of the system and when changing the A/C condenser, add 20 milliliters (0.7 fluid ounce) of refrigerant oil; if other parts are being replaced, check the Refrigerant Oil Capacities chart for the amount needed. After the install is complete, charge the A/C system.
- Q: How to Remove an A/C Condenser on Jeep Patriot?A:The first thing to do is cut the Battery Cable, make sure it is isolated and then remove the refrigerant from the system. With a 2.0L diesel engine, you'll remove the front fascia; for those with a 2.4L turbo engine, take off the charge air cooler to throttle body hose. Upper Radiator Supports must be taken out and moved aside on gasoline engine versions. For gasoline powered cars, move the radiator slightly back so you can reach the A/C condenser from the front. Remove the nut holding the A/C discharge line to the right condenser and throw out the O-ring seal and gasket. Then put tape or plugs over the open discharge line and intake port on the condenser. With the vehicle lifted, take out the nut holding the A/C line to the right of the A/C condenser. Separate the line, then throw away the O-ring seal and gasket as you install new plugs or tape over both ends. Take out the lower condenser bracket fixed clamps and with the bracket still placed on the radiator, lower the vehicle. Unhook the automatic transmission cooler lines that are on the left side of the A/C condenser, if you have the equipment. On 2.0L diesel engines, go ahead and get rid of the charge air cooler during service. Afterward, slowly raise the air conditioning condenser, detach the brackets on top from the radiator and remove it from the engine space.


Related Jeep Patriot Parts
 Jeep Patriot Blend Door Actuator
 Jeep Patriot Blower Motor
 Jeep Patriot Heater Core
 Jeep Patriot A/C Accumulator
 Jeep Patriot A/C Compressor
 Jeep Patriot A/C Compressor Cut-Out Switches
 Jeep Patriot A/C Expansion Valve
 Jeep Patriot A/C Hose
 Jeep Patriot A/C Service Cap
 Jeep Patriot A/C System Valve Core
 Jeep Patriot Evaporator
 Jeep Patriot HVAC Pressure Switch