JeepParts
My Garage
My Account
Cart
OEM Jeep Patriot Trailing Arm
Trailing Control Arm- Select Vehicle by Model
- Select Vehicle by VIN
Select Vehicle by Model
orMake
Model
Year
Select Vehicle by VIN
For the most accurate results, select vehicle by your VIN (Vehicle Identification Number).
3 Trailing Arms found


Jeep Patriot Trailing Arm, Rear Driver Side Part Number: 5105927AB
$102.51 MSRP: $205.00You Save: $102.49 (50%)Ships in 1-2 Business Days


Jeep Patriot Trailing Arm, Rear Passenger Side Part Number: 5105930AB
$137.09 MSRP: $202.00You Save: $64.91 (33%)


Jeep Patriot Trailing Arm, Rear Driver Side Part Number: 5272715AD
$247.52 MSRP: $374.00You Save: $126.48 (34%)Ships in 1-2 Business Days
Jeep Patriot Trailing Arm
Choose OEM Trailing Arm that meet Jeep factory standards. Jeep designs and tests every component for precision and durability. Each Trailing Arm follows strict manufacturing steps to lock in quality and fit. If your Jeep Patriot matters to you, OEM parts make the smart choice. You'll get the exact look, feel, and performance you expect. Shop genuine Patriot parts at the highly competitive prices online. Enjoy a manufacturer's warranty, a hassle-free return policy, and rapid delivery. No more guesswork with off brands. Get genuine parts with exact fit and true factory performance. Shop with confidence today at JeepPartsDeal.com.
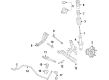
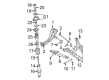
The Trailing Arm in Jeep Patriot vehicles work hand in hand with the Trailing Link Suspension that is used in their making, whose major role is to join the axle to the framework of the car. Over all its main use is to reduce any un necessary movement of the axle so that the handling of the vehicle is improved. The Jeep Patriot has a trailing-arm suspension, it comprises of two or three links plus a Panhard rod that is useful in lateral wheel location and guarantees the car to perform on several areas. Also, the Jeep Patriot might use the semi trailing arm suspension in which every end of the wheel hub attaches to a triangle shaped arm. This design also objects to have improved flexibility and also the rear suspension can move independently.
Jeep Patriot Trailing Arm Parts and Q&A
- Q: How to Remove a Trailing Arm on Jeep Patriot?A:To remove the trailing arm, lift and support the vehicle first. After that, remove the wheel mounting nuts and the tire and wheel assembly. Unscrew the screw on the brake flex hose at the trailing link and then remove the nut that keeps the brake tube routing bracket secure on the same link. Break the brake tubing away from the routing clip on the trailing link. Detach the two bolts that anchor the disc Brake Caliper adapter to the brake support plate and then pull out the disc brake caliper and adapter as an unit, using wire or a bungee cord to hang it away from the brake hose and tubes so it does not pull too far. If your car is so equipped, unscrew the screw holding the wheel speed sensor to the trailing link and remove the routing clip keeping the sensor connected to the trailing link. Following this, unhook the brake rotor, the hub and the bearing. Lift the Parking Brake Cable off the parking brake shoe lever and then pop the hair pin to release it from the brake support plate. Slide the brake support plate with the parking brake shoes off the end of the parking brake cable and pull the cable from the trailing link. Break the bolt that joins the toe link with the trailing link and then remove each nut and bolt that fastens either Control Arm to the trailing link. Next, get rid of the two bolts holding the trailing link in place and take out the trailing link.
- Q: How to install a Trailing Arm on Jeep Patriot?A:The trailing link should be installed and attached to the frame with the aid of two bolts that are tightened to 110 Nm (81 ft. lbs.). Then, secure the upper Control Arm to the trailing link with a bolt and nut, turning it until it reaches 95 Nm (70 ft. lbs.) and do the same with the lower control arm. Set up the bolt connecting the toe link to the trailing link and flex the bushing of the body mount while installing it, then adjust the bolt's torque to 95 Nm (70 ft. lbs.). Attach the Parking Brake Cable to the trailing link's inner side, slide it into the brake support plate along with the parking brake shoes and hold it in place with a hair pin. Join the parking brake cable to the lever that is part of the parking brake shoe. Should you have the wheel speed sensor, place it and screw it onto the trailing link while fixing it to 18 Nm (or 13 ft. lbs). Place the hub and bearing before fixing the brake rotor onto the studs. Slide the disc Brake Caliper and adapter assembly over the brake rotor and support plate, fixing the adapter in place with two bolts torqued to 52 ft. lbs. Set the brake tube on the trailing link, fit it into the hole in the routing clip and routing bracket and tighten the nut on the welded stud to 15 Nm (11 ft. lbs.). Wrap the brake flex hose around the trailing link bracket and use a mounting screw tightened to 23 Nm (17 ft. lbs.). At last, mount the tire and wheel on the car, tighten the angle nuts to 135 Nm (100 ft. lbs.), lower the car back to the ground and perform wheel alignment only if it's necessary.


Related Jeep Patriot Parts
 Jeep Patriot Wheel Bearing
 Jeep Patriot Control Arm
 Jeep Patriot Coil Springs
 Jeep Patriot Shock Absorber
 Jeep Patriot Camber and Alignment Kit
 Jeep Patriot Control Arm Bolt
 Jeep Patriot Lateral Link
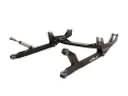 Jeep Patriot Radius Arm
 Jeep Patriot Steering Knuckle
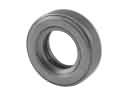 Jeep Patriot Strut Bearing
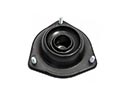 Jeep Patriot Strut Mounts
 Jeep Patriot Sway Bar Link Bushing