JeepParts
My Garage
My Account
Cart
OEM 2000 Jeep Grand Cherokee Piston
Engine Pistons- Select Vehicle by Model
- Select Vehicle by VIN
Select Vehicle by Model
orMake
Model
Year
Select Vehicle by VIN
For the most accurate results, select vehicle by your VIN (Vehicle Identification Number).
1 Piston found

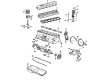
2000 Jeep Grand Cherokee Piston Part Number: 4798332AC
Product Specifications- Other Name: Piston Pin And Rod; Piston Pin And Rod
- Replaces: 4798333AC, 4798331AC, 4798333AB, 4798330AB, 4798330AC
- Item Weight: 3.20 Pounds
- Item Dimensions: 13.3 x 6.1 x 4.4 inches
- Condition: New
- Fitment Type: Direct Replacement
- SKU: 4798332AC
- Warranty: This genuine part is guaranteed by Mopar's factory warranty.
2000 Jeep Grand Cherokee Piston Parts and Q&A
- Q: How to Remove and Replace a Piston in an Engine on 2000 Jeep Grand Cherokee?A: Take out the engine cylinder head cover, then the rockers, bridges and pivots, remove the push rods and finally, you can remove the engine cylinder head. Set each piston down near the lowest point in the piston movement and use a ridge reamer to clean off the top of the cylinder's walls, ensuring the cuttings are taken by the cloth beneath. First, get the vehicle on blocks and remove the old oil. After that, you can take out the oil pan and gasket. Then, remove the main bearing cap brace and both connecting rod bearing caps and inserts and write the cylinder bore location next to them where the cast two-letter stamp is shown on the caps and rods. Put the vehicle about 2 feet above the floor so the connecting rod bolts do not touch the crankshaft journals or cylinder walls. To prevent this, cover the connecting rods with some short rubber hoses. Let an assistant squeeze the piston and the rod assembly up and over the top of each cylinder bore. While installing, carefully clean the cylinder bores and place a light coat of engine oil at each intake and exhaust valve using a cloth that does not shed fibers. If you take the pistons out, put the piston rings on each piston and cover the piston and rings with clean engine oil. Also, keep the connecting rod bolts from scratching either the crankshaft journals or the cylinder walls. The needle on the piston should always be pointing toward the front of the engine when you install the connecting rod and piston assemblies with a piston ring compressor through the top of the engine. With the crank assembly once more in the lifted position, place each bearing insert into its corresponding journal to obtain the correct space, using the bearing inserts specified in the Connecting Rod Bearing Fitting Chart. The journal end of the rod is annotated by a paint mark on the side of the crankshaft next to the main piston. There are cases when different size inserts can be matched and adding a 0.025 mm (0.001 inch) undersize insert to a standard size insert shrinks the gap by half that amount. Do not mix bearing caps, as every connecting rod and bearing cap is marked with the cylinder number near where the oil squirts out to the camshaft side of the cylinder block. Put in all the connecting rod bearing caps and inserts where they originally sat, so the squirt holes on the rods are toward the camshaft and the arrows on the pistons are pointing toward the front. When all other parts are secure, fit the main bearing cap brace and screw in its nuts to 47 Nm (35 ft. lbs.). Next, put in the oil pan along with the gaskets. Set the vehicle lower down onto its wheels, fit the engine cylinder head, push rods, rocker arms, bridges, pivots and engine cylinder cover and finally pour engine oil into the crankcase.
Related 2000 Jeep Grand Cherokee Parts
 2000 Jeep Grand Cherokee Timing Chain
 2000 Jeep Grand Cherokee Oil Pan
 2000 Jeep Grand Cherokee Cam Gear
 2000 Jeep Grand Cherokee Crankshaft Seal
 2000 Jeep Grand Cherokee Cylinder Head Gasket
 2000 Jeep Grand Cherokee Engine Mount Bracket
 2000 Jeep Grand Cherokee Exhaust Valve
 2000 Jeep Grand Cherokee Intake Valve
 2000 Jeep Grand Cherokee Lash Adjuster
 2000 Jeep Grand Cherokee Piston Ring Set
 2000 Jeep Grand Cherokee Timing Chain Tensioner
 2000 Jeep Grand Cherokee Valve Stem Seal