JeepParts
My Garage
My Account
Cart
OEM 2001 Jeep Grand Cherokee Piston
Engine Pistons- Select Vehicle by Model
- Select Vehicle by VIN
Select Vehicle by Model
orMake
Model
Year
Select Vehicle by VIN
For the most accurate results, select vehicle by your VIN (Vehicle Identification Number).
2 Pistons found


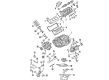
2001 Jeep Grand Cherokee Piston Part Number: 68233351AA
Product Specifications- Replaces: 5012362AF, 5012362AE, 5012362AC, 5012362AD
- Item Weight: 3.00 Pounds
- Item Dimensions: 10.5 x 6.3 x 6.5 inches
- Condition: New
- Fitment Type: Direct Replacement
- SKU: 68233351AA
- Warranty: This genuine part is guaranteed by Mopar's factory warranty.

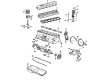
2001 Jeep Grand Cherokee Piston Part Number: 4798332AC
Product Specifications- Other Name: Piston Pin And Rod; Piston Pin And Rod
- Replaces: 4798333AC, 4798331AC, 4798333AB, 4798330AB, 4798330AC
- Item Weight: 3.20 Pounds
- Item Dimensions: 13.3 x 6.1 x 4.4 inches
- Condition: New
- Fitment Type: Direct Replacement
- SKU: 4798332AC
- Warranty: This genuine part is guaranteed by Mopar's factory warranty.
2001 Jeep Grand Cherokee Piston Parts and Q&A
- Q: How to Remove and Replace a Piston in an Engine on 2001 Jeep Grand Cherokee?A: Before you remove and replace the piston, take off the cylinder head cover, the rocker arms, bridges and pivots, then remove the push rods and the engine cylinder head. Place a cooling piston near the lowest end of the cylinder one at a time and use a ridge reamer to remove the ridge from the top section. Drain the cuttings with a cloth after each stroke. Raise the vehicle, drain the oil and remove the oil pan and gasket afterward. Remove the main bearing cap brace and the connecting rod bearing caps and inserts, marking each cap and rod, as their ends are stamped with a S.E. Place the vehicle roughly 2 feet from the floor and while doing so, protect the crankshaft journals and cylinder walls with bits of rubber hose to prevent damage by the bolts. Have your assistant force the piston and connecting rod system up through the top of the cylinder bores. For installation, make sure the cylinder bores are thoroughly clean and then spread a light coat of clean engine oil with a cloth that is oil-free. If you take out the pan, fit the piston rings into the pistons and coat them and the pistons with clean engine oil to prevent scratches on the connecting rod bolts, crankshaft journals and cylinder walls. Place the connecting rod and piston assemblies through the top of the cylinder bores by compressing them with a piston ring compressor and be sure the piston arrow points towards the front of the engine. Hold the connecting rod above the machine so the bearings are aligned with their journals and install the right sized, color-code bearing insert for each bearing. The rod journal is located by a colored paint mark near the crankshaft cheek or counterweight on the side closest to the flange, each color representing the journal size. If required, different sized inserts can be used together and a standard one together with an undersized one to achieve a clearance reduction of 0.013 mm (0.0005 inch). Be sure to keep bearing caps separate, since both the connecting rod and the bearing cap for each cylinder are marked with the same number. Attach the bearing caps with inserts on the rods to their original spots, confirming that the oil holes are directed at the camshaft and that the arrow on each piston faces the engine front. Next, fit the main bearing cap brace, tighing the nuts to 47 Nm (35 ft. lbs.) and then put the oil pan and gasket in place. Lower the car, replace the engine cylinder head, push rods, rocker arms, bridges, pivots and engine cylinder head cover and make sure you fill the crankcase with engine oil.
Related 2001 Jeep Grand Cherokee Parts
 2001 Jeep Grand Cherokee Timing Chain
 2001 Jeep Grand Cherokee Oil Pan
 2001 Jeep Grand Cherokee Cam Gear
 2001 Jeep Grand Cherokee Crankshaft Seal
 2001 Jeep Grand Cherokee Cylinder Head Gasket
 2001 Jeep Grand Cherokee Engine Mount Bracket
 2001 Jeep Grand Cherokee Exhaust Valve
 2001 Jeep Grand Cherokee Intake Valve
 2001 Jeep Grand Cherokee Lash Adjuster
 2001 Jeep Grand Cherokee Piston Ring Set
 2001 Jeep Grand Cherokee Timing Chain Tensioner
 2001 Jeep Grand Cherokee Valve Stem Seal