JeepParts
My Garage
My Account
Cart
OEM 2000 Jeep Wrangler A/C Clutch
Air Conditioning Clutch- Select Vehicle by Model
- Select Vehicle by VIN
Select Vehicle by Model
orMake
Model
Year
Select Vehicle by VIN
For the most accurate results, select vehicle by your VIN (Vehicle Identification Number).
5 A/C Clutches found


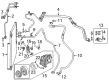
2000 Jeep Wrangler Clutch Coil Part Number: 5003681AA
$185.30 MSRP: $279.00You Save: $93.70 (34%)Ships in 1-2 Business DaysProduct Specifications- Other Name: Coil - A/C Clutch; A/C Compressor Clutch Coil; Clutch; Coil; Coil A/C Clutch; A/C Compressor Clutch
- Replaces: 5072863AA
- Item Weight: 2.10 Pounds
- Item Dimensions: 5.1 x 4.7 x 2.3 inches
- Condition: New
- Fitment Type: Direct Replacement
- SKU: 5003681AA
- Warranty: This genuine part is guaranteed by Mopar's factory warranty.


2000 Jeep Wrangler Clutch & Pulley Part Number: 4882005
Product Specifications- Other Name: Clutch - A/C Compressor; A/C Compressor Clutch; Clutch; Clutch A/C Compressor
- Item Weight: 6.00 Pounds
- Condition: New
- Fitment Type: Direct Replacement
- SKU: 4882005
- Warranty: This genuine part is guaranteed by Mopar's factory warranty.

2000 Jeep Wrangler Clutch Part Number: 5014415AA
Product Specifications- Other Name: Clutch - A/C Compressor; A/C Compressor Clutch; Clutch A/C Compressor Overhaul Package; Clutch A/C Compressor Shim Package; Clutch A/C Compressor
- Item Weight: 0.50 Pounds
- Condition: New
- Fitment Type: Direct Replacement
- SKU: 5014415AA
- Warranty: This genuine part is guaranteed by Mopar's factory warranty.
2000 Jeep Wrangler Clutch Part Number: 5014092AA
Product Specifications- Other Name: Clutch - A/C Compressor; A/C Compressor Clutch; Clutch A/C Compressor Shim Package; Clutch A/C Compressor
- Item Weight: 0.50 Pounds
- Condition: New
- Fitment Type: Direct Replacement
- SKU: 5014092AA
- Warranty: This genuine part is guaranteed by Mopar's factory warranty.

2000 Jeep Wrangler Pulley Assembly Part Number: 4720834
Product Specifications- Other Name: Pulley Kit - A/C Compressor; A/C Compressor Clutch Pulley; Serpentine Belt Drive Kit; Pulley & Armature; Clutch; Compressor Assembly, 2.4L Engine (Nippondenso) W/Clutch; A/C Compressor
- Item Weight: 4.70 Pounds
- Item Dimensions: 7.3 x 6.7 x 3.4 inches
- Condition: New
- Fitment Type: Direct Replacement
- SKU: 4720834
- Warranty: This genuine part is guaranteed by Mopar's factory warranty.
2000 Jeep Wrangler A/C Clutch Parts and Q&A
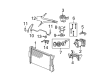
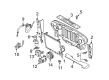
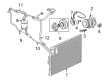
- Q: How to Service an A/C Clutch Without Losing Refrigerant on 2000 Jeep Wrangler?A: Refrigerant does not need to be removed while replacing the compressor clutch, pulley or coil because it can be serviced where the automobile is located. You should begin by separating the battery negative cable from the battery, then getting rid of the serpentine drive belt. Once the nut is off, use a band-type oil filter wrench to hold the clutch stead during this step. Hit the end of the clutch plate with a plastic mallet, pressing down, to make it release from the compressor shaft and then remove the clutch plate and shim. Don't force anything between the clutch plate assembly and the pulley so you don't damage anything. With snap ring pliers (Special Tool C-4574), take out the external snap ring holding the clutch pulley to the compressor front housing and then pull the pulley away. Separate the screw and retainer on the clutch coil lead wire harness from the front of the compressor. Then, use snap ring pliers on the external ring holding the compressor clutch coil to the compressor front and remove it, then slide the assembly off. Check the clutch pulley and the clutch plate for signs of wear and score marks. If needed, replace them. When there is oil on the friction surfaces, check the compressor shaft and the oil level in the nose and take out the felt wick inside the nose; if it's oily, this means the sealing ring around the shaft is leaking badly and the compressor should be changed. Look for bumps or extra grease coming from the clutch pulley bearing and change it if it shows signs of concern. Press the back side of the clutch field coil onto the front of the compressor, so that the dowel pin fits into its hole. Hold the clutch coil lead wire harness retaining clip in place on the front of the compressor and tighten the retaining screw. Fit the clutch field coil into place, adding the snap ring in front with snap ring pliers (Special Tool C-4574; ensure the bevel faces outward, put both eyelets on the side closest to the pin and press in the snap ring to guarantee it sits correctly in the groove. Mount the pulley assembly on the compressor and if the assembly takes too much force to grip, use a block of wood on the part where tension is created and gently tap it with a hammer. Installing the pulley assembly retaining snap ring (bevel side outward) requires using snap ring pliers (Special Tool C-4574) to press it in. Should you keep using the old clutch plate assembly and pulley assembly, you can reinstall the old shim(s); if not, place another identical stack of shims on the shaft beside the bearing shoulder. Place feeler gauges between the clutch plate and the pulley face after tightening the clutch plate. If the gap is incorrect, adjust the shim(s) so that it measures 0.35 to 0.65 millimeters (0.014 to 0.026 inches). Tighten the bolt for the compressor's shaft to 13 Nm (115 in. lbs.), since after tightening, the shims might compress and you should check the air gap in four or more places by spinning the pulley. After that, finish by removing the remaining live cells and tubes. To seat the opposing friction surfaces and strengthen the compressor clutch torque, cycle the clutch with the heater-A/C control on Recirculation, A/C button on, blower motor on the highest setting, engine running at 1500-2000 rpm and your dashboard up.
Related 2000 Jeep Wrangler Parts
 2000 Jeep Wrangler Blend Door Actuator
 2000 Jeep Wrangler Heater Core
 2000 Jeep Wrangler Blower Motor
 2000 Jeep Wrangler A/C Compressor
 2000 Jeep Wrangler Blower Motor Resistor
 2000 Jeep Wrangler Evaporator
 2000 Jeep Wrangler A/C Accumulator
 2000 Jeep Wrangler A/C Condenser
 2000 Jeep Wrangler A/C Hose
 2000 Jeep Wrangler A/C Switch
 2000 Jeep Wrangler Blower Control Switches