JeepParts
My Garage
My Account
Cart
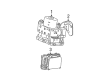
OEM 2001 Chrysler PT Cruiser ABS Control Module
Anti Lock Brake Control Module- Select Vehicle by Model
- Select Vehicle by VIN
Select Vehicle by Model
orMake
Model
Year
Select Vehicle by VIN
For the most accurate results, select vehicle by your VIN (Vehicle Identification Number).
2 ABS Control Modules found

2001 Chrysler PT Cruiser Control Module Part Number: 5017847AC
Product Specifications- Other Name: Module - Anti-Lock Brake System; ABS Control Module; Module Anti-Lock Brake System
- Replaces: 5017847AB
- Item Weight: 2.10 Pounds
- Item Dimensions: 4.2 x 3.0 x 1.8 inches
- Condition: New
- Fitment Type: Direct Replacement
- SKU: 5017847AC
- Warranty: This genuine part is guaranteed by Mopar's factory warranty.

2001 Chrysler PT Cruiser Modulator Valve Part Number: 5014869AA
Product Specifications- Other Name: HCU - ABS; ABS Hydraulic Assembly; ABS Control Module; Modulator; Hydraulic Control Unit Anti-Lock Brake System
- Condition: New
- Fitment Type: Direct Replacement
- SKU: 5014869AA
- Warranty: This genuine part is guaranteed by Mopar's factory warranty.
2001 Chrysler PT Cruiser ABS Control Module Parts and Q&A
- Q: What Preparations Are Necessary Before Removing the ABS Control Module on 2001 Chrysler PT Cruiser?A: Before beginning, depress the brake pedal nearly 5 times with the engine not running and make sure the response is firm before you start the removal. Unclip the air cleaner cover and keep it to a side, then grab the air cleaner housing and pull it upward. Unhook the battery's negative cable and isolate it, before releasing and taking out the power distribution center. Pull out the electric connector from the switch in the master cylinder reservoir and label the brake tubes as primary or secondary, so you don't get them mixed up. Take out each brake tube from the master cylinder's ports and replace these openings with plugs. Take out the primary and secondary brake tubes from the master cylinder on the Hydraulic Control Unit and use a suitable brake cleaner to clean around the master cylinder connector on the power brake booster. Take out the two nuts that hold the master cylinder to the booster, then slide it away. Pull both brake tubes apart at the Hcu and the connector between the Controller Abs (Cab) and the 25-way module. Take out the three bolts that hold the Icu to the mounting bracket and take out the Icu from under the vehicle. To install, place the Icu back into its bracket and hold it in place using the supplied bolts and tightening each to 11 Nm (97 inch lbs.). Ease the seal into the connector, then push the cable into the Cab socket while locking it down. Screw the four brake tubes into the ports on the Hcu, making sure the torque applies an 17 Nm (145 inch lbs.) force with a crow foot on a torque wrench. Clean the power brake booster and match the piston push rod with the master cylinder's push rod, then fasten the cylinder to the studs until it is touching the booster. Fit two nuts onto the master cylinder and tighten each to 28 Nm (250 inch lbs.). Restrict yourself from fully tightening the brake tubes while you attach them to the caliper and the brake master cylinder first, then secure the tubes in place, applying 17 Nm (145 inch lbs.). Clean the connections of the brake fluid level switch wiring, plug the power distribution center back## into its position and attach the negative battery cable to its port. Fasten the air cleaner housing and cover back, attach the Drbiii to set the new Cab, push out air from the hydraulic systems, make sure the master cylinder is at the proper height and drive the car to check everything is in order.
Related 2001 Chrysler PT Cruiser Parts
 2001 Chrysler PT Cruiser Brake Caliper
 2001 Chrysler PT Cruiser Brake Caliper Bolt
 2001 Chrysler PT Cruiser Brake Caliper Bracket
 2001 Chrysler PT Cruiser Brake Caliper Piston
 2001 Chrysler PT Cruiser Brake Disc
 2001 Chrysler PT Cruiser Brake Dust Shield
 2001 Chrysler PT Cruiser Brake Line
 2001 Chrysler PT Cruiser Brake Pad
 2001 Chrysler PT Cruiser Speed Sensor
 2001 Chrysler PT Cruiser Wheel Bearing Dust Cap
 2001 Chrysler PT Cruiser Wheel Cylinder
 2001 Chrysler PT Cruiser Wheel Stud