JeepParts
My Garage
My Account
Cart
OEM 2001 Chrysler Sebring Crankshaft Seal
- Select Vehicle by Model
- Select Vehicle by VIN
Select Vehicle by Model
orMake
Model
Year
Select Vehicle by VIN
For the most accurate results, select vehicle by your VIN (Vehicle Identification Number).
4 Crankshaft Seals found


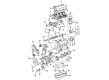
2001 Chrysler Sebring Rear Main Seal Part Number: 4663625
$40.30 MSRP: $51.88You Save: $11.58 (23%)Ships in 1-2 Business DaysProduct Specifications- Other Name: Seal - Rear Main Crankshaft; Engine Crankshaft Seal, Rear; Rear Main Seal Gasket; Seal Rear Main Crankshaft See Note; Seal Rear Main Crankshaft
- Position: Rear
- Item Weight: 0.50 Pounds
- Item Dimensions: 4.8 x 4.7 x 0.5 inches
- Condition: New
- Fitment Type: Direct Replacement
- SKU: 4663625
- Warranty: This genuine part is guaranteed by Mopar's factory warranty.


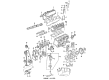
2001 Chrysler Sebring Rear Main Seal Part Number: 4621939AB
$27.24 MSRP: $40.20You Save: $12.96 (33%)Ships in 1-2 Business DaysProduct Specifications- Other Name: Seal - Rear Main Crankshaft; Engine Crankshaft Seal, Rear; Rear Seal; Seal Rear Main Crankshaft Serviced With Retainer [04663625]; Crankshaft Seal
- Position: Rear
- Item Weight: 0.50 Pounds
- Item Dimensions: 0.7 x 4.6 x 4.8 inches
- Condition: New
- Fitment Type: Direct Replacement
- SKU: 4621939AB
- Warranty: This genuine part is guaranteed by Mopar's factory warranty.


2001 Chrysler Sebring Front Crank Seal Part Number: 4663618
$20.20 MSRP: $29.95You Save: $9.75 (33%)Ships in 1-3 Business DaysProduct Specifications- Other Name: Seal - Crankshaft Oil; Engine Crankshaft Seal, Front; Engine Timing Cover Seal; Timing Cover Gasket; Timing Cover Seal; Front Seal; Crankshaft Oil Front; Engine Crankshaft Seal.
- Position: Front
- Item Weight: 0.40 Pounds
- Item Dimensions: 0.2 x 2.1 x 2.0 inches
- Condition: New
- Fitment Type: Direct Replacement
- SKU: 4663618
- Warranty: This genuine part is guaranteed by Mopar's factory warranty.


2001 Chrysler Sebring Rear Main Seal Retainer Part Number: 4663622
Product Specifications- Other Name: Cover - Crankshaft Rear Oil Seal; Retainer Crankshaft Rear Oil Seal
- Position: Rear
- Item Weight: 0.50 Pounds
- Condition: New
- Fitment Type: Direct Replacement
- SKU: 4663622
- Warranty: This genuine part is guaranteed by Mopar's factory warranty.
2001 Chrysler Sebring Crankshaft Seal Parts and Q&A
- Q: How to Service and Repair a Front Crankshaft Seal on 2001 Chrysler Sebring?A: Before servicing or repairing the front crankshaft seal, remove the negative battery cable and the accessory drive belts. After that, you should remove the crankshaft damper before removing the timing belt. Remove the crankshaft sprocket with Special Tool 6793 and be sure not to scratch the seal surface or inside of the seal bore using C-4685-C2. After that, use Tool 6771 to remove the oil seal from the front crankshaft, making sure you don't harm the surface of the cover. With Special Tool 6780, fit a new seal into the opening so the seal spring is facing the engine side and it is totally flush with the engine cover body. Install back the crankshaft sprocket using Special Tool 6792, then put the timing belt and its covers in place. Then, put in the crankshaft damper, replace the accessory drive belts and reattach the battery's negative cable.
Related 2001 Chrysler Sebring Parts
 2001 Chrysler Sebring Oil Filter
 2001 Chrysler Sebring Timing Chain
 2001 Chrysler Sebring Camshaft
 2001 Chrysler Sebring Camshaft Seal
 2001 Chrysler Sebring Engine Mount
 2001 Chrysler Sebring Intake Valve
 2001 Chrysler Sebring Oil Pan
 2001 Chrysler Sebring Timing Belt Idler Pulley
 2001 Chrysler Sebring Timing Chain Guide
 2001 Chrysler Sebring Timing Chain Tensioner
 2001 Chrysler Sebring Timing Cover
 2001 Chrysler Sebring Valve Stem Seal