JeepParts
My Garage
My Account
Cart
OEM 2001 Dodge Intrepid Crankshaft Seal
- Select Vehicle by Model
- Select Vehicle by VIN
Select Vehicle by Model
orMake
Model
Year
Select Vehicle by VIN
For the most accurate results, select vehicle by your VIN (Vehicle Identification Number).
5 Crankshaft Seals found


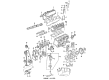
2001 Dodge Intrepid Oil Seal, Front Part Number: 4792317AB
$18.16 MSRP: $26.70You Save: $8.54 (32%)Ships in 1-2 Business DaysProduct Specifications- Other Name: Seal - Crankshaft Oil; Engine Crankshaft Seal, Front; Timing Cover Gasket; Timing Cover Seal; Crankshaft Seal; Front Crank Seal; Timing Cover Assy; Front Main Crankshaft Seal.
- Position: Front
- Replaces: 4792317, 4273275
- Item Weight: 0.50 Pounds
- Item Dimensions: 0.6 x 1.9 x 1.9 inches
- Condition: New
- Fitment Type: Direct Replacement
- SKU: 4792317AB
- Warranty: This genuine part is guaranteed by Mopar's factory warranty.


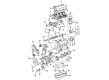
2001 Dodge Intrepid Rear Main Seal Part Number: 4663625
$40.30 MSRP: $51.88You Save: $11.58 (23%)Ships in 1-2 Business DaysProduct Specifications- Other Name: Seal - Rear Main Crankshaft; Engine Crankshaft Seal, Rear; Rear Main Seal Gasket; Seal Rear Main Crankshaft See Note; Seal Rear Main Crankshaft
- Position: Rear
- Item Weight: 0.50 Pounds
- Item Dimensions: 4.8 x 4.7 x 0.5 inches
- Condition: New
- Fitment Type: Direct Replacement
- SKU: 4663625
- Warranty: This genuine part is guaranteed by Mopar's factory warranty.


2001 Dodge Intrepid Front Crank Seal Part Number: 4663618
$20.20 MSRP: $29.95You Save: $9.75 (33%)Ships in 1-3 Business DaysProduct Specifications- Other Name: Seal - Crankshaft Oil; Engine Crankshaft Seal, Front; Engine Timing Cover Seal; Timing Cover Gasket; Timing Cover Seal; Front Seal; Crankshaft Oil Front; Engine Crankshaft Seal.
- Position: Front
- Item Weight: 0.40 Pounds
- Item Dimensions: 0.2 x 2.1 x 2.0 inches
- Condition: New
- Fitment Type: Direct Replacement
- SKU: 4663618
- Warranty: This genuine part is guaranteed by Mopar's factory warranty.


2001 Dodge Intrepid Rear Main Seal Retainer Part Number: 4663622
Product Specifications- Other Name: Cover - Crankshaft Rear Oil Seal; Retainer Crankshaft Rear Oil Seal
- Position: Rear
- Item Weight: 0.50 Pounds
- Condition: New
- Fitment Type: Direct Replacement
- SKU: 4663622
- Warranty: This genuine part is guaranteed by Mopar's factory warranty.

2001 Dodge Intrepid Rear Main Seal Part Number: 4663870
Product Specifications- Other Name: Retainer - Crankshaft Rear Oil Seal; Engine Crankshaft Seal; Crankshaft Seal; Rear Main Seal Retainer; Retainer Crankshaft Rear Oil Seal See Note; Retainer Crankshaft Rear Oil Seal
- Position: Rear
- Condition: New
- Fitment Type: Direct Replacement
- SKU: 4663870
- Warranty: This genuine part is guaranteed by Mopar's factory warranty.
2001 Dodge Intrepid Crankshaft Seal Parts and Q&A
- Q: How to Service and Repair a Crankshaft Seal on 2001 Dodge Intrepid?A: The first thing to do is remove the transaxle from the car and next take off the drive plate to begin working on the crankshaft seal. Carefully insert a 3/16" wide flat bladed screwdriver between the dust lip and the crankshaft seal case, at an angle, so that it presses on the metal case and not the seal surface, although contact with the crankshaft edge is acceptable. Prior to installation, look at the crankshaft edge (chamfer) for burrs or scratches and smooth the area with 400 grit sandpaper, if needed, so seals are protected. After that, secure Special Tool 6926-1 Guide to the crankshaft by placing it above as a pilot tool with its magnetic base. Set the seal over the pilot slot, so that the lip of the seal is facing the crankshaft and ensure you hold the pilot tool on the shaft as you install it. After that, fit Special Tool 6926-2 Installer into the snout area and attach the C-4171 Handle, then twist the seal into position inside the retainer until it lines up with the housing. At last, place the drive plate and the transaxle.
Related 2001 Dodge Intrepid Parts
 2001 Dodge Intrepid Oil Pan
 2001 Dodge Intrepid Camshaft
 2001 Dodge Intrepid Cylinder Head
 2001 Dodge Intrepid Cylinder Head Gasket
 2001 Dodge Intrepid Engine Mount
 2001 Dodge Intrepid Engine Mount Bracket
 2001 Dodge Intrepid Harmonic Balancer
 2001 Dodge Intrepid Lash Adjuster
 2001 Dodge Intrepid Oil Filler Cap
 2001 Dodge Intrepid Rocker Arm
 2001 Dodge Intrepid Rod Bearing
 2001 Dodge Intrepid Timing Belt Tensioner