JeepParts
My Garage
My Account
Cart
OEM 2002 Dodge Neon Heater Core
HVAC Heater Core- Select Vehicle by Model
- Select Vehicle by VIN
Select Vehicle by Model
orMake
Model
Year
Select Vehicle by VIN
For the most accurate results, select vehicle by your VIN (Vehicle Identification Number).
1 Heater Core found


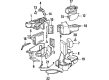
2002 Dodge Neon Heater Core Part Number: 5174809AA
Product Specifications- Other Name: Core - Heater; HVAC Heater Core; Core Heater
- Replaces: 4734453
- Item Weight: 2.90 Pounds
- Item Dimensions: 14.2 x 11.2 x 7.7 inches
- Condition: New
- Fitment Type: Direct Replacement
- SKU: 5174809AA
- Warranty: This genuine part is guaranteed by Mopar's factory warranty.
2002 Dodge Neon Heater Core Parts and Q&A
- Q: How to Replace a Heater Core in a Right-Hand Drive on 2002 Dodge Neon?A: Before you change the heater core in a right-hand drive, disconnect the negative battery cable and drain the cooling fluid. The refrigerant system should be emptied before taking off the instrument panel. After that, take out the retaining bolt from the expansion valve and separate the refrigerant lines and electrical connection from the valve. Take out the expansion valve bolts and then remove the valve from the vehicle. Attached to the heater core, get rid of the coolant supply hoses and remove the fixing nuts for the A/C-Heater housing that hold it to the bulkhead. Remove the drain tube from the housing nipple by taking out the spring clip and pulling on it. While inside the vehicle, unhook the defroster duct from the A/C-Heater housing and remove those housing from the body. After, unscrew the holding bolt and remove the electrical connectors from the A/C-Heater housing. Take out the A/C-Heater housing and transfer it to a bench, after which separate the heater cover and remove the coolant lines. Pull the heater core out of the A/C-Heater housing assembly once you have removed it. To set up the heater core, fit it into the A/C-Heater housing and close it up again. Fit the housing back in the vehicle, securing it with retaining bolts torqued to 20 Nm (177 in. lbs.) and joining it back to the wires. Attach the defroster duct and fasten the A/C-Heater housing drain tube to it with its retaining clip. Secure the A/C-Heater housing with retainers tightened to 20 Nm (177 in. lbs.) and attach the hoses for the heater core coolant supply after. Set up the expansion valve, gasket and retaining bolts, tightening them up to 11 Nm (97 in. lbs.) and hook up the electrical connector at the bottom of the valve, verifying both sealing O-rings are lubricated and not damaged. Install the refrigerant lines and retaining bolt again, torquing the bolt to 23 Nm (203 in. lbs.) and finally put in the instrument panel. Afterward, evacuate the refrigerant system, charge it and fill the cooling system.
Related 2002 Dodge Neon Parts
 2002 Dodge Neon A/C Accumulator
 2002 Dodge Neon A/C Clutch
 2002 Dodge Neon A/C Compressor
 2002 Dodge Neon A/C Compressor Cut-Out Switches
 2002 Dodge Neon A/C Condenser
 2002 Dodge Neon A/C Expansion Valve
 2002 Dodge Neon A/C Hose
 2002 Dodge Neon A/C Switch
 2002 Dodge Neon Ambient Temperature Sensor
 2002 Dodge Neon Blower Motor Resistor
 2002 Dodge Neon Evaporator
 2002 Dodge Neon HVAC Pressure Switch