JeepParts
My Garage
My Account
Cart
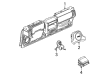
OEM 2003 Jeep Wrangler Air Bag
Air Bag Module- Select Vehicle by Model
- Select Vehicle by VIN
Select Vehicle by Model
orMake
Model
Year
Select Vehicle by VIN
For the most accurate results, select vehicle by your VIN (Vehicle Identification Number).
2 Air Bags found

 Product Specifications
- Other Name: Airbag - Passenger; Instrument Panel Air Bag, Upper; Passenger Inflator Module; Air Bag Passenger
- Position: Upper Passenger Side
- Item Weight: 7.70 Pounds
- Item Dimensions: 15.1 x 10.7 x 6.7 inches
- Condition: New
- Fitment Type: Direct Replacement
- SKU: 55314982AF
- Warranty: This genuine part is guaranteed by Mopar's factory warranty.
 Product Specifications
- Other Name: Airbag - Driver; Steering Wheel Air Bag; Driver Air Bag; Air Bag Driver
- Position: Driver Side
- Item Weight: 2.90 Pounds
- Item Dimensions: 13.0 x 8.3 x 4.8 inches
- Condition: New
- Fitment Type: Direct Replacement
- SKU: 5JG52DX9AA
- Warranty: This genuine part is guaranteed by Mopar's factory warranty.
2003 Jeep Wrangler Air Bag Parts and Q&A
- Q: How to Replace a Faulty or Damaged Air Bag on 2003 Jeep Wrangler?A: Before replacing a damaged driver air bag, first unplug the battery negative cable and wait two minutes to allow the air bag system capacitor to discharge. Take out the two screws found under the steering wheel that hold the air bag to the armature. Get rid of the air bag in front of you, then reach the back of the air bag housing to locate the two electrical connections. Tom Smit Removed the pigtail connector attached to the Clock Spring wire from the feed connector on the back of the driver air bag. Fasten your grip and pull or carefully jiggle the Clock Spring driver air bag pigtail wire connector insulator to disconnect it from the air bag inflator connector receptacle. Take out the air bag from inside the steering wheel. A new Clock Spring must be installed if the driver's air bag is deployed. During installation, bring the driver air bag near the steering wheel so the two electrical connections at the back of the housing can be reconnected. Join the Clock Spring driver air bag pigtail wire connector with the air bag inflator connector receptacle, so that a clear click tells you the connection is secure. Connect the Clock Spring horn switch pigtail wire to the harness enabling the air bag horn switch on the rear section of the driver air bag case. Put the driver air bag right on the steering wheel so that the automotive wire connections and the steering wheel wires are not crushed. Put the two screws that secure the driver air bag to the steering wheel armature in from the underside, holding both sides in place and tightening them to 10 N.m. No need to hook up the battery negative cable right now, as you'll have to perform the supplemental restraint system verification test afterwards whenever you replace any component.
Related 2003 Jeep Wrangler Parts
 2003 Jeep Wrangler Antenna
 2003 Jeep Wrangler Clock Spring
 2003 Jeep Wrangler Ignition Switch
 2003 Jeep Wrangler Headlight Switch
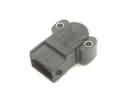 2003 Jeep Wrangler Throttle Position Sensor
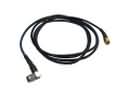 2003 Jeep Wrangler Antenna Cable
 2003 Jeep Wrangler Engine Control Module
 2003 Jeep Wrangler Oil Pressure Switch
 2003 Jeep Wrangler Air Bag Control Module
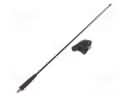
 2003 Jeep Wrangler Antenna Mast
 2003 Jeep Wrangler Intake Manifold Temperature Sensor
 2003 Jeep Wrangler Mirror Switch