JeepParts
My Garage
My Account
Cart
OEM 2004 Dodge Dakota Exhaust Valve
Exhaust Muffler Valve- Select Vehicle by Model
- Select Vehicle by VIN
Select Vehicle by Model
orMake
Model
Year
Select Vehicle by VIN
For the most accurate results, select vehicle by your VIN (Vehicle Identification Number).
2 Exhaust Valves found


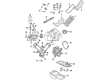
2004 Dodge Dakota Exhaust Valve Part Number: 53020748
Product Specifications- Other Name: Valve - Exhaust; Intake Valve; Valves; Valve Exhaust Standard
- Item Weight: 1.10 Pounds
- Item Dimensions: 9.5 x 5.2 x 1.9 inches
- Condition: New
- Fitment Type: Direct Replacement
- SKU: 53020748
- Warranty: This genuine part is guaranteed by Mopar's factory warranty.

2004 Dodge Dakota Exhaust Valve Part Number: 53021571AA
Product Specifications- Other Name: Valve - Exhaust; Intake Valve; Valves; Valve Exhaust Standard
- Item Weight: 0.60 Pounds
- Condition: New
- Fitment Type: Direct Replacement
- SKU: 53021571AA
- Warranty: This genuine part is guaranteed by Mopar's factory warranty.
2004 Dodge Dakota Exhaust Valve Parts and Q&A
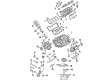
- Q: How to Service and Repair Exhaust Valves and Intake Valves on 2004 Dodge Dakota?A: Before touching the intake and exhaust valves and seats, you need to take out the cylinder heads first. First, disconnect the rocker arms with the lash adjusters, next remove the camshaft bearing caps and finally, take out the camshaft. Wear Special Tool 8519 Adapter and use either C-3422-B or C-3422-C Valve Spring Compressor to squeeze the valve, gently tapping the top of the spring if locking pins do not release. With care, remove the spring retainer lock halves and handle the valve spring at all times, because it is under tension. After taking off the valve spring compressor, pull out the spring retainer and spring, check for any jagged bits on the keeper grooves and remove any burrs from the valve stem as you remove the valve. Because intake and exhaust valves use the same seal, pull out the valve stem seal and be sure to mark the valve so you know where it will fit again. It's good to examine and test the valve springs to determine if they're worth keeping while removing the valves. Inspect the springs for damages, then measure the load at test length using tool C-647 and discard any that do not fall within established levels. After applying some clean engine oil to the valve stem, fit it into the cylinder and confirm the valve stem seal is in place, using the garter spring. Set the spring and spring retainer before using the valve spring compressor to put in the two halves of the valve spring retainer. Raise the compressor and make sure the retainer halves and spring retainer have dropped into their holes completely. Using clean engine oil, grease the camshaft journal, put the camshaft so that the left side's sprocket dowel is approximately at 11 o'clock and the right one's dowel is at 12 o'clock and then place the camshaft bearing covers. As shown in the manual, tighten the camshaft bearing cap retaining bolts to 9 - 13 Nm (100 inch lbs.) in 1/2 turns of the wrench in the order given. Install the hydraulic lash adjusters and the rocker arms in the last step.
Related 2004 Dodge Dakota Parts
 2004 Dodge Dakota Timing Chain
 2004 Dodge Dakota Cam Gear
 2004 Dodge Dakota Camshaft
 2004 Dodge Dakota Crankshaft
 2004 Dodge Dakota Crankshaft Seal
 2004 Dodge Dakota Cylinder Head Gasket
 2004 Dodge Dakota Dipstick
 2004 Dodge Dakota Harmonic Balancer
 2004 Dodge Dakota Intake Valve
 2004 Dodge Dakota Oil Filler Cap
 2004 Dodge Dakota Rocker Arm
 2004 Dodge Dakota Timing Chain Tensioner