JeepParts
My Garage
My Account
Cart
OEM 2004 Dodge Durango Brake Master Cylinder
- Select Vehicle by Model
- Select Vehicle by VIN
Select Vehicle by Model
orMake
Model
Year
Select Vehicle by VIN
For the most accurate results, select vehicle by your VIN (Vehicle Identification Number).
2 Brake Master Cylinders found

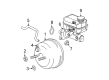
2004 Dodge Durango Master Cylinder Part Number: 5102283AB
$228.38 MSRP: $289.51You Save: $61.13 (22%)Ships in 1-2 Business DaysProduct Specifications- Other Name: Master Cylinder - Brake; Brake Master Cylinder; Master Cylinder Brake
- Item Weight: 3.30 Pounds
- Condition: New
- Fitment Type: Direct Replacement
- SKU: 5102283AB
- Warranty: This genuine part is guaranteed by Mopar's factory warranty.
2004 Dodge Durango Master Cylinder Part Number: 5102284AB
Product Specifications- Other Name: Master Cylinder - Brake; Brake Master Cylinder; Master Cylinder Brake
- Item Weight: 3.20 Pounds
- Item Dimensions: 10.9 x 7.4 x 5.9 inches
- Condition: New
- Fitment Type: Direct Replacement
- SKU: 5102284AB
- Warranty: This genuine part is guaranteed by Mopar's factory warranty.
2004 Dodge Durango Brake Master Cylinder Parts and Q&A
- Q: How to Service and Repair a Brake Master Cylinder on 2004 Dodge Durango?A: Start the brake master cylinder service by pressing the brake pedal five times to remove any air left in the booster, then remove all the fluid from the reservoir. Detach the connector for warning you of low fluid and put a towel or cloth below the brake master cylinder outlet to protect your car. Get rid of the brake lines from the brake master cylinder and the bolts that keep it in place. Try to pull the brake master cylinder and reservoir assembly from the booster, ensuring it remains perpendicular to the front of the booster so you won't bump into the booster output rod or cause it to fall out of place. If replacing the brake master cylinder, bleed it before you install it. Position and lock the brake booster's output rod properly, so that it enters the brake master cylinder plunger sleeve when installing the brake parts. Review if there's a vacuum seal at the shoulder of the brake master cylinder flange, as well as its neck-there should be a square seal for it to be vacuum tight. Lay the brake master cylinder down in the booster so the plunger is located at the top and is perfectly placed above the output rod, then carefully fasten the brake master cylinder onto the studs. Attach the mounting nuts and close them off with a torque wrench at 10 Nm and next install the brake lines and tighten them at 19 Nm. Reinstall the low fluid level switch connector after which you should fill up and bleed the base braking system.
Related 2004 Dodge Durango Parts
 2004 Dodge Durango Brake Booster
 2004 Dodge Durango Brake Caliper
 2004 Dodge Durango ABS Control Module
 2004 Dodge Durango Brake Caliper Bolt
 2004 Dodge Durango Brake Caliper Bracket
 2004 Dodge Durango Brake Caliper Piston
 2004 Dodge Durango Brake Disc
 2004 Dodge Durango Brake Dust Shield
 2004 Dodge Durango Brake Line
 2004 Dodge Durango Brake Pad
 2004 Dodge Durango Hydraulic Hose
 2004 Dodge Durango Wheel Stud