JeepParts
My Garage
My Account
Cart
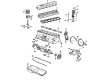
OEM 2004 Jeep Grand Cherokee Rocker Arm
Engine Rocker Arm- Select Vehicle by Model
- Select Vehicle by VIN
Select Vehicle by Model
orMake
Model
Year
Select Vehicle by VIN
For the most accurate results, select vehicle by your VIN (Vehicle Identification Number).
3 Rocker Arms found


2004 Jeep Grand Cherokee Rocker Arms Part Number: 53020742AC
$18.24 MSRP: $26.70You Save: $8.46 (32%)Product Specifications- Other Name: Arm - Valve; Rocker Arm; Rocker Arm Valve
- Replaces: 68045794AA, 53021913AB, 53020742AB
- Item Weight: 0.60 Pounds
- Item Dimensions: 1.8 x 2.6 x 3.7 inches
- Condition: New
- Fitment Type: Direct Replacement
- SKU: 53020742AC
- Warranty: This genuine part is guaranteed by Mopar's factory warranty.


2004 Jeep Grand Cherokee Rocker Arms Part Number: J3242393
Product Specifications- Other Name: Arm - Valve; Arm, Valve Rocker; Arm, Valve Rocket; Rocker Arm Valve; Arm, Rocker
- Replaces: 53020344
- Item Weight: 0.70 Pounds
- Item Dimensions: 4.1 x 3.1 x 1.9 inches
- Condition: New
- Fitment Type: Direct Replacement
- SKU: J3242393
- Warranty: This genuine part is guaranteed by Mopar's factory warranty.


2004 Jeep Grand Cherokee Rocker Pivot Part Number: J3235090
Product Specifications- Other Name: Rocker Arm; Rocker Arm Pivot; Pivot, Rocker Arm; Pivot Rocker Arm; Pivot
- Item Weight: 0.70 Pounds
- Condition: New
- Fitment Type: Direct Replacement
- SKU: J3235090
- Warranty: This genuine part is guaranteed by Mopar's factory warranty.
2004 Jeep Grand Cherokee Rocker Arm Parts and Q&A
- Q: How to Maintain and Repair a Rocker Arm Assembly on 2004 Jeep Grand Cherokee?A: To handle the rocker arm and adjustment assembly, take out the cylinder head cover first. Monitor the rocker arm bridges because misalignments in the valve tip region might occur. Loose each bridge's capscrew a thin bit each turn after the bridge rather than vice versa or you may damage the bridges. After taking out the bridges, pivots and set of rocker arms, set them on a bench according to the order they were unbolted and then leave the push rods in the order they were removed. Wash every part with cleaner and use air to clear the oil moving through the rocker arms and push rods. Review all the rocker arm pivot surfaces, if they appear scuffed, pitted, cracked or are highly worn, get a replacement and inspect the valve stem tip contact point for serious corrosion. Check the condition of every push rod end and if any has worn greatly, replace it along with the related hydraulic tappet due to a lack of oil. Check the shape of the push rods by rolling them on a flat surface or by shining a light between them and a surface, since any wear in the center may show there's possibly a blockage inside the engine cylinder head. While installing, apply some Mopar Engine Oil Supplement (or a suitable equivalent) to the ball ends of the push rods, then place them back where they originally were and see that the bottom end is properly centered in the tappet plunger cap seat. Coat the surface where the rocker arm connects to the pivot with Mopar Engine Oil Supplement or something similar, then fit the rocker arms, pivots and bridges into their places over each cylinder as they were before. Install each capscrew loosely into its bridge then tighten them in an alternating order one turn at a time; this way, your bridge Installer will be able to reach the tightening value of 28 Nm (21 ft. lbs.) before damage can set in. The last step is to replace the engine cylinder head cover.
Related 2004 Jeep Grand Cherokee Parts
 2004 Jeep Grand Cherokee Camshaft
 2004 Jeep Grand Cherokee Oil Pan
 2004 Jeep Grand Cherokee Harmonic Balancer
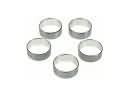 2004 Jeep Grand Cherokee Camshaft Bearing
 2004 Jeep Grand Cherokee Coolant Filter
 2004 Jeep Grand Cherokee Crankshaft Pulley
 2004 Jeep Grand Cherokee Dipstick Tube
 2004 Jeep Grand Cherokee Engine Mount Bracket
 2004 Jeep Grand Cherokee Exhaust Valve
 2004 Jeep Grand Cherokee Rod Bearing
 2004 Jeep Grand Cherokee Timing Chain Tensioner
 2004 Jeep Grand Cherokee Valve Stem Seal