JeepParts
My Garage
My Account
Cart
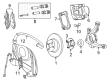
OEM 2005 Chrysler PT Cruiser Steering Knuckle
Front Steering Knuckle- Select Vehicle by Model
- Select Vehicle by VIN
Select Vehicle by Model
orMake
Model
Year
Select Vehicle by VIN
For the most accurate results, select vehicle by your VIN (Vehicle Identification Number).
6 Steering Knuckles found


2005 Chrysler PT Cruiser Knuckle, Front Driver Side Part Number: 5272487AC
$242.25 MSRP: $318.00You Save: $75.75 (24%)Ships in 1-2 Business DaysProduct Specifications- Other Name: Knuckle - Front; Steering Knuckle, Front Left
- Position: Front Driver Side
- Replaces: 5272487AB
- Item Weight: 12.00 Pounds
- Item Dimensions: 10.3 x 10.5 x 5.9 inches
- Condition: New
- Fitment Type: Direct Replacement
- SKU: 5272487AC
- Warranty: This genuine part is guaranteed by Mopar's factory warranty.


2005 Chrysler PT Cruiser Knuckle, Front Passenger Side Part Number: 5272486AC
$213.00 MSRP: $316.00You Save: $103.00 (33%)Ships in 1-3 Business DaysProduct Specifications- Other Name: Knuckle - Front; Steering Knuckle, Front Right
- Position: Front Passenger Side
- Replaces: 5272486AB
- Item Weight: 10.90 Pounds
- Item Dimensions: 10.5 x 10.4 x 6.0 inches
- Condition: New
- Fitment Type: Direct Replacement
- SKU: 5272486AC
- Warranty: This genuine part is guaranteed by Mopar's factory warranty.

2005 Chrysler PT Cruiser Knuckle, Front Passenger Side Part Number: 5272478AE
$206.18 MSRP: $338.00You Save: $131.82 (39%)Ships in 1-2 Business DaysProduct Specifications- Other Name: Knuckle - Front; Steering Knuckle, Front Right
- Position: Front Passenger Side
- Replaces: 5272478AB
- Item Weight: 10.00 Pounds
- Item Dimensions: 10.4 x 10.4 x 10.5 inches
- Condition: New
- Fitment Type: Direct Replacement
- SKU: 5272478AE
- Warranty: This genuine part is guaranteed by Mopar's factory warranty.

2005 Chrysler PT Cruiser Knuckle, Front Passenger Side Part Number: 5272492AB
$185.73 MSRP: $214.00You Save: $28.27 (14%)Ships in 1-2 Business DaysProduct Specifications- Other Name: Knuckle - Front; Steering Knuckle, Front Right; Knuckle Front
- Position: Front Passenger Side
- Item Weight: 10.40 Pounds
- Item Dimensions: 11.5 x 8.4 x 4.7 inches
- Condition: New
- Fitment Type: Direct Replacement
- SKU: 5272492AB
- Warranty: This genuine part is guaranteed by Mopar's factory warranty.
2005 Chrysler PT Cruiser Knuckle, Front Driver Side Part Number: 5272479AE
$273.32 MSRP: $338.00You Save: $64.68 (20%)Ships in 1-2 Business DaysProduct Specifications- Other Name: Knuckle - Front; Steering Knuckle, Front Left
- Position: Front Driver Side
- Replaces: 5272479AB
- Item Weight: 9.70 Pounds
- Condition: New
- Fitment Type: Direct Replacement
- SKU: 5272479AE
- Warranty: This genuine part is guaranteed by Mopar's factory warranty.
- Product Specifications
- Other Name: Knuckle - Front; Steering Knuckle, Front Left; Knuckle Front
- Position: Front Driver Side
- Item Weight: 11.00 Pounds
- Item Dimensions: 12.7 x 12.5 x 6.3 inches
- Condition: New
- Fitment Type: Direct Replacement
- SKU: 5272493AB
- Warranty: This genuine part is guaranteed by Mopar's factory warranty.
2005 Chrysler PT Cruiser Steering Knuckle Parts and Q&A
- Q: How to Remove and Reinstall a Steering Knuckle on 2005 Chrysler PT Cruiser?A: Apply the brakes and hold them down, lift the car and then remove the front tire and wheel from the assembly to take out the steering knuckle. After that, pull out the hub nut, lock nut and cotter pin and while using the brakes, sit near the end of the driveshaft and undo and remove the hub nut. Take off the brakes, then uninstall the caliper, adapter and rotor as an assembly from the steering knuckle. Hold the tie rod stud with a wrench and use the wrench again to unfasten and remove the steering knuckle nut. Remover MB991113 and Special MB91738 are used to pull out the tie rod end from the knuckle and also take out the heat shield. Straighten out the steering knuckle and remove the stud nut and clamp bolts that go to the ball joint, but always leave the bolts that screw between the strut and knuckle untouched. Using a pin punch to tap on the bolt, pull out each of the bolts connecting the steering knuckle to the strut, so you don't minimize the ball joint seal. Begin the separation by prying the control arm down in the lower section and up on the stud's connecting surface on the ball joint boss. Support the driveshaft so the inner CV joint doesn't disconnect and then break the steering knuckle loose from the C/V joint at the other end of the driveshaft. If the knuckle you replace does not have a wheel bearing, install a new bearing before putting in the steering knuckle. To disassemble, unmount the steering knuckle, hub and wheel bearing together from the car, then remove three of the wheel studs by unscrewing them with Remover, Special Tool C-4150A and pushing them out. Set the Bearing Splitter, Special Tool 1130, between the hub and the bearing retainer plate. After that, set the steering knuckle face down in an arbor press. Lower Remover/Installer, Special Tool 6644-2, to remove the hub from the wheel bearing and take out the bearing splitter, before removing the bolts securing the bracket. Release the wheel bearing from the steering knuckle by pressing it out with Remover/Installer, Special Tool MB-990799, then use the Bearing Splitter, Special Tool 1130, to take the bearing race apart from the hub. Before assembly, wipe down the steering knuckle bore, put the steering knuckle in an arbor press, use Installer, Special Tool C-4698-2 and make sure the wheel bearing is squarely inserted. Press the wheel bearing into the steering knuckle with Installer, Special Tool 5052, then install and secure the retainer plate with the bolts set to 28 Nm (250 inch lbs.), as shown in the drawings. Set the wheel mounting studs into the hub flange and force them in with the arbor press. Push the hub into the wheel bearing with the arbor press and make certain it is completely seated. Verify that the hub turns easily, then set the steering knuckle on the vehicle by sliding it onto the drive shaft and making sure the ball joint stud is with the stud on the steering knuckle. Fit a new stud pinch bolt and nut onto the ball joint and tighten them to 95 Nm (70 ft. lbs.), ensuring the strut assembly-to-steering knuckle bolts don't rotate during installation. For each strut bolts, first align them and tighten the nuts so the torque is 53 Nm (40 ft. lbs.) plus 90° further increase. Apply the tie rod heat shield, then join the outer tie rod ball stud to the steering knuckle arm and attach it with a 55 Nm (40 ft. lbs.) torque. Install the brake rotor, brake caliper and adapter after that, then clean and tighten the drive shaft outer C/V joint hub nut. Once brake pressure is applied, tighten the hub nut to 244 Nm (180 ft. lbs.). Then, install a spring washer, a lock nut and a cotter pin on the hub nut. After that, fit the tire and wheel assembly back onto the car, tighten the wheel mounting nuts so that the torque reaches 135 Nm (100 ft. lbs.), drop the car and set the front toe according to the instruction.
Related 2005 Chrysler PT Cruiser Parts
 2005 Chrysler PT Cruiser Wheel Bearing
 2005 Chrysler PT Cruiser Wheel Hub
 2005 Chrysler PT Cruiser Control Arm
 2005 Chrysler PT Cruiser Ball Joint
 2005 Chrysler PT Cruiser Bump Stop
 2005 Chrysler PT Cruiser Coil Spring Insulator
 2005 Chrysler PT Cruiser Coil Springs
 2005 Chrysler PT Cruiser Shock And Strut Mount
 2005 Chrysler PT Cruiser Sway Bar Bracket
 2005 Chrysler PT Cruiser Sway Bar Bushing
 2005 Chrysler PT Cruiser Sway Bar Kit
 2005 Chrysler PT Cruiser Sway Bar Link