JeepParts
My Garage
My Account
Cart
OEM 2005 Dodge Caravan Brake Caliper
Caliper- Select Vehicle by Model
- Select Vehicle by VIN
Select Vehicle by Model
orMake
Model
Year
Select Vehicle by VIN
For the most accurate results, select vehicle by your VIN (Vehicle Identification Number).
5 Brake Calipers found

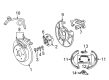
2005 Dodge Caravan Intake Manifold, Rear Part Number: 5019808AA
Product Specifications- Other Name: Caliper - Disc Brake; Disc Brake Caliper, Rear; Caliper; Caliper Disc Brake; Brake Caliper
- Position: Rear
- Item Weight: 5.10 Pounds
- Item Dimensions: 7.4 x 7.1 x 6.4 inches
- Condition: New
- Fitment Type: Direct Replacement
- SKU: 5019808AA
- Warranty: This genuine part is guaranteed by Mopar's factory warranty.

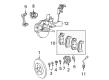
2005 Dodge Caravan Caliper, Front Driver Side Part Number: 5019806AA
Product Specifications- Other Name: Caliper - Disc Brake; Disc Brake Caliper, Front Left; Caliper Disc Brake; Brake Caliper
- Position: Front Driver Side
- Item Weight: 10.00 Pounds
- Item Dimensions: 7.1 x 6.2 x 3.9 inches
- Condition: New
- Fitment Type: Direct Replacement
- SKU: 5019806AA
- Warranty: This genuine part is guaranteed by Mopar's factory warranty.
- Product Specifications
- Other Name: Caliper - Disc Brake; Disc Brake Caliper, Front Right; Caliper Disc Brake; Brake Caliper
- Position: Front Passenger Side
- Item Weight: 9.50 Pounds
- Item Dimensions: 10.1 x 7.8 x 6.9 inches
- Condition: New
- Fitment Type: Direct Replacement
- SKU: 5019807AA
- Warranty: This genuine part is guaranteed by Mopar's factory warranty.
2005 Dodge Caravan Caliper, Front Driver Side Part Number: 5139901AA
Product Specifications- Other Name: Caliper - Disc Brake; Disc Brake Caliper, Front Left; Caliper Disc Brake; Brake Caliper
- Position: Front Driver Side
- Item Weight: 9.60 Pounds
- Condition: New
- Fitment Type: Direct Replacement
- SKU: 5139901AA
- Warranty: This genuine part is guaranteed by Mopar's factory warranty.
- Product Specifications
- Other Name: Caliper - Disc Brake; Disc Brake Caliper, Front, Front Right; Caliper Disc Brake; Brake Caliper
- Position: Front Passenger Side
- Item Weight: 9.30 Pounds
- Condition: New
- Fitment Type: Direct Replacement
- SKU: 5139900AA
- Warranty: This genuine part is guaranteed by Mopar's factory warranty.
2005 Dodge Caravan Brake Caliper Parts and Q&A
- Q: How to Service and Repair a Rear Brake Caliper on 2005 Dodge Caravan?A: First, move the brake pedal far down to its first inch before pinning it in place using a brake pedal depressor to stop the brake fluid from dripping out of the reservoir. Raise the vehicle and take off the rear wheel and tire set. With the brake hose disconnected from the caliper, throw away both washers you find underneath the banjo bolt. Take out the caliper guide pin bolts, then rotate the front of the caliper up and use your fingers to pull the rear away from under the abutment. If you need to remove the brake rotor, take the retainer clips off and pull the rotor directly from the studs. Before you remove it, check and clean the caliper, then place the piston outside its bore using hydraulic pressure while you keep the brake pedal down. Release the brake fluid flex hose and place the caliper in a vise with cushioned jaws, after which you should pull off and throw out the piston dust boot. Make sure a soft tool is used to pull out the piston seal, then use alcohol or recommend solvent to scrub the bore and clear all holes and check for any signs of scoring or pitting. Wipe the caliper with a damp cloth and throw away any cloth that has fibers from asbestos in an air-tight container. Look for any leaks, damage to the dust boot and the state of the guide pin dust boots on the caliper; if there are problems, break it apart, clean it and add new seals and dust boots. Dip the new piston seal in clean brake fluid, slide it down into its groove in the caliper bore and place the new piston boot over the piston after coating it. Slide the piston into the center of the caliper and make sure the pressure is even to keep it from binding. Gain access to the boot's counterbore using Special Tool C-4689 or C-4842 and Handle C-4171, then drive it in place and reconnect the caliper before you bleed the brakes. Retract the caliper piston, put a new brake rotor on if you have swapped it and lightly drop the caliper and brake shoes onto the adapter. Fit the special caliper guide pin bolts, tighten them until they read 35 Nm (26 ft. lbs.) and secure the brake hose with special washers, tightening the banjo bolt to 47 Nm (35 ft. lbs.). Attach the wheel and tire assembly again, calculate the proper order for tightening stud nuts, adjust them all to 9 ft-lbs., lower the car, take away the brake pedal depressor, fill the brake system and go on a test drive to check the system's operation.
Related 2005 Dodge Caravan Parts
 2005 Dodge Caravan Brake Master Cylinder
 2005 Dodge Caravan Parking Brake Cable
 2005 Dodge Caravan Speed Sensor
 2005 Dodge Caravan ABS Control Module
 2005 Dodge Caravan Brake Caliper Piston
 2005 Dodge Caravan Brake Disc
 2005 Dodge Caravan Brake Line
 2005 Dodge Caravan Brake Pad
 2005 Dodge Caravan Brake Proportioning Valve
 2005 Dodge Caravan Hydraulic Hose
 2005 Dodge Caravan Wheel Cylinder
 2005 Dodge Caravan Wheel Stud