JeepParts
My Garage
My Account
Cart
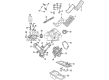
OEM 2005 Dodge Dakota Piston
Engine Pistons- Select Vehicle by Model
- Select Vehicle by VIN
Select Vehicle by Model
orMake
Model
Year
Select Vehicle by VIN
For the most accurate results, select vehicle by your VIN (Vehicle Identification Number).
3 Pistons found


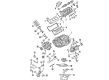
2005 Dodge Dakota Piston Part Number: 68233351AA
Product Specifications- Replaces: 5012362AF, 5012362AE, 5012362AC, 5012362AD
- Item Weight: 3.00 Pounds
- Item Dimensions: 10.5 x 6.3 x 6.5 inches
- Condition: New
- Fitment Type: Direct Replacement
- SKU: 68233351AA
- Warranty: This genuine part is guaranteed by Mopar's factory warranty.


2005 Dodge Dakota Piston Part Number: 5019316AC
Product Specifications- Replaces: 5019316AA, 5019316AB
- Item Weight: 3.30 Pounds
- Item Dimensions: 11.3 x 7.3 x 6.9 inches
- Condition: New
- Fitment Type: Direct Replacement
- SKU: 5019316AC
- Warranty: This genuine part is guaranteed by Mopar's factory warranty.

2005 Dodge Dakota Piston Part Number: 5018018AB
Product Specifications- Other Name: Piston Pin And Rod Std; Piston Pin And Rod Std
- Item Weight: 3.10 Pounds
- Item Dimensions: 14.7 x 7.4 x 5.7 inches
- Condition: New
- Fitment Type: Direct Replacement
- SKU: 5018018AB
- Warranty: This genuine part is guaranteed by Mopar's factory warranty.
2005 Dodge Dakota Piston Parts and Q&A
- Q: How to Remove and Replace a Piston and Its Connecting Rod on 2005 Dodge Dakota?A: Before taking out and installing the piston and connecting rod, cut off the battery's negative wire, take off the oil pan and gasket/windage tray and remove the cylinder head(s). When wanted, use a good ridge reamer to take off the top ridge from the cylinder bores to cover the tops of the pistons. Removing pistons and connecting rods from the top of the cylinder block helps to center each rod as you rotate the crankshaft. Don't use a number stamp or punch on connecting rod parts and mark the positions of connecting rod and bearing cap parts using a permanent ink tool or scribe so you don't harm the core and cap surfaces. Take off the connecting rod cap, fit Special Tool 8507 Connecting Rod Guides into the removed connecting rod and take out the piston from the cylinder bore for every piston. As soon as you remove the bearing, mount the bearing cap onto the connecting rod to avoid harm. Avoid wire wheels or abrasive cleaners on the pistons and rod ends because of the Moly, clean with a special solvent in warm water and use a wood or plastic scraper on the ring grooves. Check the connecting rod journal for any excess, taper or scratches and look for signs of twisting or bending on the connecting rod. Also, examine the piston for a taper, elliptical shape, scoring and cracks around the ring lands. When installing, put the piston rings in place first, set the piston and connecting rod assembly into the bore, soak the piston and rings in engine oil and fit a ring compressor on them. Make certain the bearing hole is in the correct position and put clean engine oil on the bearing surface. Thread Special Tool 8507 Connecting Rod Guides into the connecting rod bolts so that the raised F on the piston pin bore lines up with the front of the engine and the connecting rod oil slinger turns towards the engine front. Apply oil and cleans it out of the cylinder bore, turn the crankshaft until you have centered the rod journal and gently insert the rod and piston into the cylinder while directing the rod onto the journal. Bear in mind that connecting rod bolts are Torque to Yield Bolts and should never be used again after they are loosened or taken out; always put in new bolts each time they are removed. Use engine oil to coat the rod bolts and bearing areas, screw the connecting rod cap and bearing cap into place and torque the bolts to 27 Nm plus 90°. After that, replace the cylinder head(s), timing chain and cover, cylinder head covers and oil pan and gasket/windage tray, pour the correct amount of engine oil into the crankcase and reattach the negative cable to the battery.
Related 2005 Dodge Dakota Parts
 2005 Dodge Dakota Cylinder Head
 2005 Dodge Dakota Cam Gear
 2005 Dodge Dakota Crankshaft
 2005 Dodge Dakota Crankshaft Thrust Washer Set
 2005 Dodge Dakota Dipstick Tube
 2005 Dodge Dakota Exhaust Valve
 2005 Dodge Dakota Intake Valve
 2005 Dodge Dakota Oil Pan Gasket
 2005 Dodge Dakota Rod Bearing
 2005 Dodge Dakota Timing Chain Tensioner
 2005 Dodge Dakota Timing Cover
 2005 Dodge Dakota Timing Cover Gasket