JeepParts
My Garage
My Account
Cart
OEM 2006 Dodge Dakota Piston
Engine Pistons- Select Vehicle by Model
- Select Vehicle by VIN
Select Vehicle by Model
orMake
Model
Year
Select Vehicle by VIN
For the most accurate results, select vehicle by your VIN (Vehicle Identification Number).
3 Pistons found


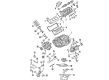
2006 Dodge Dakota Piston Part Number: 68233351AA
Product Specifications- Replaces: 5012362AF, 5012362AE, 5012362AC, 5012362AD
- Item Weight: 3.00 Pounds
- Item Dimensions: 10.5 x 6.3 x 6.5 inches
- Condition: New
- Fitment Type: Direct Replacement
- SKU: 68233351AA
- Warranty: This genuine part is guaranteed by Mopar's factory warranty.


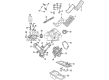
2006 Dodge Dakota Piston Part Number: 5019316AC
Product Specifications- Replaces: 5019316AA, 5019316AB
- Item Weight: 3.30 Pounds
- Item Dimensions: 11.3 x 7.3 x 6.9 inches
- Condition: New
- Fitment Type: Direct Replacement
- SKU: 5019316AC
- Warranty: This genuine part is guaranteed by Mopar's factory warranty.

2006 Dodge Dakota Piston Part Number: 5018018AB
Product Specifications- Other Name: Piston Pin And Rod Std; Piston Pin And Rod Std
- Item Weight: 3.10 Pounds
- Item Dimensions: 14.7 x 7.4 x 5.7 inches
- Condition: New
- Fitment Type: Direct Replacement
- SKU: 5018018AB
- Warranty: This genuine part is guaranteed by Mopar's factory warranty.
2006 Dodge Dakota Piston Parts and Q&A
- Q: How to Remove and Replace a Piston in an Engine on 2006 Dodge Dakota?A: Before you remove and replace the piston, take off the negative cable from the battery, remove the oil pan and gasket/windage tray and the cylinder head(s). If necessary, reamer the tops of the bore ridges using a solid ridge reamer, so that the pistons' tops are safely covered by the cylinder liner. Pinch bolts must be removed from the top of the cylinder block as you turn the crankshaft to align each connecting rod in the cylinder. Forget about putting numbers on the ends of connecting rods and caps, instead use a permanent marker to mark the rod and cap positions, making sure not to hurt the surfaces of the uneven parts. Remove the cap on the connecting rod and fit the Special Tool 8507 Connecting Rod Guides into the connecting rod as you remove it. After each piston is removed, take out the piston from its cylinder bore. Right after removing the bearing, place the bearing cap on the mating connecting rod. Don't scrub the pistons or rods with anything abrasive, since touching the Moly grease may damage them; instead, soft clean the pistons with a good solvent in warm water and then towel dry, then use a wood or plastic scraper just for the grooves of the rings on the pistons. Look for roughness, taper or wear on the connecting rod's journal and check the connecting rod itself for any bending or twisting. As for the piston, examine its ring lands for cracks, check for taper or shape loss and inspect for scoring. Before installing the piston, place the rings into the block, soak them in oil, put a ring compressor on them and verify that they don't shift. Make the holes for the bearings match and coat them lightly with clean engine oil. Screw the Special Tool 8507 Connecting Rod Guides into the connecting rod bolt holes so that the F on the piston pin bore points toward the front of the engine and the connecting rod oil slinger slot points forward as well. Grease and brush the cylinder bore with engine oil, spin the crankshaft to center the journal on the connecting rod and move the rod into the cylinder, tapping the top slightly with the hammer handle to center the piston and connect the rod with the journal. Remember that, as Torque to Yield Bolts, Connecting Rod Bolts must be swapped out after use every time you loosen or remove them. Coat both the rod bolts and bearing surfaces with engine oil, place the connecting rod cap and bearing in position and tighten those bolts to 27 Nm (20 ft. lbs.) plus 90°. After that, put back the cylinder head(s), timing chain and cover, cylinder head cover(s), oil pan and gasket/windage tray, add enough engine oil to the crankcase and attach the negative cable back to the battery.
Related 2006 Dodge Dakota Parts
 2006 Dodge Dakota Cylinder Head
 2006 Dodge Dakota Cam Gear
 2006 Dodge Dakota Crankshaft
 2006 Dodge Dakota Crankshaft Thrust Washer Set
 2006 Dodge Dakota Dipstick Tube
 2006 Dodge Dakota Exhaust Valve
 2006 Dodge Dakota Intake Valve
 2006 Dodge Dakota Oil Pan Gasket
 2006 Dodge Dakota Rod Bearing
 2006 Dodge Dakota Timing Chain Tensioner
 2006 Dodge Dakota Timing Cover
 2006 Dodge Dakota Timing Cover Gasket