JeepParts
My Garage
My Account
Cart
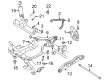
OEM 2005 Dodge Durango Steering Knuckle
Front Steering Knuckle- Select Vehicle by Model
- Select Vehicle by VIN
Select Vehicle by Model
orMake
Model
Year
Select Vehicle by VIN
For the most accurate results, select vehicle by your VIN (Vehicle Identification Number).
2 Steering Knuckles found


2005 Dodge Durango Knuckle, Front Driver Side Part Number: 52113229AE
$592.28 MSRP: $898.00You Save: $305.72 (35%)Product Specifications- Other Name: Knuckle - Front; Steering Knuckle, Front Left; Knuckle Front
- Position: Front Driver Side
- Replaces: 52113229AC, 52113229AD, 52113229AB
- Item Weight: 11.20 Pounds
- Item Dimensions: 18.5 x 13.1 x 5.5 inches
- Condition: New
- Fitment Type: Direct Replacement
- SKU: 52113229AE
- Warranty: This genuine part is guaranteed by Mopar's factory warranty.

2005 Dodge Durango Knuckle, Front Passenger Side Part Number: 52113228AE
$605.57 MSRP: $857.00You Save: $251.43 (30%)Product Specifications- Other Name: Knuckle - Front; Steering Knuckle, Front Right; Knuckle Front
- Position: Front Passenger Side
- Replaces: 52113228AB, 52113228AC, 52113228AD
- Item Weight: 11.80 Pounds
- Item Dimensions: 18.8 x 12.9 x 5.5 inches
- Condition: New
- Fitment Type: Direct Replacement
- SKU: 52113228AE
- Warranty: This genuine part is guaranteed by Mopar's factory warranty.
2005 Dodge Durango Steering Knuckle Parts and Q&A
- Q: How to Service and Repair a Steering Knuckle on 2005 Dodge Durango?A: First, support and lift the car off the ground; after that, take off the wheel and tire assembly to service the steering knuckle. After that, remove the brake caliper, rotor, shield and ABS wheel speed sensor if it is fitted on the vehicle. On 4X4 models, undo the front halfshaft nut. Take off the nut from the tie rod end and use Remover 8677 to free the tie rod from the knuckle without harming the ball joint seal. Take off the upper ball joint nut and then remove the ball joint from the knuckle with Remover 8677 . Lift the lower control arm with a hydraulic jack, then take out the lower ball joint nut, separate the ball joint from the knuckle with Remover 8677 and finally remove the knuckle itself. Following that, disconnect the hub/bearing bolts from the knuckle and get the hub/bearing out of the steering knuckle. When you install, make sure the ball joint stud tapers are free from filth and dried, even using mineral spirits if that's essential. Put the hub/bearing onto the steering knuckle and tighten the bolts with a torque of 163 Nm (120 ft. lbs.). Apply the knuckle to the top and bottom ball joints and next install and tighten both nut assemblies to 75 Nm (55 ft. lbs.). Take the hydraulic jack away from the lower suspension arm, add the tie rod end and tighten the nut to 75 Nm (55 ft. lbs.). For models with a 4X4 system, add the hub/bearing to the output shaft first, then fasten the halfshaft with a nut until you reach 185 ft. lbs. or 251 Nm. Replace the sensor, the brake shield, rotor and caliper as needed. After that, place the wheel on the hub and tighten the nuts, remove the jack support, lower the car and get a wheel alignment done.
Related 2005 Dodge Durango Parts
 2005 Dodge Durango Ball Joint
 2005 Dodge Durango Control Arm
 2005 Dodge Durango Sway Bar Link
 2005 Dodge Durango Wheel Hub
 2005 Dodge Durango Bump Stop
 2005 Dodge Durango Coil Spring Insulator
 2005 Dodge Durango Control Arm Bushing
 2005 Dodge Durango Shock Absorber
 2005 Dodge Durango Shock And Strut Mount
 2005 Dodge Durango Sway Bar Bracket
 2005 Dodge Durango Sway Bar Bushing
 2005 Dodge Durango Sway Bar Kit