JeepParts
My Garage
My Account
Cart
OEM 2005 Dodge Ram 1500 Oil Pan
Oil Drain Pan- Select Vehicle by Model
- Select Vehicle by VIN
Select Vehicle by Model
orMake
Model
Year
Select Vehicle by VIN
For the most accurate results, select vehicle by your VIN (Vehicle Identification Number).
4 Oil Pans found


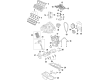
2005 Dodge Ram 1500 Oil Pan Part Number: 53021334AF
$204.39 MSRP: $304.00You Save: $99.61 (33%)Product Specifications- Other Name: Pan - Engine Oil; Engine Oil Pan; Pan Engine Oil
- Item Weight: 7.50 Pounds
- Item Dimensions: 25.3 x 10.4 x 8.4 inches
- Condition: New
- Fitment Type: Direct Replacement
- SKU: 53021334AF
- Warranty: This genuine part is guaranteed by Mopar's factory warranty.

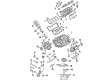
2005 Dodge Ram 1500 Oil Pan Part Number: 53021779AC
$144.87 MSRP: $218.00You Save: $73.13 (34%)Ships in 1-2 Business DaysProduct Specifications- Other Name: Pan - Engine Oil; Engine Oil Pan
- Replaces: 53021000AC, 53021000AD, 53021779AB
- Item Weight: 5.40 Pounds
- Item Dimensions: 7.5 x 9.9 x 18.4 inches
- Condition: New
- Fitment Type: Direct Replacement
- SKU: 53021779AC
- Warranty: This genuine part is guaranteed by Mopar's factory warranty.

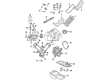
2005 Dodge Ram 1500 Oil Pan Part Number: 53020902AB
$148.24 MSRP: $220.00You Save: $71.76 (33%)Ships in 1-2 Business DaysProduct Specifications- Other Name: Pan - Engine Oil; Engine Oil Pan; Pan Engine Oil
- Item Weight: 6.90 Pounds
- Item Dimensions: 23.0 x 10.7 x 7.1 inches
- Condition: New
- Fitment Type: Direct Replacement
- SKU: 53020902AB
- Warranty: This genuine part is guaranteed by Mopar's factory warranty.

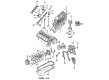
2005 Dodge Ram 1500 Oil Pan Part Number: 5037413AF
Product Specifications- Other Name: Pan - Engine Oil; Engine Oil Pan
- Replaces: 5037413AC, 5037413AB, 5037413AE, 5037413AD
- Item Weight: 17.80 Pounds
- Item Dimensions: 31.5 x 17.6 x 9.4 inches
- Condition: New
- Fitment Type: Direct Replacement
- SKU: 5037413AF
- Warranty: This genuine part is guaranteed by Mopar's factory warranty.
2005 Dodge Ram 1500 Oil Pan Parts and Q&A
- Q: How to Maintain and Fix an Oil Pan on 2005 Dodge Ram 1500?A: Before starting service and repair of the oil pan, unhook the negative battery cable and set up engine support fixture tool #8534 without raising the engine. Slacken the holding bolts for the left and right side engine mounts without removing them, then if you have a dust cover, remove it. Lower the engine only enough to remove the oil pan and lift the front crossmember from the vehicle. On a producible engine, use 8534 to raise the engine and expose the oil pan, taking care not to press on the oil pan or its gasket since the gasket is part of the engine windage tray and does not move with the oil pan. Take out the bolts holding the oil pan into place and remove the oil pan, then unfit and extract the oil pump pickup tube. Verify the windage tray and gasket and replace them if neccessary. Wash your oil pan using solvent and dry it thoroughly with a clean cloth, so you don't end up damaging the surface with a grinder wheel or abrasive tool. Use clean solvent to properly clean your oil screen and tube. Assess the drain plug area and its hole for signs of damage, making repairs when needed and check if the oil pan mounting flange is bent or distorted, brake it back to shape if seen. For installation, wipe down the oil pan gasket mating areas of both the bedplate and oil pan, verify that the integrated oil pan gasket is intact and put in a new one if necessary. Install the gasket/windage tray assembly in place, set the oil pickup tube into the lower part of the engine and attach it with nuts and bolts tightened to 28 Nm (20 ft. lbs.). If the old stud is taken out, put the No. 9 stud into its place and mount the oil pan, fastening the mounting bolts and the nut to 15 Nm (11 ft. lbs.). Set the engine into its mounts using special part 8534, bolt on the mounts on both sides with tool 8535 and fasten the nuts to a tightness of 68 Nm or 50 ft. lbs. Unfasten tool 8534, install the front crossmember if the assembly contains a structural dust cover and quickly check all fasteners. Install the negative battery cable, ensure the oil is in its proper level, turn on the engine and inspect the car for leaks.
Related 2005 Dodge Ram 1500 Parts
 2005 Dodge Ram 1500 Oil Filter
 2005 Dodge Ram 1500 Camshaft
 2005 Dodge Ram 1500 Oil Filler Cap
 2005 Dodge Ram 1500 Cam Gear
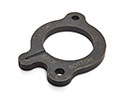 2005 Dodge Ram 1500 Camshaft Thrust Plate
 2005 Dodge Ram 1500 Crankshaft Pulley
 2005 Dodge Ram 1500 Dipstick Tube
 2005 Dodge Ram 1500 Engine Mount Bracket
 2005 Dodge Ram 1500 Exhaust Valve
 2005 Dodge Ram 1500 Lash Adjuster
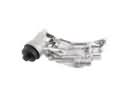 2005 Dodge Ram 1500 Oil Filter Housing
 2005 Dodge Ram 1500 Piston