JeepParts
My Garage
My Account
Cart
OEM 2006 Chrysler Crossfire Coil Springs
Strut Spring- Select Vehicle by Model
- Select Vehicle by VIN
Select Vehicle by Model
orMake
Model
Year
Select Vehicle by VIN
For the most accurate results, select vehicle by your VIN (Vehicle Identification Number).
5 Coil Springs found


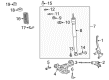
2006 Chrysler Crossfire Coil Spring, Front Part Number: 5161527AA
$222.39 MSRP: $281.92You Save: $59.53 (22%)Ships in 1-2 Business DaysProduct Specifications- Other Name: Spring - Front Coil; Coil Springs; Spring; Spring Front Coil
- Position: Front
- Item Weight: 9.20 Pounds
- Item Dimensions: 13.4 x 13.3 x 9.4 inches
- Condition: New
- Fitment Type: Direct Replacement
- SKU: 5161527AA
- Warranty: This genuine part is guaranteed by Mopar's factory warranty.

2006 Chrysler Crossfire Coil Spring, Front Part Number: 5135480AA
Product Specifications- Other Name: Spring - Front Coil; Coil Spring, Front; Coil Springs; Spring; Spring Front Coil
- Position: Front
- Item Weight: 8.30 Pounds
- Item Dimensions: 16.0 x 8.3 x 5.3 inches
- Condition: New
- Fitment Type: Direct Replacement
- SKU: 5135480AA
- Warranty: This genuine part is guaranteed by Mopar's factory warranty.

2006 Chrysler Crossfire Coil Spring, Front Part Number: 5142010AA
Product Specifications- Other Name: Spring - Front Coil; Coil Spring, Front; Coil Springs; Spring; Spring Front Coil
- Position: Front
- Item Weight: 7.60 Pounds
- Item Dimensions: 13.7 x 4.6 x 4.6 inches
- Condition: New
- Fitment Type: Direct Replacement
- SKU: 5142010AA
- Warranty: This genuine part is guaranteed by Mopar's factory warranty.

2006 Chrysler Crossfire Coil Spring, Rear Part Number: 5142012AA
Product Specifications- Other Name: Spring - Rear; Coil Springs; Spring
- Position: Rear
- Item Weight: 6.20 Pounds
- Item Dimensions: 12.7 x 4.1 x 4.1 inches
- Condition: New
- Fitment Type: Direct Replacement
- SKU: 5142012AA
- Warranty: This genuine part is guaranteed by Mopar's factory warranty.
2006 Chrysler Crossfire Coil Spring, Rear Part Number: 5102299AA
Product Specifications- Other Name: Spring - Rear; Coil Spring, Rear; Coil Springs; Spring; Spring Rear
- Position: Rear
- Item Weight: 5.90 Pounds
- Item Dimensions: 13.8 x 4.2 x 4.0 inches
- Condition: New
- Fitment Type: Direct Replacement
- SKU: 5102299AA
- Warranty: This genuine part is guaranteed by Mopar's factory warranty.
2006 Chrysler Crossfire Coil Springs Parts and Q&A
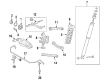
- Q: How to Maintain and Fix Coil Springs in the Front Suspension on 2006 Chrysler Crossfire?A: First, park your car so it stands on its own three wheels and remove the top shock absorber nut. After that, remove the washer and rubber mount next. Lift the vehicle up and secure it, then remove the bolt and nut that attach the lower shock absobers under the vehicle. Support the lower control arm using the right device, then raise it until it is near level, screening off the dangerous area and securing the support with accepted clamps. Check for damage on any special tools and put on safety gloves and eye protection, because the springs may injure you if they release before you are ready. Use Special Tool 9151 Spring Compressor and 9152 Clamping Plates in order to carefully compress the front spring. With the nuts out, bar the bolts out of the control arm mount with gentle movements. Take the supporting device lower and pull down the lower control arm, while supporting the front spring with one hand. Remove the front spring when there is enough room between the arm and the perch. For installation, fitted the compressed front spring with the rubber mount back onto the car. Swing the lower control arm up to where it should be mounted, insert the bolts and nuts and make sure the car is at its normal ride height so as not to distort the suspension when tightening. Fasten the support mount on the end of the lower control arm, ensuring the space between your spring and the 2 forged metal bent-socket sections is sufficient and slowly release the spring to make sure it's set correctly. Take off and remove the supporting device to let the lower control arm rest on the lower mounting points. Insert both the shock absorber lower bolt and nut, tightening the nut to 55 Nm. Set the car lower and while lowering, fit the shock into the top mounting surface. Then install the rubber mount and washer from the underside of the shock. Afterward, fasten the shock absorber upper mounting nut with 18 Nm and tighten the lower control arm to 120 Nm, before doing the proper vehicle alignment.
Related 2006 Chrysler Crossfire Parts
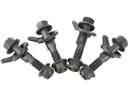 2006 Chrysler Crossfire Alignment Bolt
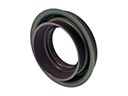 2006 Chrysler Crossfire Axle Shaft Seal
 2006 Chrysler Crossfire Axle Support Bushings
 2006 Chrysler Crossfire Ball Joint
 2006 Chrysler Crossfire Control Arm
 2006 Chrysler Crossfire Leaf Spring Bushing
 2006 Chrysler Crossfire Shock Absorber
 2006 Chrysler Crossfire Steering Knuckle
 2006 Chrysler Crossfire Sway Bar Bushing
 2006 Chrysler Crossfire Sway Bar Link
 2006 Chrysler Crossfire Track Bar
 2006 Chrysler Crossfire Wheel Hub