JeepParts
My Garage
My Account
Cart
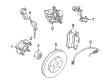
OEM 2006 Chrysler Sebring Brake Caliper
Caliper- Select Vehicle by Model
- Select Vehicle by VIN
Select Vehicle by Model
orMake
Model
Year
Select Vehicle by VIN
For the most accurate results, select vehicle by your VIN (Vehicle Identification Number).
5 Brake Calipers found

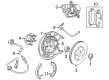
2006 Chrysler Sebring Caliper, Rear Passenger Side Part Number: 5019743AB
$89.99 MSRP: $159.00You Save: $69.01 (44%)Ships in 1-2 Business DaysProduct Specifications- Other Name: Caliper - Disc Brake; Disc Brake Caliper, Rear Left, Rear Right; Brake Caliper
- Position: Rear Passenger Side
- Replaces: 5019743AA
- Item Weight: 4.10 Pounds
- Item Dimensions: 8.2 x 6.4 x 3.9 inches
- Condition: New
- Fitment Type: Direct Replacement
- SKU: 5019743AB
- Warranty: This genuine part is guaranteed by Mopar's factory warranty.
2006 Chrysler Sebring Caliper, Rear Driver Side Part Number: 5019744AB
Product Specifications- Other Name: Caliper - Disc Brake; Disc Brake Caliper, Rear Left, Rear Right; Brake Caliper
- Position: Rear Driver Side
- Replaces: 5019744AA
- Item Weight: 3.90 Pounds
- Item Dimensions: 8.4 x 6.4 x 3.7 inches
- Condition: New
- Fitment Type: Direct Replacement
- SKU: 5019744AB
- Warranty: This genuine part is guaranteed by Mopar's factory warranty.

 Product Specifications
- Other Name: Caliper - Disc Brake; Disc Brake Caliper, Front Right; Caliper Assembly; Caliper; Caliper Disc Brake
- Position: Front Passenger Side
- Replaces: 5072544AA, 5019520AA
- Item Weight: 7.20 Pounds
- Condition: New
- Fitment Type: Direct Replacement
- SKU: 5083790AA
- Warranty: This genuine part is guaranteed by Mopar's factory warranty.

 Product Specifications
- Other Name: Caliper - Disc Brake; Disc Brake Caliper, Front Left; Caliper Disc Brake; Brake Caliper
- Position: Front Driver Side
- Item Weight: 8.50 Pounds
- Condition: New
- Fitment Type: Direct Replacement
- SKU: 5072551AA
- Warranty: This genuine part is guaranteed by Mopar's factory warranty.
- Product Specifications
- Other Name: Caliper - Disc Brake; Disc Brake Caliper, Front Right; Caliper Disc Brake; Brake Caliper
- Position: Front Passenger Side
- Item Weight: 8.50 Pounds
- Condition: New
- Fitment Type: Direct Replacement
- SKU: 5018990AA
- Warranty: This genuine part is guaranteed by Mopar's factory warranty.
2006 Chrysler Sebring Brake Caliper Parts and Q&A
- Q: How to Maintain a Brake Caliper for Optimal Performance on 2006 Chrysler Sebring?A: First, press the brake farther than the first inch and hold it with a brake pedal depressor so the master cylinder remains detached from the hydraulic system. Lift the vehicle and get rid of the front wheel and assembly. Remove the anti-rattle spring from the caliper and adapter outboard sides, then loosen and pull off the banjo bolt from the hose to caliper assembly. Eliminate the two caps covering the caliper guide pin bolts and remove the bolts underneath. After that, separate the caliper and adapter from the brake disc and keep in mind that usually, the outboard shoe will stay attached to the adapter. Clean and check the caliper prior to disassembling it. Use your fingers to press in one side of the rubber guide pin bushing and pull it out and then do this with the other bushing. Before removing the piston, swing the caliper assembly away from the rotor and vehicle body, fit a piece of wood between the piston and caliper fingers and press the brake pedal gently to release the piston. Do not let the fluid drain by holding down the brake pedal and then separate the brake flex hose from the caliper. Clamp the caliper in a vise so that the protective jaws touch its edge and remove the piston dust boot, then carefully remove the piston seal from the bore to discard both the worn and the old seal. Wipe the piston bore and exam it for marks, using crocus cloth for mild scratching. Once you clean, use water to dampen your equipment, clean with a cloth and keep any garbage in a watertight container that carries the right label. Examine the caliper for ruptures, any damage to the dust boot and worn out dust boots for the guide pin; if there are any, tear down and recondition the caliper, then replace the seals and dust boots. Start assembly by folding the guide pin bushing and attaching it by inserting it into the caliper mounting boss and expanding it until it - remains secure. Wet a new piston seal with clean brake fluid and fit it into the groove of the caliper bore, making sure it does not move. Pour brake fluid onto the new piston boot and then put it over the piston, using even pressure as you insert the piston into the bore. Make sure to drive the boot into the counterbore with a hammer and the proper tools. Put the caliper back in place, confirm the piston is fully drawn back and add Mopers Dielectric Grease to each caliper adapter abutment. Over the brake rotor and adapter, install the caliper while adding in the guide pin bolts, then tighten carefully up to 35 Nm (26 ft. lbs.) so that you don't cross-thread them. Attach the caps to the guide pin bolts and the anti-rattle spring on the caliper's outside edge. Order new washers and fit them in place, route the banjo bolt into the caliper and tighten until the torque reaches 35 Nm (26 ft.-lb.). Attach the wheel and tire assembly, then fasten all nuts to 135 Nm (100 ft. lbs.) using the appropriate order. Drop the vehicle, release the brake pedal depressor, purge the air from the brakes and check the brakes under test conditions.
Related 2006 Chrysler Sebring Parts
 2006 Chrysler Sebring ABS Control Module
 2006 Chrysler Sebring Brake Booster
 2006 Chrysler Sebring Brake Caliper Bracket
 2006 Chrysler Sebring Brake Caliper Piston
 2006 Chrysler Sebring Brake Disc
 2006 Chrysler Sebring Brake Drum
 2006 Chrysler Sebring Brake Fluid Level Sensor
 2006 Chrysler Sebring Brake Line
 2006 Chrysler Sebring Brake Master Cylinder
 2006 Chrysler Sebring Brake Pad
 2006 Chrysler Sebring Speed Sensor
 2006 Chrysler Sebring Wheel Stud