JeepParts
My Garage
My Account
Cart
OEM 2006 Dodge Durango Control Arm Bushing
Suspension Arm Bushing- Select Vehicle by Model
- Select Vehicle by VIN
Select Vehicle by Model
orMake
Model
Year
Select Vehicle by VIN
For the most accurate results, select vehicle by your VIN (Vehicle Identification Number).
2 Control Arm Bushings found


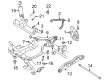
2006 Dodge Durango Rear Bushings Part Number: 52113214AA
$60.63 MSRP: $109.00You Save: $48.37 (45%)Ships in 1-2 Business DaysProduct Specifications- Other Name: Bushing - Control Arm; Control Arm Bushing; Axle Pivot Bushing; Lower Control Arm Rear Bushing; Bushing Control Arm
- Item Weight: 2.20 Pounds
- Item Dimensions: 3.2 x 3.3 x 2.3 inches
- Condition: New
- Fitment Type: Direct Replacement
- SKU: 52113214AA
- Warranty: This genuine part is guaranteed by Mopar's factory warranty.

2006 Dodge Durango Front Bushings Part Number: 52855292AA
$68.10 MSRP: $86.33You Save: $18.23 (22%)Ships in 1-2 Business DaysProduct Specifications- Other Name: Bushing - Control Arm; Suspension Control Arm Bushing Kit; Control Arm Bush Kit; Control Arm Bushing; Axle Pivot Bushing; Lower Control Arm Front Bushing; Bushing Control Arm
- Item Weight: 1.70 Pounds
- Item Dimensions: 7.2 x 4.2 x 3.1 inches
- Condition: New
- Fitment Type: Direct Replacement
- SKU: 52855292AA
- Warranty: This genuine part is guaranteed by Mopar's factory warranty.
2006 Dodge Durango Control Arm Bushing Parts and Q&A
- Q: How to Service and Repair Control Arm Bushings on 2006 Dodge Durango?A: Before servicing the control arm bushings, remove the lower control arm and fix it in a vise with extra pressure, making sure to use a lubricant on the parts that need to be threaded. For the control arm's bushing in the front, you should install the C4212-F (Press), 9334-4 (Driver), 9334-6 (Spacer) and 9334-5 (Receiver) tools to replace it. When removing the small bushing on the torsion bar side, use tools C4212-F (Press), 9334-4 (Driver), 9334-6 (Spacer) and 9334-5 (Receiver). After that, remove the cross member of the torsion bar and secure it in a vise, adding extreme pressure lubricant to any threaded parts on the tools. Press the bushing out using special tools 4212-F (Press), 9335-2 (Receiver), 9335-3 (Driver) and 9335-4 (Spacer). When fitting the bushings to the lower control arm, smear tantalizing lubricant on the threads of the tools. Secure the new big bushing to the control arm with the help of C4212-F, 9334-3 and 9334-1 tools. You should use the tools C4212-F, 9334-3-depth spacer and 9334-2- driver to install the new bushing onto the lower control arm of the vehicle. After you've removed the control arm from the vise, put it back in, restore the suspension height and do a wheel alignment. The torsion bar cross member bushing should be fitted into the cross member using the C4212-F press, 9335-3 driver, 9335-4 spacer and 9335-1 depth setting cup, each in the correct orientation. After that, take out the cross member from the vise, install it again, adjust the vehicle's ride height and align the wheels.
Related 2006 Dodge Durango Parts
 2006 Dodge Durango Ball Joint
 2006 Dodge Durango Coil Springs
 2006 Dodge Durango Steering Knuckle
 2006 Dodge Durango Sway Bar Link
 2006 Dodge Durango Wheel Bearing
 2006 Dodge Durango Wheel Hub
 2006 Dodge Durango Bump Stop
 2006 Dodge Durango Coil Spring Insulator
 2006 Dodge Durango Shock Absorber
 2006 Dodge Durango Sway Bar Bracket
 2006 Dodge Durango Sway Bar Bushing
 2006 Dodge Durango Sway Bar Kit