JeepParts
My Garage
My Account
Cart
OEM 2006 Dodge Durango Exhaust Pipe
Exhaust Tail Pipe- Select Vehicle by Model
- Select Vehicle by VIN
Select Vehicle by Model
orMake
Model
Year
Select Vehicle by VIN
For the most accurate results, select vehicle by your VIN (Vehicle Identification Number).
9 Exhaust Pipes found

2006 Dodge Durango Rear Muffler Part Number: 68027036AA
$278.75 MSRP: $427.00You Save: $148.25 (35%)Ships in 1-2 Business DaysProduct Specifications- Other Name: Muffler - Exhaust; Exhaust Muffler; Direct-Fit Exhaust; Exhaust System Kit; Resonator; Muffler
- Replaces: 52103712AF, 52103712AD, 52103712AE
- Item Weight: 9.10 Pounds
- Item Dimensions: 53.0 x 14.0 x 8.9 inches
- Condition: New
- Fitment Type: Direct Replacement
- SKU: 68027036AA
- Warranty: This genuine part is guaranteed by Mopar's factory warranty.


2006 Dodge Durango Rear Muffler Part Number: 68044067AA
Product Specifications- Other Name: Muffler - Exhaust; Exhaust Muffler; Resonator; Muffler; Muffler And Tailpipe Exhaust
- Replaces: 52103711AE, 52103711AG, 52103711AF, 52103711AI
- Item Weight: 20.60 Pounds
- Item Dimensions: 51.4 x 15.2 x 13.9 inches
- Condition: New
- Fitment Type: Direct Replacement
- SKU: 68044067AA
- Warranty: This genuine part is guaranteed by Mopar's factory warranty.

2006 Dodge Durango Catalytic Converter Part Number: 52855410AC
Product Specifications- Other Name: Converter - Exhaust; Exhaust Pipe; Converter & Pipe
- Replaces: 52855410AB
- Item Weight: 35.40 Pounds
- Item Dimensions: 23.0 x 29.2 x 20.3 inches
- Condition: New
- Fitment Type: Direct Replacement
- SKU: 52855410AC
- Warranty: This genuine part is guaranteed by Mopar's factory warranty.

2006 Dodge Durango Front Muffler Part Number: 52855524AB
Product Specifications- Other Name: Muffler - Exhaust; Exhaust Muffler; Exhaust Muffler Assembly; Resonator; Muffler; Muffler Exhaust
- Replaces: 52855524AA
- Item Weight: 37.50 Pounds
- Item Dimensions: 26.3 x 12.5 x 11.0 inches
- Condition: New
- Fitment Type: Direct Replacement
- SKU: 52855524AB
- Warranty: This genuine part is guaranteed by Mopar's factory warranty.

2006 Dodge Durango Rear Muffler Part Number: 52855326AE
Product Specifications- Other Name: Muffler - Exhaust; Exhaust Muffler; Resonator; Muffler; Muffler And Tailpipe Exhaust
- Replaces: 52855326AC, 52855326AD
- Item Weight: 25.40 Pounds
- Item Dimensions: 16.4 x 14.7 x 13.4 inches
- Condition: New
- Fitment Type: Direct Replacement
- SKU: 52855326AE
- Warranty: This genuine part is guaranteed by Mopar's factory warranty.

2006 Dodge Durango Front Pipe Part Number: 52855187AE
Product Specifications- Other Name: Pipe - Exhaust Extension; Exhaust Intermediate Pipe; Direct-Fit Exhaust; Exhaust System Kit; Exhaust Pipe; Intermed Pipe; Pipe Exhaust Extension
- Replaces: 52855187AC
- Item Weight: 7.60 Pounds
- Item Dimensions: 39.0 x 7.9 x 5.2 inches
- Condition: New
- Fitment Type: Direct Replacement
- SKU: 52855187AE
- Warranty: This genuine part is guaranteed by Mopar's factory warranty.

2006 Dodge Durango Catalytic Converter Part Number: 52855504AB
Product Specifications- Other Name: Converter - Exhaust; Exhaust Pipe; Converter & Pipe; Pipe And Converter Exhaust
- Replaces: 52855504AA
- Item Weight: 27.50 Pounds
- Item Dimensions: 59.1 x 15.0 x 14.9 inches
- Condition: New
- Fitment Type: Direct Replacement
- SKU: 52855504AB
- Warranty: This genuine part is guaranteed by Mopar's factory warranty.

2006 Dodge Durango Front Muffler Part Number: 52103653AE
Product Specifications- Other Name: Muffler - Exhaust; Exhaust Muffler; Exhaust Muffler Assembly; Direct-Fit Exhaust; Exhaust System Kit; Resonator; Muffler; Muffler Exhaust
- Replaces: 52103653AC, 52103653AD
- Item Weight: 36.30 Pounds
- Item Dimensions: 50.4 x 12.4 x 10.6 inches
- Condition: New
- Fitment Type: Direct Replacement
- SKU: 52103653AE
- Warranty: This genuine part is guaranteed by Mopar's factory warranty.
2006 Dodge Durango Catalytic Converter Part Number: 52855505AB
Product Specifications- Other Name: Converter - Exhaust; Exhaust Pipe; Converter & Pipe; Pipe And Converter Exhaust
- Item Weight: 11.80 Pounds
- Item Dimensions: 36.2 x 15.7 x 19.0 inches
- Condition: New
- Fitment Type: Direct Replacement
- SKU: 52855505AB
- Warranty: This genuine part is guaranteed by Mopar's factory warranty.
2006 Dodge Durango Exhaust Pipe Parts and Q&A
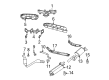
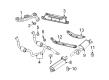
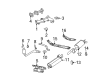
- Q: How to Service and Repair an Exhaust Pipe on 2006 Dodge Durango?A: The first step to servicing or repairing the tailpipe is to raise and prop up the car. Use Mopar Rust Penetrant to cover all the nuts and bolts and let it work for five minutes. Disconnect the clamp (3) joining the exhaust pipe to the muffler and use a grinder to smoothen - or grind away if necessary - any tack welds. Take off the exhaust pipe insulators (1) and, should you have rear muffler insulators (5), also remove them. Should it be needed, use an oxygen/acetylene torch to heat up the attachment and turn the tailpipe out of the exhaust muffler. Take out the exhaust pipe (2) from the muffler (4). Throw away rusted clamps, worn or broken supports, along with any attaching parts and put in their place with original equipment parts or acceptable replacements to ensure correct alignment and good exhaust noise levels. Clip the band in place, knowing that the clamps cannot be used again and should be swapped when the adhesive is removed. Trim off any burrs on the exhaust pipe (2) and position it over the muffler (4), making certain that the alignment tang is in the alignment slot. Do not tighten the muffler-to-exhaust pipe clamp at the moment and then fit the rear muffler insulators (5) if you removed them before. After that, install the tailpipe insulators (1). Look at the exhaust system and correct it if it comes into contact with the vehicle's outer panels. Next, fasten the muffler-to-exhaust clamp to a torque rating of 61 Nm (45 ft. lbs.), drive the vehicle down, start the engine and examine for exhaust leaks, repairing any as you find them.
Related 2006 Dodge Durango Parts
 2006 Dodge Durango Catalytic Converter
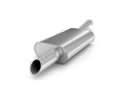 2006 Dodge Durango Muffler
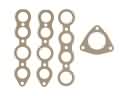 2006 Dodge Durango Exhaust Manifold
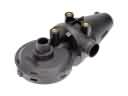 2006 Dodge Durango PCV Valve
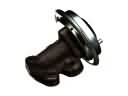 2006 Dodge Durango EGR Valve
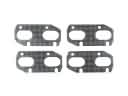 2006 Dodge Durango Exhaust Manifold Gasket
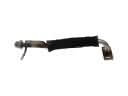 2006 Dodge Durango EGR Tube
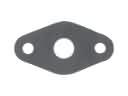 2006 Dodge Durango EGR Tube Gaskets
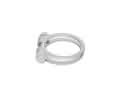 2006 Dodge Durango Exhaust Clamp
 2006 Dodge Durango Exhaust Hanger
 2006 Dodge Durango Exhaust Heat Shield
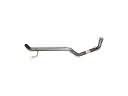 2006 Dodge Durango Tail Pipe