JeepParts
My Garage
My Account
Cart
OEM Dodge Durango Exhaust Pipe
Exhaust Tail Pipe- Select Vehicle by Model
- Select Vehicle by VIN
Select Vehicle by Model
orMake
Model
Year
Select Vehicle by VIN
For the most accurate results, select vehicle by your VIN (Vehicle Identification Number).
120 Exhaust Pipes found


Dodge Durango Muffler, Driver Side Part Number: 68276628AA
$530.40 MSRP: $800.00You Save: $269.60 (34%)Ships in 1-2 Business Days

Dodge Durango Muffler & Pipe Part Number: 4880202AG
$818.81 MSRP: $1235.00You Save: $416.19 (34%)Ships in 1-2 Business Days


Dodge Durango Catalytic Converter, Passenger Side Part Number: 68210351AC
$1418.28 MSRP: $2080.00You Save: $661.72 (32%)Ships in 1-3 Business Days


Dodge Durango Catalytic Converter, Driver Side Part Number: 68036556AG
$1927.80 MSRP: $2800.00You Save: $872.20 (32%)Ships in 1-3 Business Days
Dodge Durango Catalytic Converter, Passenger Side Part Number: 68037894AF
$1739.45 MSRP: $2545.00You Save: $805.55 (32%)Ships in 1-3 Business Days
Dodge Durango Muffler Part Number: 52103430AF
$79.45 MSRP: $228.00You Save: $148.55 (66%)Ships in 1-2 Business Days
Dodge Durango Front Muffler Part Number: 68046111AA
$132.50 MSRP: $380.00You Save: $247.50 (66%)Ships in 1-2 Business Days
Dodge Durango Tail Pipe Extension Part Number: 68305535AC
$134.83 MSRP: $214.00You Save: $79.17 (37%)Ships in 1-3 Business Days
Dodge Durango Extension Pipe Part Number: 68072208AB
$216.31 MSRP: $328.00You Save: $111.69 (35%)Ships in 1-2 Business DaysDodge Durango Tail Pipe Extension Part Number: 68497951AA
$235.66 MSRP: $360.00You Save: $124.34 (35%)
Dodge Durango Exhaust Manifold Part Number: 68591586AA
$248.63 MSRP: $377.00You Save: $128.37 (35%)Ships in 1-2 Business Days
Dodge Durango Rear Muffler Part Number: 68027036AA
$278.75 MSRP: $427.00You Save: $148.25 (35%)Ships in 1-2 Business Days
Dodge Durango Exhaust Manifold, Passenger Side Part Number: 53010920AB
$542.56 MSRP: $827.00You Save: $284.44 (35%)
Dodge Durango Exhaust Manifold, Driver Side Part Number: 53010921AB
$551.40 MSRP: $839.00You Save: $287.60 (35%)Ships in 1-2 Business DaysDodge Durango Muffler W/Tpipe Part Number: 68276624AB
$1221.03 MSRP: $1860.00You Save: $638.97 (35%)Ships in 1-2 Business Days
Dodge Durango Muffler Part Number: 68496766AA
$1314.95 MSRP: $2005.00You Save: $690.05 (35%)
Dodge Durango Muffler W/Tpipe Part Number: 53010360AC
$1364.68 MSRP: $2080.00You Save: $715.32 (35%)


Dodge Durango Catalytic Converter Part Number: 52103383AB


Dodge Durango Front Pipe Part Number: 52855840AB


Dodge Durango Rear Muffler Part Number: 68044067AA
| Page 1 of 6 |Next >
1-20 of 120 Results
Dodge Durango Exhaust Pipe
Choose OEM Exhaust Pipe that meet Dodge factory standards. Dodge designs and tests every component for precision and durability. Each Exhaust Pipe follows strict manufacturing steps to lock in quality and fit. If your Dodge Durango matters to you, OEM parts make the smart choice. You'll get the exact look, feel, and performance you expect. Shop genuine Durango parts at the highly competitive prices online. Enjoy a manufacturer's warranty, a hassle-free return policy, and rapid delivery. No more guesswork with off brands. Get genuine parts with exact fit and true factory performance. Shop with confidence today at JeepPartsDeal.com.
Dodge Durango Exhaust Pipe is yet another important part that has made a statement of quality and reliability to indicate its functionality in the general flow of the vehicle performance. Intended for the release of noxious gases out of the engine, the exhaust pipe plays a significant role of not allowing these gases to get into the cabin thus protecting passengers from diseases. This exhaust pipe is suitable for numerous Dodge Durango models to integrate with other elements like the muffler and the catalytic converter to complement the vehicle's exhaust equipment. The Dodge Durango is a mid-size SUV that demonstrates high-performance at the driving scene; it has been produced through generations, and so the exhaust pipe design nurtures V6 and V8 powerful engines. The Dodge Durango Exhaust Pipe needs to be in good condition, and any harm resulting from an accident or rust should be addressed, as it will hamper the vehicle's running and create safety concerns. It is relevant to note that apart from the functional aspects of the exhaust pipe, the placing of the pipe on the side opposite to that of the curb is also to make the car stylish. The automotive segment that the Dodge Durango Exhaust Pipe belongs to is characterized by special features relative to its construction and intensity, which allows it to be reliable and efficient in today's driving conditions. To sum up, without doubt the Dodge Durango Exhaust Pipe is crucial for improving efficient, safety, and driving performances of the Dodge Durango; thus, the car receives a well-deserved reputation for the SUV fans.
Dodge Durango Exhaust Pipe Parts and Q&A
- Q: How to Inspect and Replace an Exhaust Pipe on Dodge Durango?A:Check the exhaust pipe and throw away any rusted clamps, damaged supports and connectors. Make sure the components are original or equivalent to help the system fit properly and so that noise from the exhaust stays within limits.
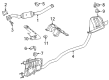
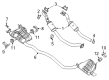
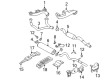
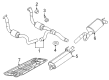
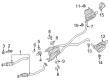
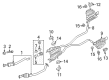
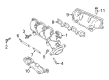
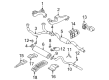
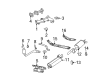
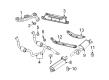
- Q: How to Maintain and Fix an Exhaust Pipe on Dodge Durango?A:Before performing service on or repairs to the exhaust pipe, first raise and support the vehicle. Rub Mopar(R) Rust Penetrant on all the bolts and nuts, letting them sit for 5 minutes. Take out the exhaust pipe-to-Muffler clamp (3) and grind the spots where small initial welds (tacks) may exist on the exhaust pipe, if there are any. If required, detach both the congress insulators on the exhaust and the front and rear muffler insulators, labeled (1) and (5). In case the pipe bond is tough, use an oxygen/acetylene torch on the connection and twist the tailpipe out of the muffler. Don't Forget: Separate the exhaust pipe (2) from the muffler (4). Check every component, throw out clamps that are rusted and replace broken or worn supports, either using the same parts as the car or expert-recommended substitutions to make sure the exhaust still fits and makes acceptable noise. Remove any burrs from the exhaust pipe (2) and then secure it to the muffler (4), so that the alignment tang is in the alignment slot. Slide on the muffler clamp and secure it, but do not tighten yet (2). Then, if the muffler insulators are noted, put them in before fitting the Tail Pipe insulators (1). Verify if any part of the exhaust touches the car's body and adjust them if needed. Also, use a torque wrench to tighten the muffler-to-exhaust pipe clamp to 42 Nm (31 ft. lbs.), lower the vehicle, start it up and examine the exhaust pipe for leaks, fixing them as soon as you notice any.


Related Dodge Durango Parts
 Dodge Durango Catalytic Converter
 Dodge Durango Muffler
 Dodge Durango Exhaust Manifold
 Dodge Durango Exhaust Manifold Gasket
 Dodge Durango Exhaust Clamp
 Dodge Durango Exhaust Flange Gasket
 Dodge Durango Exhaust Hanger
 Dodge Durango Exhaust Heat Shield
 Dodge Durango Exhaust Seal Ring
 Dodge Durango Exhaust Tip
 Dodge Durango Muffler Strap
 Dodge Durango Tail Pipe
Browse Dodge Durango Exhaust Pipe by Years
2025
2024
2023
2022
2021
2020
2019
2018
2017
2016
2015
2014
2013
2012
2011
2009
2008
2007
2006
2005
2004
2003
2002
2001
2000
1999
1998