JeepParts
My Garage
My Account
Cart
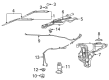
OEM 2006 Dodge Durango Wiper Arm
Windshield Wiper Arm- Select Vehicle by Model
- Select Vehicle by VIN
Select Vehicle by Model
orMake
Model
Year
Select Vehicle by VIN
For the most accurate results, select vehicle by your VIN (Vehicle Identification Number).
3 Wiper Arms found

2006 Dodge Durango Wiper Arm, Passenger Side Part Number: 68044499AA
$125.71 MSRP: $175.00You Save: $49.29 (29%)Ships in 1-2 Business DaysProduct Specifications- Other Name: Wiper Arm - Wiper; Windshield Wiper Arm, Right; Front Arm; Arm Wiper
- Position: Passenger Side
- Replaces: 5135556AB
- Item Weight: 2.00 Pounds
- Item Dimensions: 31.2 x 4.2 x 0.4 inches
- Condition: New
- Fitment Type: Direct Replacement
- SKU: 68044499AA
- Warranty: This genuine part is guaranteed by Mopar's factory warranty.


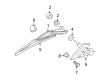
2006 Dodge Durango Wiper Arm, Rear Part Number: 5135583AA
Product Specifications- Other Name: Arm Wiper - Rear Wiper; Back Glass Wiper Arm; Rear Arm; Arm Liftgate Wiper; Arm Rear Wiper
- Position: Rear
- Item Weight: 0.90 Pounds
- Item Dimensions: 1.8 x 3.2 x 14.5 inches
- Condition: New
- Fitment Type: Direct Replacement
- SKU: 5135583AA
- Warranty: This genuine part is guaranteed by Mopar's factory warranty.
2006 Dodge Durango Wiper Arm, Driver Side Part Number: 5135557AA
Product Specifications- Other Name: Wiper Arm - Wiper; Windshield Wiper Arm, Left; Front Arm; Arm Wiper
- Position: Driver Side
- Item Weight: 1.40 Pounds
- Item Dimensions: 29.6 x 4.2 x 0.1 inches
- Condition: New
- Fitment Type: Direct Replacement
- SKU: 5135557AA
- Warranty: This genuine part is guaranteed by Mopar's factory warranty.
2006 Dodge Durango Wiper Arm Parts and Q&A
- Q: How to Remove and Install a Rear Wiper Arm on 2006 Dodge Durango?A: To remove the rear wiper arm, push the sharp end of a small screwdriver into the gap on the large side, then pull and press the plastic cap on the pivot end so it comes loose. Once you have removed the screw hold by hand, remove the nut connecting the arm to the wiper motor output shaft. Not using a battery terminal puller is important, as it could injure the wiper arm at the back of the car. Use a very gentle back and forth motion to swing the rear wiper arm free from the output shaft. Before placing the wiper arm in place, check that the rear wiper motor is in park by turning the ignition to On and turning the rear wiper switch Off. If the wiper motor moves, wait for it to stop before switching the ignition to Off. The rear wiper arm has to be in line with the motor output shaft when the motor is in park to be installed properly. Put the rear wiper arm pivot end onto the motor shaft so that the wiper blade lines up with the alignment mark at the top of the lower liftgate blacked-out area on the right side of the lower liftgate glass. With indexing finished, slide the tapered part of the arm down over the bearing on the output shaft. The arm should be attached to the shaft properly by tightening the mounting nut to 12 N.m (9 ft. lbs.). Wet both the liftgate glass and the area behind the rear wiper, lower the wiper arm, turn the switch to Off and check that the arm is where it should be. Place the plastic cap's tab into the mounting hole on the opposite side from the notch and push down on the notched part until you feel it snap in.
Related 2006 Dodge Durango Parts
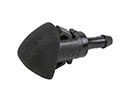 2006 Dodge Durango Windshield Washer Nozzle
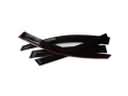 2006 Dodge Durango Air Deflector
 2006 Dodge Durango Dash Panels
 2006 Dodge Durango Door Lock
 2006 Dodge Durango Floor Pan
 2006 Dodge Durango Seat Cushion
 2006 Dodge Durango Seat Heater
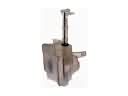 2006 Dodge Durango Washer Reservoir
 2006 Dodge Durango Windshield Wiper
 2006 Dodge Durango Wiper Blade
 2006 Dodge Durango Wiper Motor
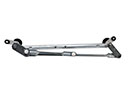 2006 Dodge Durango Wiper Pivot