JeepParts
My Garage
My Account
Cart
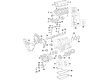
OEM 2007 Chrysler Pacifica Rod Bearing
Engine Connecting Rod Bearing- Select Vehicle by Model
- Select Vehicle by VIN
Select Vehicle by Model
orMake
Model
Year
Select Vehicle by VIN
For the most accurate results, select vehicle by your VIN (Vehicle Identification Number).
2 Rod Bearings found


2007 Chrysler Pacifica Connecting Rod Bearing Part Number: 68002286AC
$18.22 MSRP: $27.05You Save: $8.83 (33%)Ships in 1-3 Business DaysProduct Specifications- Other Name: Bearing Kit - Connecting Rod; Engine Connecting Rod Bearing Set; Connecting Rod Bearing Set; Rod Bearing; Bearings; Bearing Kit Connecting Rod Standard
- Replaces: 68002286AA, 68002286AB
- Item Weight: 0.50 Pounds
- Item Dimensions: 3.8 x 2.6 x 2.0 inches
- Condition: New
- Fitment Type: Direct Replacement
- SKU: 68002286AC
- Warranty: This genuine part is guaranteed by Mopar's factory warranty.


2007 Chrysler Pacifica Bearings Part Number: 5161294AA
$18.30 MSRP: $27.05You Save: $8.75 (33%)Ships in 1-2 Business DaysProduct Specifications- Other Name: Bearing Kit - Connecting Rod; Bearing Package Connecting Rod Standard: One [1] Upper & One [1] Lower Bearing.
- Replaces: 5012056AA
- Item Weight: 0.50 Pounds
- Item Dimensions: 3.8 x 3.8 x 1.8 inches
- Condition: New
- Fitment Type: Direct Replacement
- SKU: 5161294AA
- Warranty: This genuine part is guaranteed by Mopar's factory warranty.
2007 Chrysler Pacifica Rod Bearing Parts and Q&A
- Q: How to Measure and Repair Rod Bearing Clearance on 2007 Chrysler Pacifica?A: Both standard forged and forged cracked cap styles of connecting rods are offered and they are interchangeable for replacement, but they have slightly different methods of tightening the bearings. When removing the caps, mark them so you can correctly reinstall them and put the bearing shells on with the tangs inside the matching grooves in the rods and caps, plus keeping the tangs facing the rod's same direction. Bolt in the rods along the same bank until they are put in place, using connecting rod bearings in standard size and the two undersize options of 0.025 mm (0.001 in.) and 0.250 mm (0.010 in.). Put both bearings in at the same time, never use one old and one new half and never attempt to file either the rods or the bearing caps. Check the connecting rod for taper and for roundness on its journal. To find out the correct clearances in the connecting rod bearings, turn the crankshaft, watch the connecting rod reach the lowest point, then remove any oil from the surface before measuring with Plastigage. On the front of the bearing cap, apply a piece of Plastigage that stretches across the entire width of the bearing shell, spaced 1/4 inch from its center and look wherever you suspect any wear. Set up the rod cap and Plastigage and tighten it as you are given, not rotating the crankshaft. Take off the bearing cap, then look at the Flattened Plastigage next to the scale on the package to see the oil clearance. If the measurements at the ends are not the same, check for taper. Take note of all your readings and when the bearing clearance is outside the wear limit, replace it.
Related 2007 Chrysler Pacifica Parts
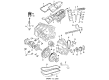
 2007 Chrysler Pacifica Oil Pan
 2007 Chrysler Pacifica Camshaft Seal
 2007 Chrysler Pacifica Coolant Filter
 2007 Chrysler Pacifica Crankshaft Thrust Washer Set
 2007 Chrysler Pacifica Exhaust Valve
 2007 Chrysler Pacifica Harmonic Balancer
 2007 Chrysler Pacifica Lash Adjuster
 2007 Chrysler Pacifica Oil Pump
 2007 Chrysler Pacifica Oil Pump Gasket
 2007 Chrysler Pacifica Piston
 2007 Chrysler Pacifica Pushrod
 2007 Chrysler Pacifica Timing Cover