JeepParts
My Garage
My Account
Cart
OEM 2007 Jeep Liberty Engine Mount
Engine Motor Mount- Select Vehicle by Model
- Select Vehicle by VIN
Select Vehicle by Model
orMake
Model
Year
Select Vehicle by VIN
For the most accurate results, select vehicle by your VIN (Vehicle Identification Number).
7 Engine Mounts found


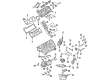
2007 Jeep Liberty Front Mount, Passenger Side Part Number: 52129268AE
$104.29 MSRP: $194.00You Save: $89.71 (47%)Ships in 1-2 Business DaysProduct Specifications- Other Name: Insulator - Engine Mount; Engine Mount, Left, Right; Engine Mount Bracket; Motor Mount; Front Insulator; Insulator
- Position: Passenger Side
- Replaces: 52129268AD, 52129268AC
- Item Weight: 5.00 Pounds
- Item Dimensions: 9.6 x 7.9 x 4.5 inches
- Condition: New
- Fitment Type: Direct Replacement
- SKU: 52129268AE
- Warranty: This genuine part is guaranteed by Mopar's factory warranty.

2007 Jeep Liberty Transmission Mount Part Number: 52129040AD
$36.48 MSRP: $105.00You Save: $68.52 (66%)Ships in 1-2 Business DaysProduct Specifications- Other Name: Insulator - Transmission Support; Automatic Transmission Mount; Engine Mount Bracket; Transfer Case Mount; Motor Mount; Rear Mount
- Replaces: 52129040AB, 52129040AC
- Item Weight: 6.70 Pounds
- Condition: New
- Fitment Type: Direct Replacement
- SKU: 52129040AD
- Warranty: This genuine part is guaranteed by Mopar's factory warranty.
2007 Jeep Liberty Front Mount, Driver Side Part Number: 52129269AE
Product Specifications- Other Name: Insulator - Engine Mount; Engine Mount, Left; Engine Mount Bracket; Motor Mount; Front Insulator
- Position: Driver Side
- Replaces: 52129269AD, 52129269AC
- Item Weight: 4.30 Pounds
- Item Dimensions: 8.1 x 7.5 x 5.4 inches
- Condition: New
- Fitment Type: Direct Replacement
- SKU: 52129269AE
- Warranty: This genuine part is guaranteed by Mopar's factory warranty.

2007 Jeep Liberty Rear Mount Part Number: 52129033AE
Product Specifications- Other Name: Bracket - Transmission Mount; Engine Mount Bracket; Motor Mount
- Condition: New
- Fitment Type: Direct Replacement
- SKU: 52129033AE
- Warranty: This genuine part is guaranteed by Mopar's factory warranty.

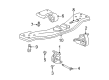
2007 Jeep Liberty Trans Crossmember Part Number: 52129090AC
Product Specifications- Other Name: Support - Transmission; Transmission Crossmember; Crossmember Transmission
- Item Weight: 18.80 Pounds
- Item Dimensions: 36.0 x 7.3 x 2.3 inches
- Condition: New
- Fitment Type: Direct Replacement
- SKU: 52129090AC
- Warranty: This genuine part is guaranteed by Mopar's factory warranty.

 Product Specifications
- Other Name: Insulator - Engine Mount; Engine Mount, Right; Engine Mount Torque Strut; Engine Mount Bracket; Motor Mount; Insulator; Insulator Engine Mount
- Position: Passenger Side
- Item Weight: 4.50 Pounds
- Item Dimensions: 6.7 x 6.1 x 5.4 inches
- Condition: New
- Fitment Type: Direct Replacement
- SKU: 52129014AC
- Warranty: This genuine part is guaranteed by Mopar's factory warranty.

2007 Jeep Liberty Front Bracket, Driver Side Part Number: 52129015AC
Product Specifications- Other Name: Insulator - Engine Mount; Engine Mount, Left; Engine Mount Torque Strut; Engine Mount Bracket; Motor Mount; Insulator; Insulator Engine Mount
- Position: Driver Side
- Replaces: 52129015AB
- Item Weight: 4.40 Pounds
- Item Dimensions: 7.1 x 5.9 x 6.8 inches
- Condition: New
- Fitment Type: Direct Replacement
- SKU: 52129015AC
- Warranty: This genuine part is guaranteed by Mopar's factory warranty.
2007 Jeep Liberty Engine Mount Parts and Q&A
- Q: How to Install and Torque an Engine Mount Correctly on 2007 Jeep Liberty?A: Install the insulator mount by placing it on the engine and going through it with a bolt. After attaching the bolt connectors to the cylinder block-to-insulator mounts, lift the engine up a bit, remove the jack and the wooden block. Apply 61 Nm (45 ft. lbs.) of torque to the cylinder block-to-insulator mount bolts and tighten the retaining nut to the same tightening force after putting it in place. After all the other work, secure the fan blade, fan clutch and fan shroud.
Related 2007 Jeep Liberty Parts
 2007 Jeep Liberty Cylinder Head
 2007 Jeep Liberty Intake Valve
 2007 Jeep Liberty Oil Pan
 2007 Jeep Liberty Oil Pan Gasket
 2007 Jeep Liberty Rocker Arm
 2007 Jeep Liberty Transmission Mount
 2007 Jeep Liberty Engine Mount Bracket
 2007 Jeep Liberty Lash Adjuster
 2007 Jeep Liberty Oil Filler Cap
 2007 Jeep Liberty Piston Ring Set
 2007 Jeep Liberty Timing Cover
 2007 Jeep Liberty Valve Stem Seal