JeepParts
My Garage
My Account
Cart
OEM 2009 Chrysler PT Cruiser Control Arm
Suspension Arm- Select Vehicle by Model
- Select Vehicle by VIN
Select Vehicle by Model
orMake
Model
Year
Select Vehicle by VIN
For the most accurate results, select vehicle by your VIN (Vehicle Identification Number).
2 Control Arms found


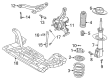
2009 Chrysler PT Cruiser Control Arm, Front Lower Driver Side Part Number: 4656731AN
$246.42 MSRP: $376.00You Save: $129.58 (35%)Ships in 1-2 Business DaysProduct Specifications- Other Name: Arm - Lower Control; Front Left Suspension Control Arm and Ball Joint Assembly.; Lower Control Arm; Arm Lower Control Front; Arm Control; Suspension Control Arm
- Position: Front Lower Driver Side
- Replaces: 4656731AL, 4656731AH, 4656731AJ, 4656731AF, 4656731AK, 4656731AM, 4656731AG
- Item Weight: 9.10 Pounds
- Item Dimensions: 3.4 x 14.8 x 17.2 inches
- Condition: New
- Fitment Type: Direct Replacement
- SKU: 4656731AN
- Warranty: This genuine part is guaranteed by Mopar's factory warranty.


2009 Chrysler PT Cruiser Control Arm, Front Lower Passenger Side Part Number: 4656730AN
$131.39 MSRP: $195.00You Save: $63.61 (33%)Ships in 1-3 Business DaysProduct Specifications- Other Name: Arm - Lower Control; Front Right Suspension Control Arm and Ball Joint Assembly.; Lower Control Arm; Arm Lower Control Front; Arm Control; Suspension Control Arm
- Position: Front Lower Passenger Side
- Replaces: 4656730AK, 4656730AL, 4656730AH, 4656730AM, 4656730AJ, 4656730AG, 4656730AF
- Item Weight: 8.90 Pounds
- Item Dimensions: 3.4 x 14.5 x 16.5 inches
- Condition: New
- Fitment Type: Direct Replacement
- SKU: 4656730AN
- Warranty: This genuine part is guaranteed by Mopar's factory warranty.
2009 Chrysler PT Cruiser Control Arm Parts and Q&A
- Q: How to Remove and Replace the Front Lower Control Arm on 2009 Chrysler PT Cruiser?A: Hold the car on stands to raise it safely and remove the old lower control arm. Take off the wheel mounting nuts and the whole tire and wheel assembly. For each side, separate both stabilizer bar link assemblies by holding the upper retainer/nut with a wrench and turning the link bolt. Turn the "hook" at the front of the stabilizer bar down and unfasten the retainer bolts if they need to be loosen. Disconnect the nut and clamp bolting the ball joint stud to the knuckle without pulling on the knuckle to protect the C/V joint's inside. Pry down on the lower control arm and push up on the ball joint boss of the knuckle using a suitable prying device to take the stud off the knuckle. For the proper lower control arm, take out the fastener joining the wheel house splash shield to the drive belt splash shield and if needed, remove other fasteners connecting the fascia to the drive belt splash shield forward screw. After that, unscrew everything fastening the splash shield to the vehicle's parts-the crossmember and the body-as well as the splash shield itself. Undo the nuts from the mounting bolts, remove the strut at the right forward area of the crossmember and body and get out the washer behind the strut bolt. In the end, remove the bolt holding the engine torque strut to the engine, the bolt holding it to the crossmember and after that, the engine torque strut. Take out the front bolt that fastens the lower control arm to the crossmember, then remove the rear bolt holding the front of the lower control arm to the crossmember and frame rail and finally take away the lower control arm from the crossmember.
Related 2009 Chrysler PT Cruiser Parts
 2009 Chrysler PT Cruiser Wheel Bearing
 2009 Chrysler PT Cruiser Axle Pivot Bushing
 2009 Chrysler PT Cruiser Axle Support Bushings
 2009 Chrysler PT Cruiser Ball Joint
 2009 Chrysler PT Cruiser Bump Stop
 2009 Chrysler PT Cruiser Coil Spring Insulator
 2009 Chrysler PT Cruiser Coil Springs
 2009 Chrysler PT Cruiser Shock And Strut Mount
 2009 Chrysler PT Cruiser Sway Bar Bracket
 2009 Chrysler PT Cruiser Sway Bar Bushing
 2009 Chrysler PT Cruiser Sway Bar Kit
 2009 Chrysler PT Cruiser Sway Bar Link